Ongoing 2014 Tri-Glide build-out, lots of pics and thoughts on the differences

As I noted months ago in this thread, I have not been satisfied with how much the Oil Bud oil cooler actually cools down the oil. I have not taken the time to remove the Oil Bud and replace it with a Jagg oil cooler.

However, the other day I did a little experiment.

I took a funnel, cut it in half (and did a few little fitment cuts) and then attached the two halves to the frame, underneath the water pump cover. The theory was that they would scoop air and push it across the oil bud.

It is a jerry-rig for sure, but I was happy to see it lowered the oil temps a solid 10 degrees, so that is giving me a solid 25 degree total drop out of the Oil Bud. Not nearly as much as I expected, but better than a poke in the eye with a sharp stick.

I do not see this as a long term fix, and the funnel halves are the lowest point now, so they may possibly get ripped/knocked off at some point, but until I take the time to remove the Oil Bud and decide where to put a Jagg cooler, it is what I am going to be running.

Here's a pic-

OilBudScoops_zpsbchwuszy.jpg


It should be noted that on bikes with no water pump assembly and shroud, I have seen the Oil Bud deliver impressive drops in oil temps, as it should for the impressive price. However, my experience with the waterheads has been less than satisfactory, and it is understandable, the pump & shroud are blocking the flow of air over the unit, whereas with no pump and shroud the unit is directly in the wind.

Kevin
 
I am glad we have got you and msocko3 and Fuzzy and some of the other guys who aren't afraid to take a wrench or a funnel to their bikes in order to make them better. Then you are so kind to share things with us including lots of pictures. I appreciate your posts and especially the trip photos. We might not get to Alaska this year but I have seen it vicariously through yours and Mary's eyes. Hey thanks for all you guys do

Steve


Cool! :)

Kevin
 
Back earlier in this thread I mentioned how Mary did not like the stock backrest, especially on longer rides. I removed it for her, and she made a lower profile backrest, with no arms. She was Much more comfortable.


However, with the TP relocated back a ways, she decided she wanted some more padding going all the way down.


Here is what she had made prior to our Fall Colors Trip last year.


PassBKRST8_zps0812a646.jpg


This picture shows her latest modification. She's ridden with it for about 1,000 miles now and says it's perfect. :)


MarysBackrest_zps2bn5mgbb.jpg


On the exhaust front...I have ants in my pants to get my new end caps. The ones I pictured earlier....


EndCaps_zpsi4xijr6k.jpg


....were not long enough. So some new ones are being made. I should have them in a day or so. Then I'll be able to get my slip-ons on with the new end caps. btw, ended up using rattle can ceramic coating (black) on them. So, the little bit of the pipe that is visible will be black, then have the Polished Aluminum end caps. :)

Kevin
 
Cool!

I got 60 more miles in today. Took the long way home from the shop.

I'm looking forward to being done with the break-in miles. There is definitely more power there than the '11. Just can't tell how much with being easy on the wrist and RPM's.

Need to get the tank lift and Deluxe option installed...not used to that air coming over the top of the tank, makes for a bit of buffeting...plus I want that air going under the tank across the engine.

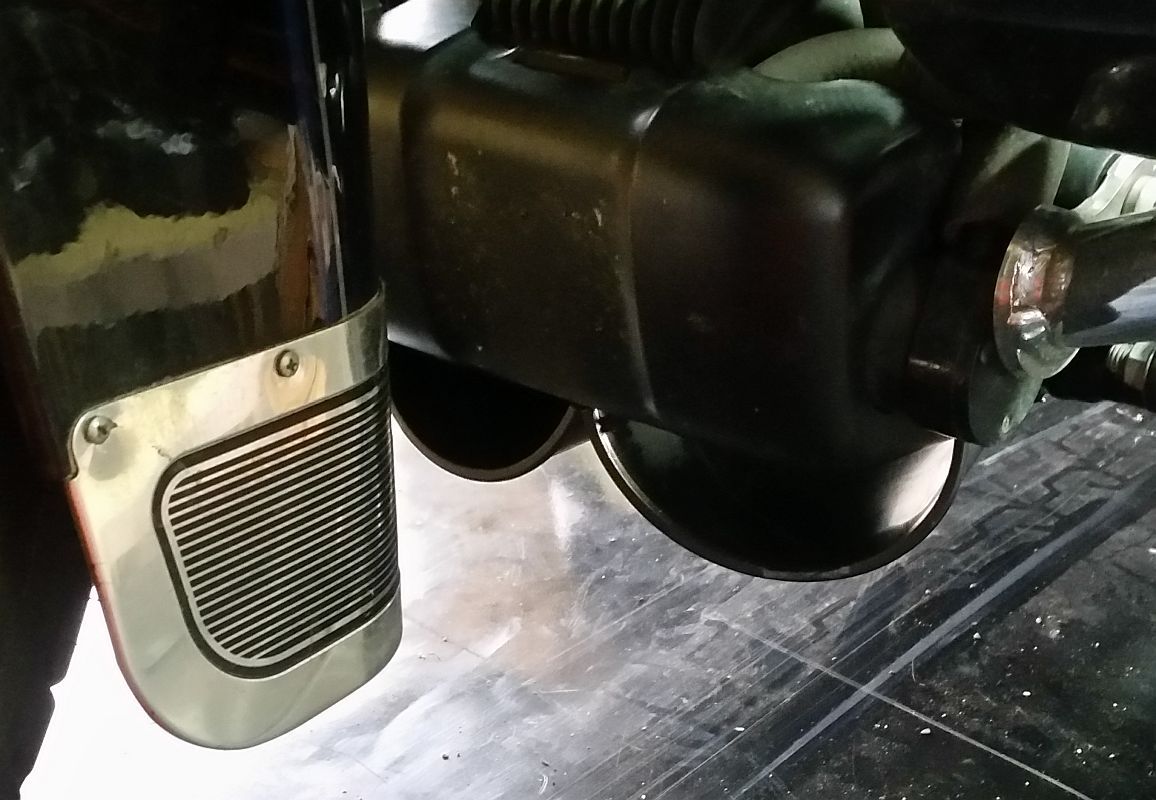
These were the first miles I put on it with the Wards Parts Werks fans installed.

After it was warmed up I let it sit for about 10 minutes idling, the radiator fans never kicked on...last ride (without the Wards fans) the radiator fans kicked on after about 5 minutes of idling.

My HD brand dipstick oil temp gauge went defective today...3 days after it was purchased.
:( So I had no way to see what the oil temps were doing.

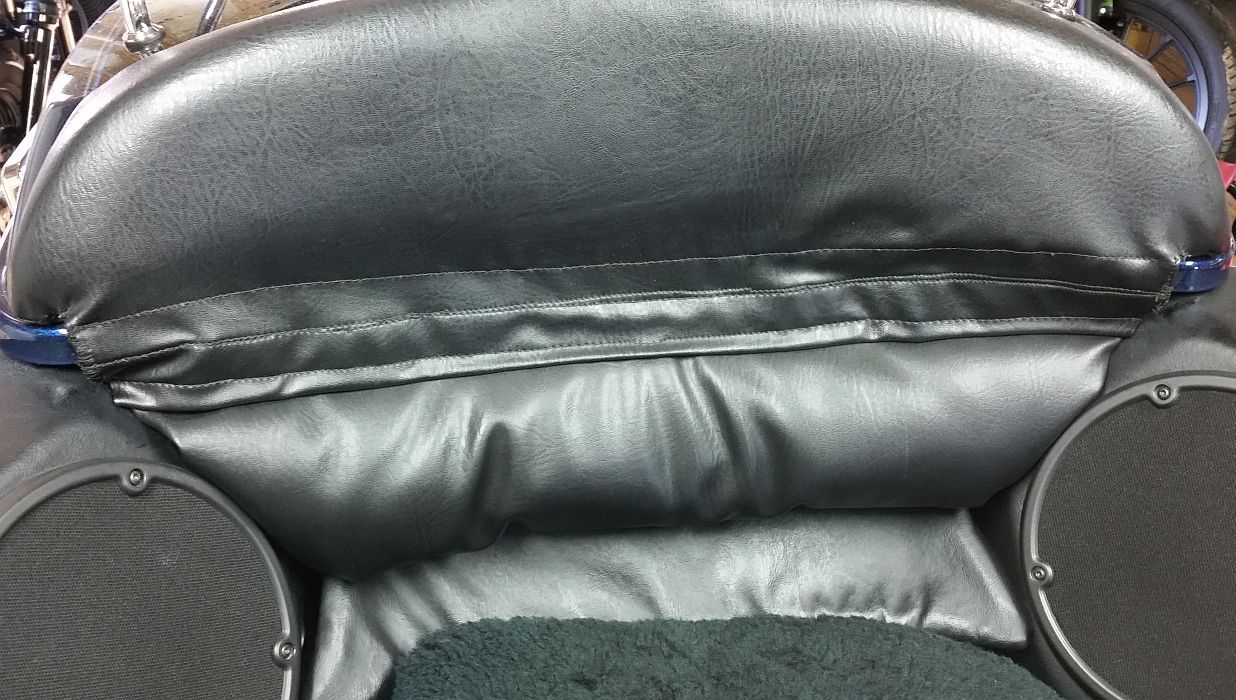
From the pic below you can see I installed my backrest, air hawk and sheepskin. Definitely better for me...but need to get the handlebars made and installed...those puppies are just too short for me.

Also, hopefully you can't see in the pic that Mary put some 3M film on the fenders, the plastic between the fenders and the side covers, and also film on the side covers.

TG3M_zps8fb2e0a4.jpg


Here's a better pic of the Wards fans and the DK Custom Shift Linkage-

TGSide_zps7ab0a6e7.jpg


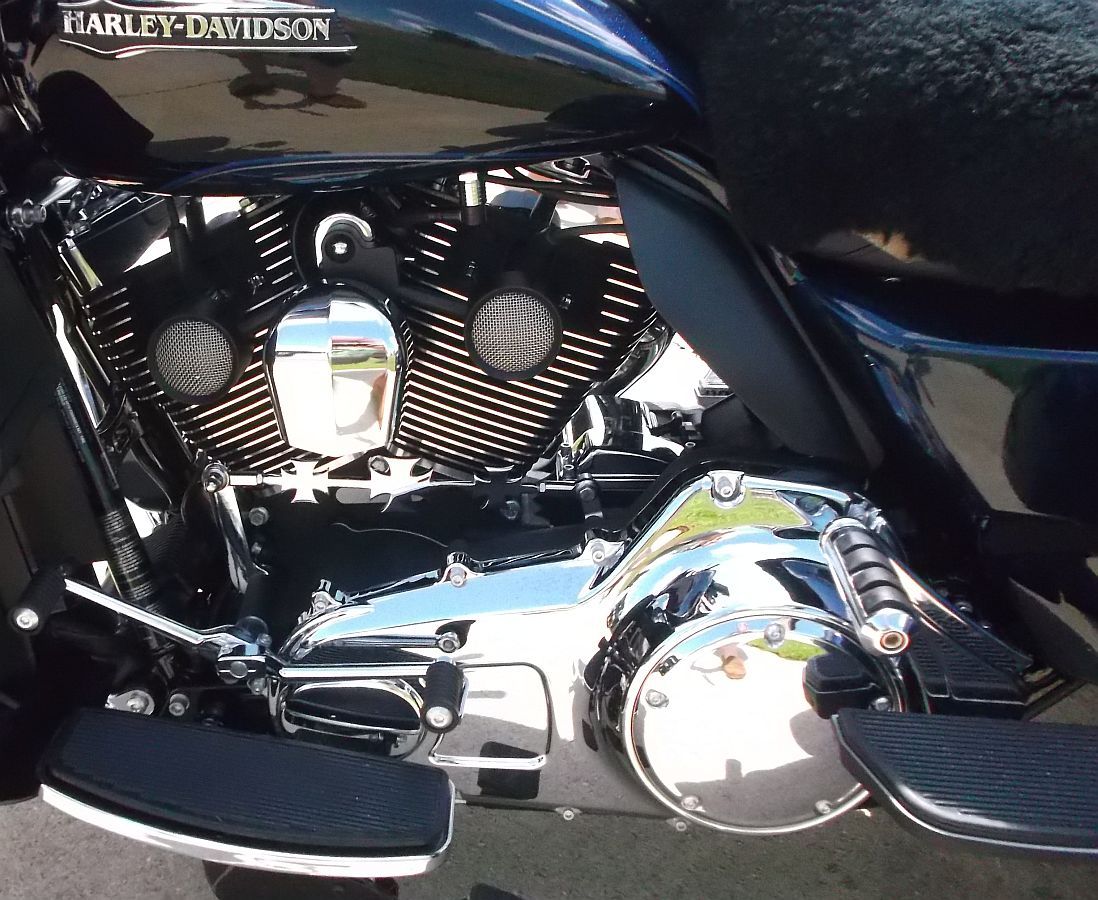
Here's a pic of the wheel after being rattle canned with clear. Looks good, hope it holds up. :)

TGWheela_zps410f233e.jpg


Still have quite a few things to do on the list, but making progress.

Kevin


Kevin,

Hard to to tell from the picture but did you lose quite a bit of the glossy shine to your wheels when you cleared them. I used the same paint and lost quite a bit of the original shine to the wheels. It also created a slightly rough texture as well. Looking at the picture you posted above it may have turned out the same. However; pictures can be misleading at times.

I just just ordered your tank lift kit, new shifter linkage and a few other things from DK today.
 
Handlebars

Hey Kevin,

Just curious about your handlebars, do you have a picture you could post of what you did?

Kind of thinking about the whole handlebar change thing right now. I've looked at a few different bars out there, the one I'm leaning towards has 5" pullback, much less than stock and less than some other taller bars as well. I know the pullback needs become less as you come up to shoulder height so maybe it will be okay. Looking for a real natural wrist position and still deciding between 12-14" bars.

So I was just curious what you ended up doing since you didn't like much of what was available when you were looking.
 
<Just curious about your handlebars, do you have a picture you could post of what you did?
Kind of thinking about the whole handlebar change thing right now. I've looked at a few different bars out there, the one I'm leaning towards has 5" pullback, much less than stock and less than some other taller bars as well. I know the pullback needs become less as you come up to shoulder height so maybe it will be okay. Looking for a real natural wrist position and still deciding between 12-14 bars.
So I was just curious what you ended up doing since you didn't like much of what was available when you were looking.

I am on the road right now...don't have a picture. But it was really simple. I took some stock handlebars, cut them in the straight sections below the grips, welded in 8 or 9 of straight handlebar tube. Cleaned up the welds. Had them powder coated.

So they are the stock bars, with just a longer straight section on each side.

Remember to rotate the grips section to the natural wrist position before welding them onto the extension.

Kevin
 
I would've never figured just exhaust tips would make that much of a difference.

Of course, I had the FullSac dx header put on, and it followed that they took the baffles out of my factory exhaust and put theirs in. They also changed out the tips of the exhaust as well.

I know that I have significantly more power than before. In fact, I've raised the front wheel off the ground (an inch or two--no wheelies here ;)) going into 2nd gear on several occasions. First time I wasn't expecting it AT ALL. I let out a big whoop when I realized what happened!
 
I would've never figured just exhaust tips would make that much of a difference.

Of course, I had the FullSac dx header put on, and it followed that they took the baffles out of my factory exhaust and put theirs in. They also changed out the tips of the exhaust as well.

I know that I have significantly more power than before. In fact, I've raised the front wheel of the ground (an inch or two--no wheelies here ;)) going into 2nd gear on several occasions. First time I wasn't expecting it AT ALL. I let out a big whoop when I realized what happened!

Yeah, the large effect that the velocity and flow of exhaust gasses and energy pulses have on engine performance is one of the most mis-understood subjects in the HD world.

Kevin
 
I contacted DKC and got a speedy reply from Dawn. As stated earlier these kits are not made by DK, they are made and packaged by VTwin Goodies. And it turns out that I got the correct hardware, but it was packaged with the wrong instructions. So Dawn sent me a copy of the correct instructions, and then it all made sense. This is a great example of EXCELLENT customer service

Below is a picture of the correct instruction sheet in case there might be others with the incorrect instructions, and a pic of the three bolts that are used to install this kit.


I found out the hard way that a 1/4 allen bit in a 1/4 Makita impact driver will not cut the mustard. I destroyed two 1/4 allen extensions and got the bit stuck inside the bolt that is captive in the rear part of the mount Luckily I was able to remove it with a few choice %#@ words, and tomorrow am borrowing a Snap-On 3/8 battery powered impact driver to get the job done right.
 

Attachments

  • IMGP2429.JPG
    IMGP2429.JPG
    272.2 KB · Views: 292
  • IMGP2428.JPG
    IMGP2428.JPG
    182.5 KB · Views: 270
Another thing I meant to add to the update-

It's been almost a year and a half, and 24k miles. and the clear coat that I put on the rear wheels is holding up well. There are a few small spots where the clear has been chipped off, probably by riding on gravel roads, and there is only one small spot that is stained...that happened while at a HD dealership.

It certainly has been nice to spend 30 seconds a wheel to wipe them clean with pledge periodically.

Kevin
 
Impact allen sockets are the best way when using impact guns to get the bolts out.. Or some heat as they most likey have Loctite on the bolts.

When installing the driver floorboard extensions,the rear bolt on the right side gave me a lot of trouble,probably because of thread locker. I finally had to run a tap through the hole to clean it up. Even after that,threading the new bolt back in was a snug fit.
 
Natural Choice Do it!

With the insight you have on the Tri-Glide Kevin you have to do it next. Harley could even take a look also. :wave4: ride safely fearless.
 
I have a question regarding the new front tire. My factory front tire on my 14 tri glide has 14000 on it and I think this winter I will replace it. Do you have the part number for your new front tire?

I am assuming it is the factory size that was originally on it just a rear tire. Part number would be a big help.

Thanks!
 
130/90B16 73H

The tread depth is 10/32, and I think the stock front tire had a tread depth of either 5 or 6/32
I am really liking how it feels and handles. Way too soon to know how many miles I'll get out of it, but I think it will probably be close to double what I would get out of a stock front tire.

Kevin
 

Welcome to the Trike Talk Community

Join our vibrant online community dedicated to all things Trikes! Whether you're a seasoned rider or just starting out, this is the place to share experiences, tips, and stories about your three-wheeled adventures. Explore modifications, maintenance advice, and rides, all while connecting with fellow trike enthusiasts from around the globe

Forum statistics

Threads
55,515
Messages
838,598
Members
22,620
Latest member
JamesFW

Trike Talk Community

Welcome to a community dedicated to the most diverse and fastest growing powersports segment, Motorcycle Trikes. Come join the discussion about the best makes and models, popular modifications and proven performance hacks, trike touring and travel, maintenance, meetups and more!

Register Already a member? Login

Forum statistics

Threads
55,515
Messages
838,598
Members
22,620
Latest member
JamesFW
 photo 260e2760-d89e-45b2-8675-2bc26fb3d465.jpg

 photo Trike-Talk-150-x-200.gif

 photo DK Trike Talk Right side banner 19.jpg

Merziere Reverser

 photo 9796095c-0d4b-4a9b-88ed-efe4c498d084.png
 photo f9866e4e-75c5-471a-86f5-5e72a446ecc3.png
Back
Top