Although not really needed unless you plan on putting a "pillion pad" on it, are you going to put a fender brace on it?
If not, the fender brace tabs on the frame look "lonely"...


 Likes: 250
 Thanks: 0


Although not really needed unless you plan on putting a "pillion pad" on it, are you going to put a fender brace on it?
If not, the fender brace tabs on the frame look "lonely"...

No pillion.Originally Posted by peteg59

Fender brace tabs...are you referring to the holes on the axle plates? Planning on filling those, and then re-contouring the axle plates. Yep, gotta go add that to the white board right now...forgot to put that on the list.
Kevin
www.DKCustom.com
Gear Up & Ride in! DK Custom 4th Annual Open House, June 8th. 🏍️ Click HERE For The Lowdown.
Call: 662-252-8828 Text: 662-420-4891
Email: Support@DKCustomProducts.com
Yes, and please accept my apology for adding work to the "list"...

It was on my "mental list" months ago...but I did forget about it until you reminded me.
It is now on the whiteboard.
Kevin
www.DKCustom.com
Gear Up & Ride in! DK Custom 4th Annual Open House, June 8th. 🏍️ Click HERE For The Lowdown.
Call: 662-252-8828 Text: 662-420-4891
Email: Support@DKCustomProducts.com
Been out a bit lately with Family.
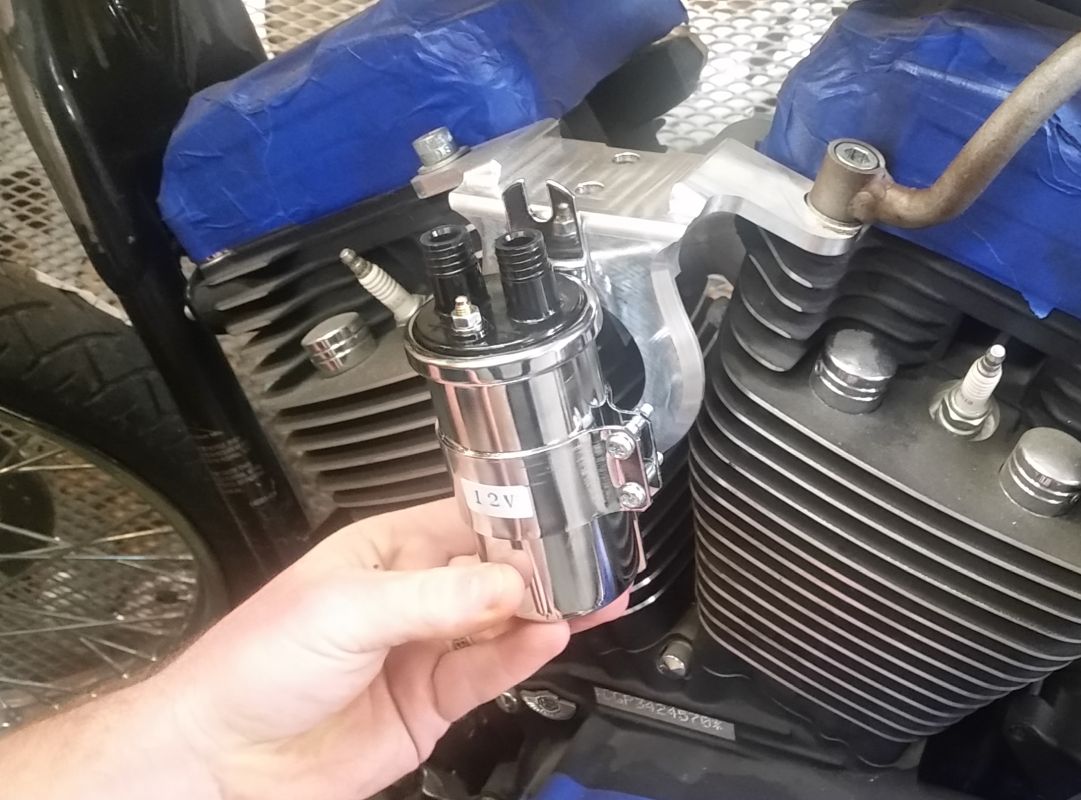
Got into the shop today and the chrome coil was here.
Gonna wait til we verify it works to take the 12V sticker off it. Will probably Not use the wires that came with it....probably will use the 409 Pro-Race wires.
Friday may have time to fiddle around with various mounting locations.
Kevin
www.DKCustom.com
Gear Up & Ride in! DK Custom 4th Annual Open House, June 8th. 🏍️ Click HERE For The Lowdown.
Call: 662-252-8828 Text: 662-420-4891
Email: Support@DKCustomProducts.com
I like the chrome bobber style coil
You could use an EFI coil BUT
You would be 4 ever playing with it to get the ohm resistance down enough to lite the fire all the time with out burning up your wires
Nuff Said," Were Burnin Daylight, Lets Ride"(Sober 37 years)
Current ride : 2021 FREEWHEELER M8, oldest ride 1960 FL
Yeah, we started down that path with the EFI Coil, realized it was not really workable. I'm liking the look of the chrome one too...gotta decide where to put it.
Kevin
www.DKCustom.com
Gear Up & Ride in! DK Custom 4th Annual Open House, June 8th. 🏍️ Click HERE For The Lowdown.
Call: 662-252-8828 Text: 662-420-4891
Email: Support@DKCustomProducts.com
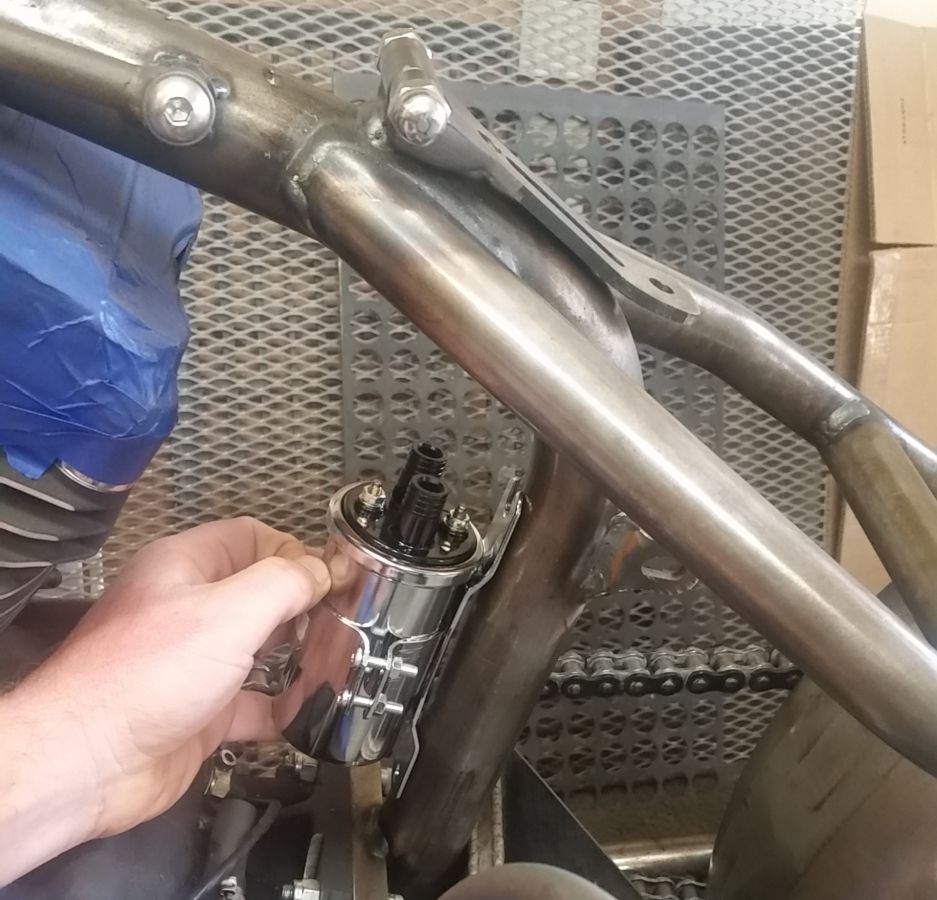
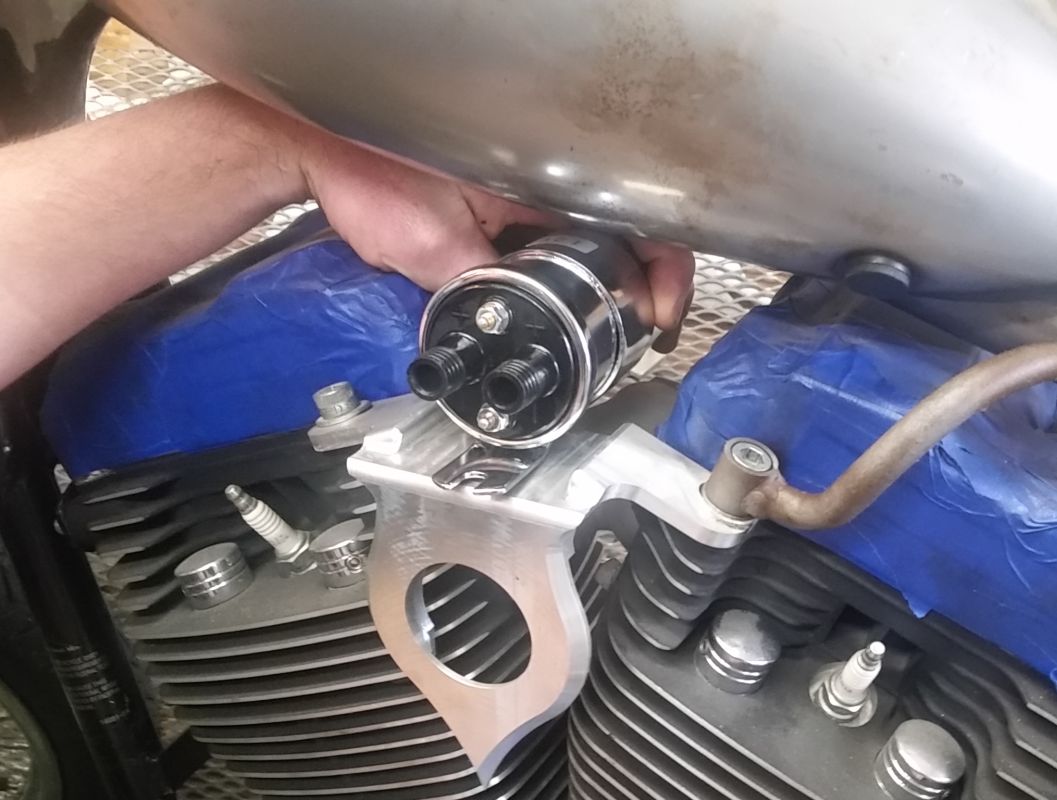
We had some more time this last Friday. Progress is slow but steady.
We played around with different places to put the coil-
(the aluminum piece between the cylinders is going to be gone. We just have not made the new piece yet)
No!
Looks good from the right side, but horrible on the left.
Ack-No!
That's worse!
That looks pretty good! Yes!
Unless we come up with a better idea, we'll be welding some threaded bungs into the frame to mount the coil there.
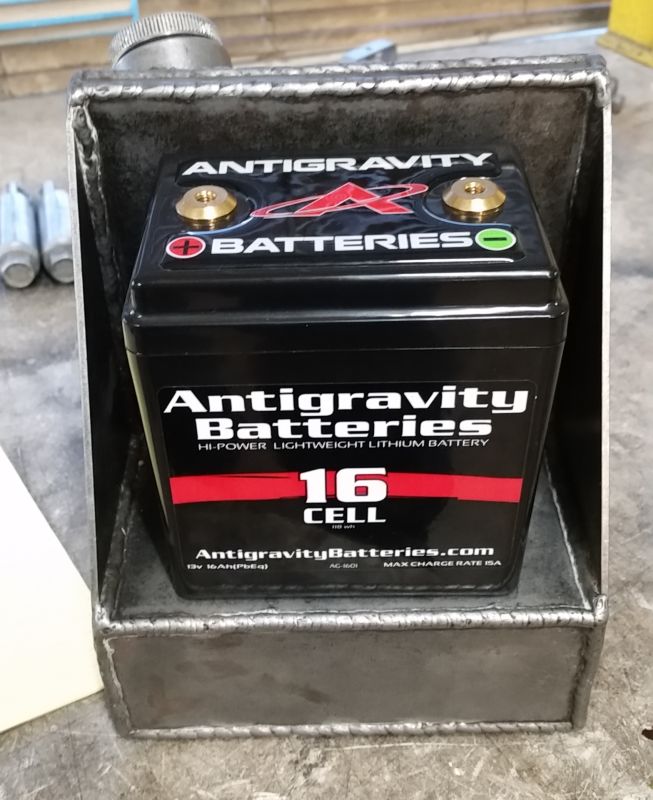
Next up was to nail down the battery mount.
The battery will be sitting on some rubber mounts, up off the oil tank. There will also be some rubber mounts between the tank and the back of the battery, for the cover to push the battery against.
There will be air circulating around all 6 sides of the battery...no part of it will be in contact with the oil tank.
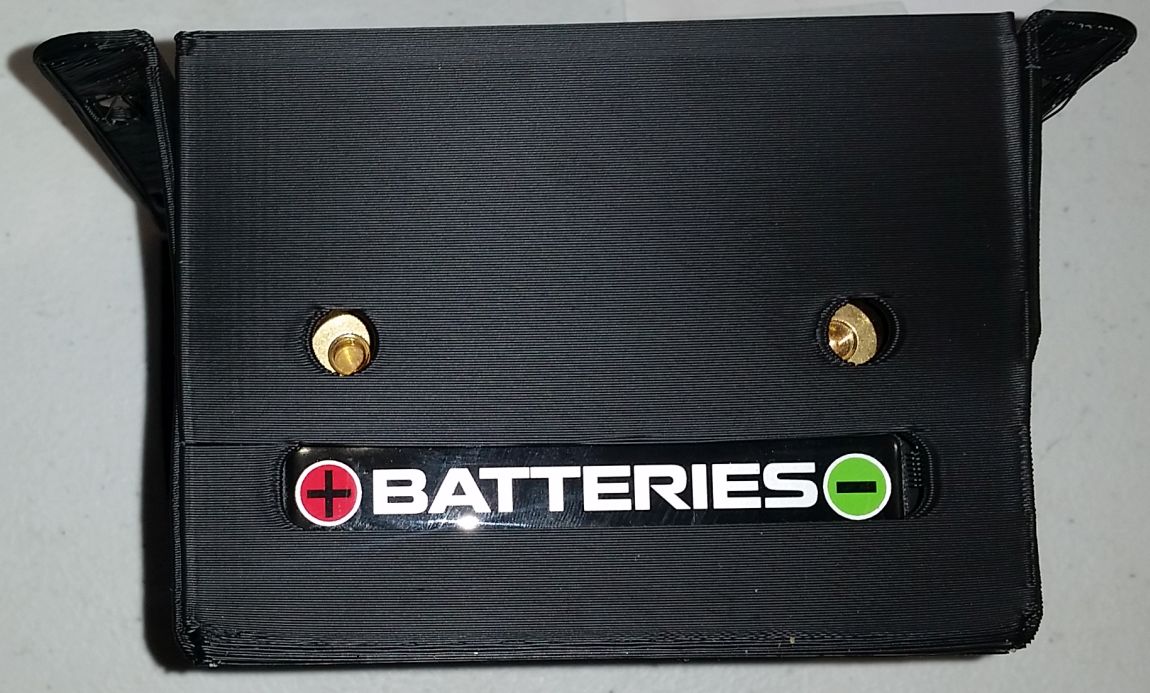
We are going to use some sheet metal and fabricate a 4 sided cover (similar to what the Dynas' use with the foam strips on the inside of the cover to go against the battery. There will be some cut-outs for the two terminals and one that will show the "+ Batteries -" writing on the top.
There will also be some cut-outs in the cover, w/ mesh behind the cut-outs for a little contrast.
The cover will be fastened to the oil tank, holding the battery in place.
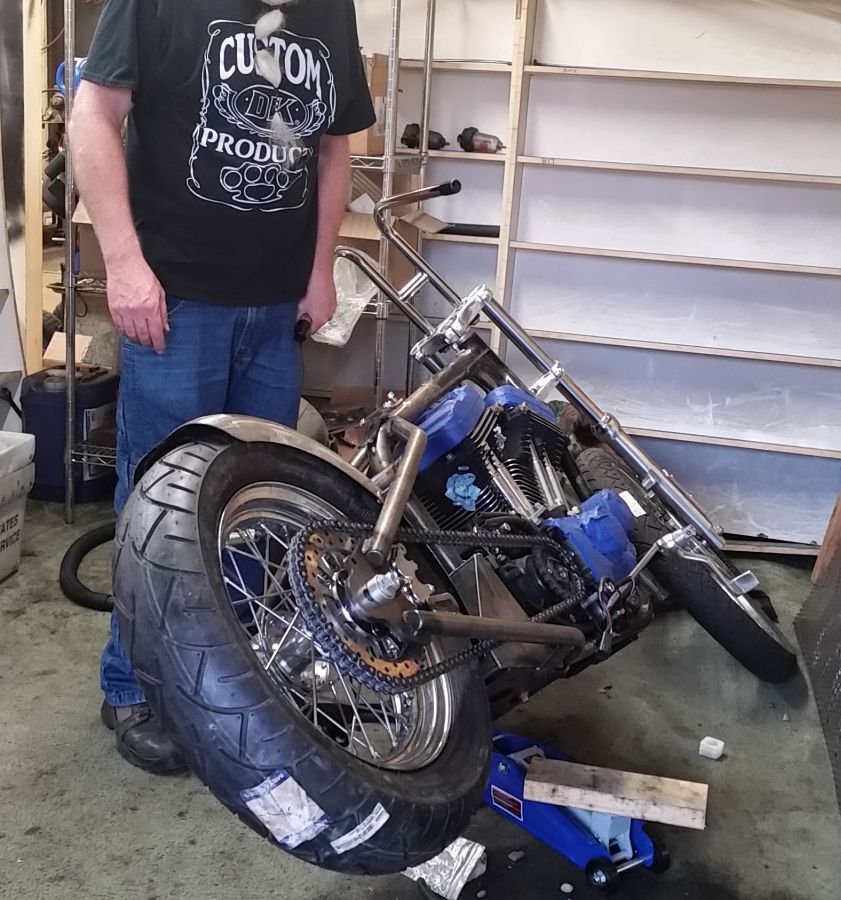
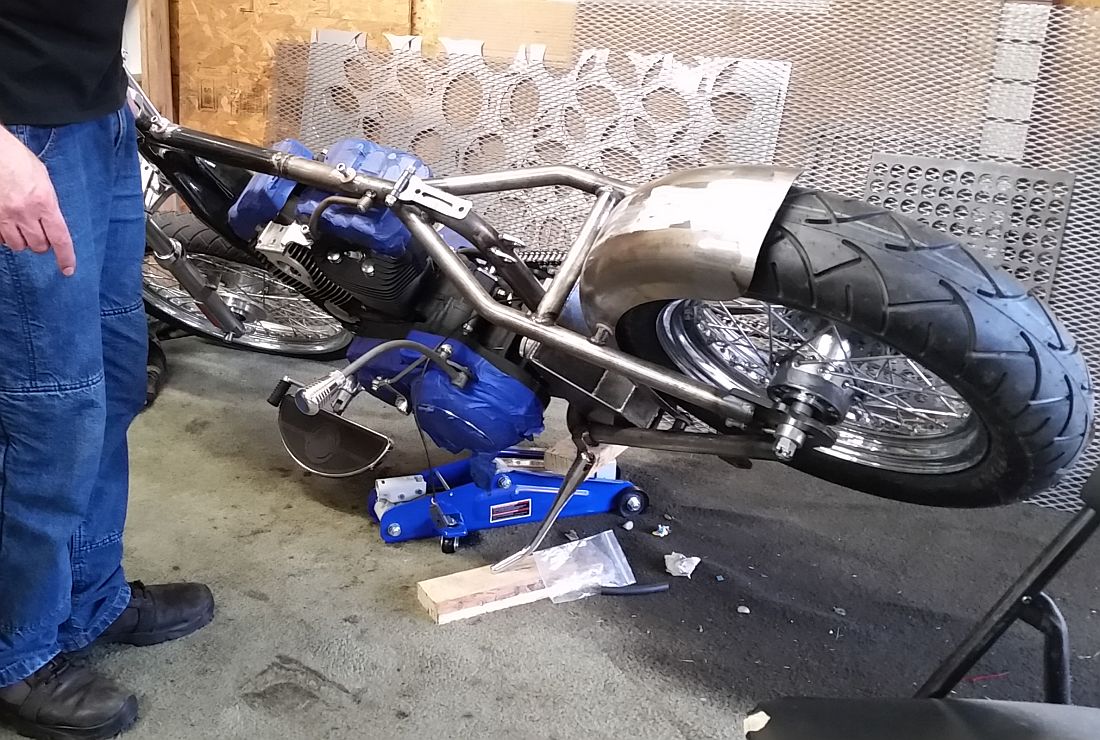
Next up was to measure exactly how much space we have for the electrics box.
Good welding, and a strong kick-stand from TC Bros. made it easy to lean it over and take a look.
Just the front tire and tip of the kick-stand was the perfect balance point, that took no effort to hold it there.
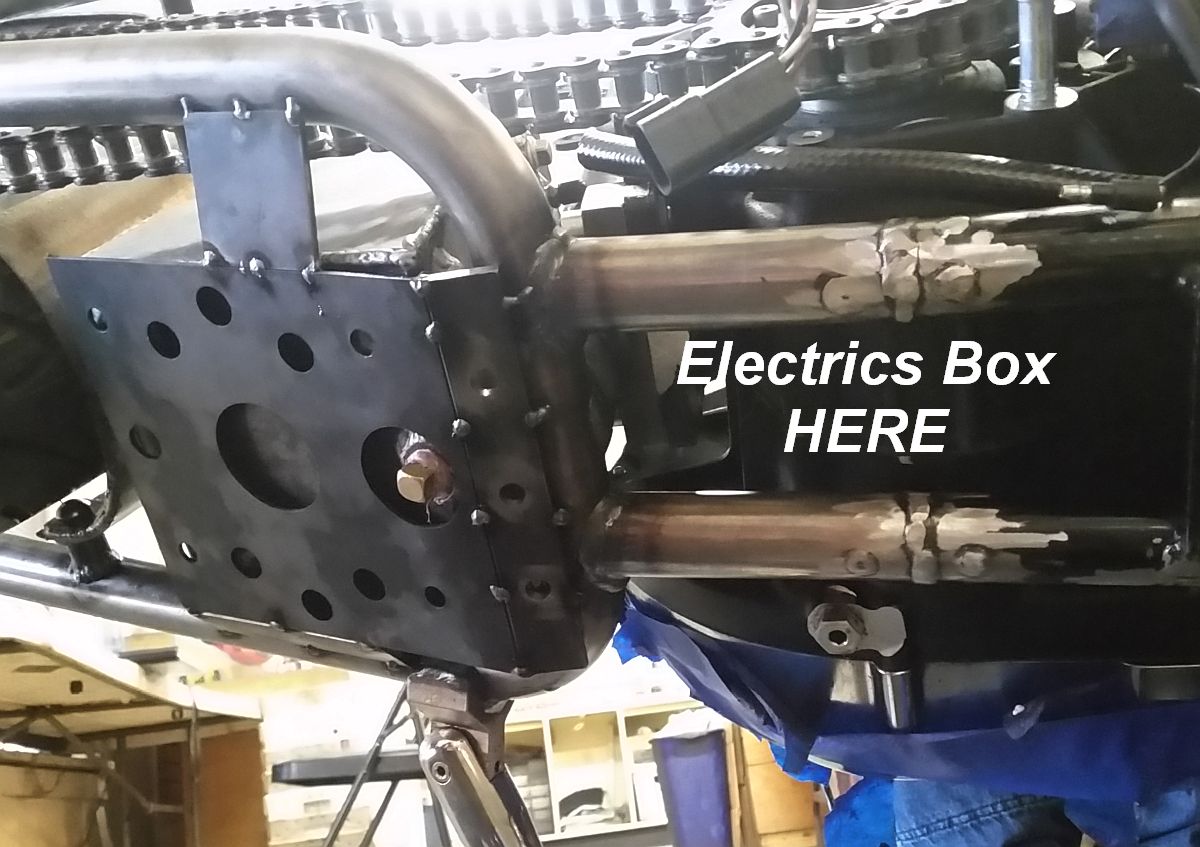
The space shown below is wedge shaped...and smaller than we thought. We will be using it, but may have to find a second location to hide a bit more...this is probably not going to be big enough for everything.
Notice the oil tank mount is just tacked together still...and the frame still needs a bunch of finish work.
That's all til next week.
Kevin
www.DKCustom.com
Gear Up & Ride in! DK Custom 4th Annual Open House, June 8th. 🏍️ Click HERE For The Lowdown.
Call: 662-252-8828 Text: 662-420-4891
Email: Support@DKCustomProducts.com
Yesterday we got sidetracked working on our 2018 product development list...but we did get a bit done on the SBS Chop.
Last week I described the 4 sided cover that will go around the battery, securing it into the oil tank shelf.
Here is a drawing of the sheet metal, before it is folded.
A couple of looks at it after it is folded up.
The two round holes on the top are to access the two terminals. All the slots, except the one on the top, will have mesh screen behind them.
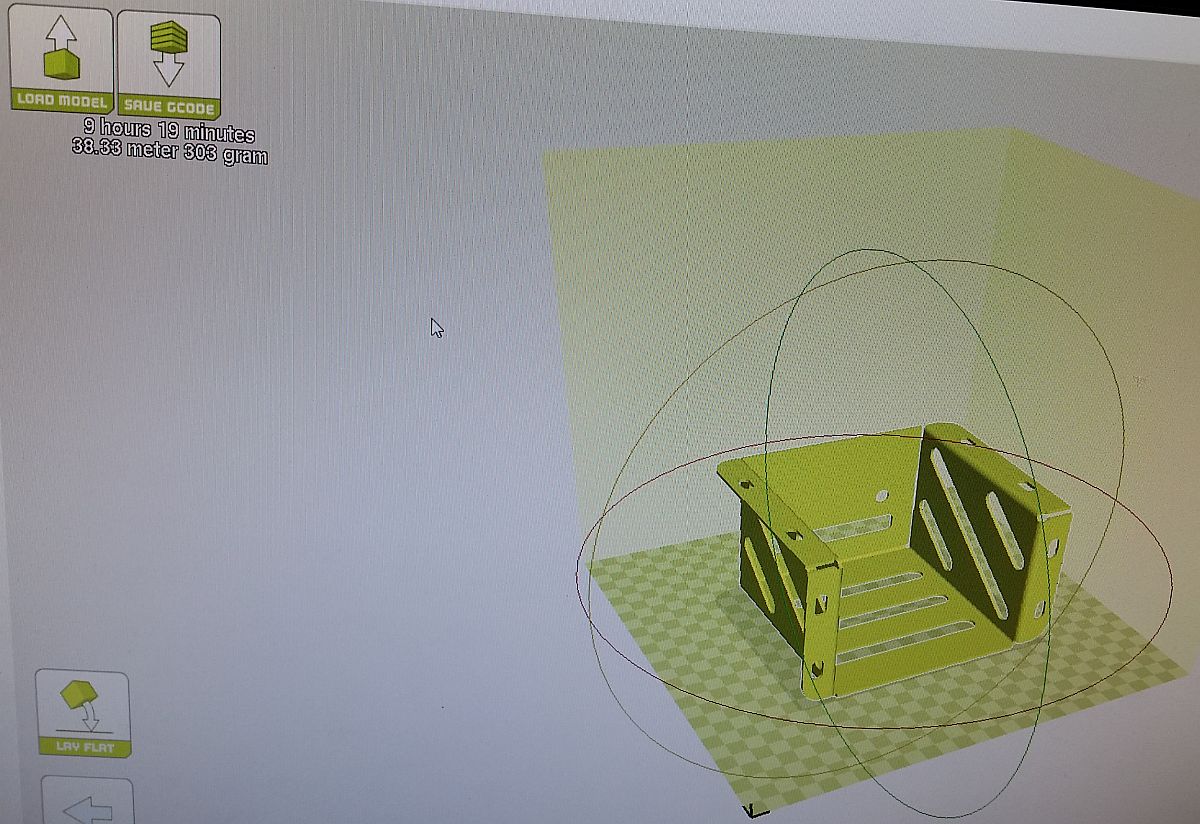
Before we cut out the metal, we are going to 3D print it...making sure everything fits and we like it.
In the 3D printer drawing above, you can see it is taking 9 hours to print it this weekend...it will use 38 meters of plastic wire, and weigh 303 grams.
Kevin
www.DKCustom.com
Gear Up & Ride in! DK Custom 4th Annual Open House, June 8th. 🏍️ Click HERE For The Lowdown.
Call: 662-252-8828 Text: 662-420-4891
Email: Support@DKCustomProducts.com
That's an impressive way to "trial" things.
"No matter what you ride, give respect to get respect"
2016 Billet Silver/Black Tri Glide
Yes, we've been very pleased with it. Had it about a year and it makes prototyping MUCH faster, and MUCH less expensive.
It also allows us to try things that may turn into products, that in the past we might not have even attempted, due to the longer, more expensive process of prototyping in metal.
Kevin
www.DKCustom.com
Gear Up & Ride in! DK Custom 4th Annual Open House, June 8th. 🏍️ Click HERE For The Lowdown.
Call: 662-252-8828 Text: 662-420-4891
Email: Support@DKCustomProducts.com
We have been using our 3D printer, most everyday, since March 2017.
We had our first mishap over the weekend.
The "hot end", what I would call the printer head, ran into (repeatedly) some plastic that had come loose from the base. Ended up making a melted mess on the hot end.
We're going to try and clean it...if we can't get it cleaned up, we already have a replacement on the way.
Thought you might be interested in a few other pics....
...interesting to see that big sections of the 3D printer were Made With a 3D Printer-
Kevin
www.DKCustom.com
Gear Up & Ride in! DK Custom 4th Annual Open House, June 8th. 🏍️ Click HERE For The Lowdown.
Call: 662-252-8828 Text: 662-420-4891
Email: Support@DKCustomProducts.com
Got the 3D printer back operational.
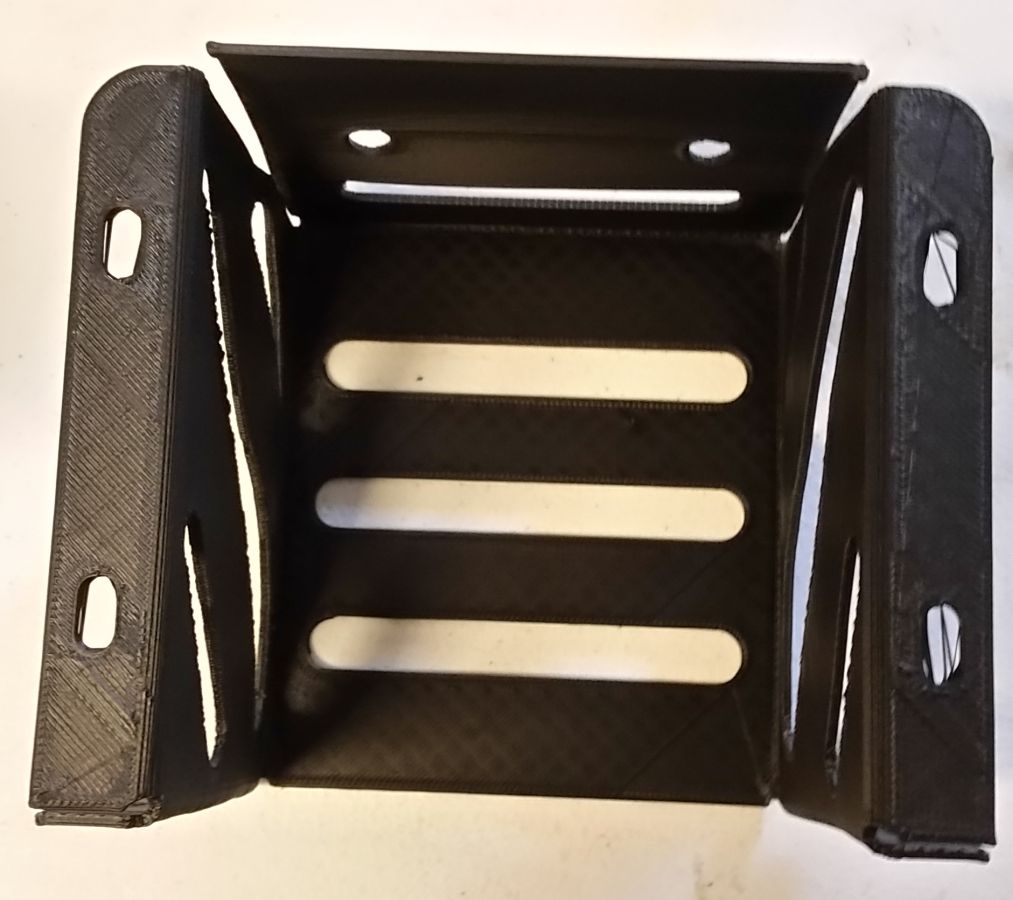
Here is the 3D printed battery retainer-
Another view-
Top view with battery inside-
Sizing of the retainer was a bit off...we did not account for the space the welded seams took.
I'm going to look at it on the bike. But I don't think I like it. The idea sounded good...but looking at it, I am not sure I like it at all. I'm thinking it may look better, and go with the overall minimalist theme, to just have a leather strap holding the battery in place.
We'll see.
Kevin
www.DKCustom.com
Gear Up & Ride in! DK Custom 4th Annual Open House, June 8th. 🏍️ Click HERE For The Lowdown.
Call: 662-252-8828 Text: 662-420-4891
Email: Support@DKCustomProducts.com
A+ for your efforts on the batt.box topper/cover Kevin
To my untrained eye the cover looks odd mainly due to it being black, & the silver unpainted lower box together don't match and sort of clash with each other right now? I'd try to picture exactly how they'd look together & assembled in place on bike, once finished in whatever topcoat you go with. Then maybe you might think they belong together & that they add just that much more "custom" to its overall look/value?
Simple is also good. Tough choice and even though you've not hinted at this along the way, if completion of the project is becoming an issue, simple is usually better...
Getting it completed is taking longer than expected...but I want to do it right. I want this bike to be magazine cover worthy.
I agree, after seeing it, even thinking about it after everything is painted and powder coated...the lines just clash. Pretty sure I will be going with a simpler, more elegant look.
Thank you for your input, it's appreciated.
Kevin
www.DKCustom.com
Gear Up & Ride in! DK Custom 4th Annual Open House, June 8th. 🏍️ Click HERE For The Lowdown.
Call: 662-252-8828 Text: 662-420-4891
Email: Support@DKCustomProducts.com
Well guys...today we did not have any time to work on the chop...business got in the way.
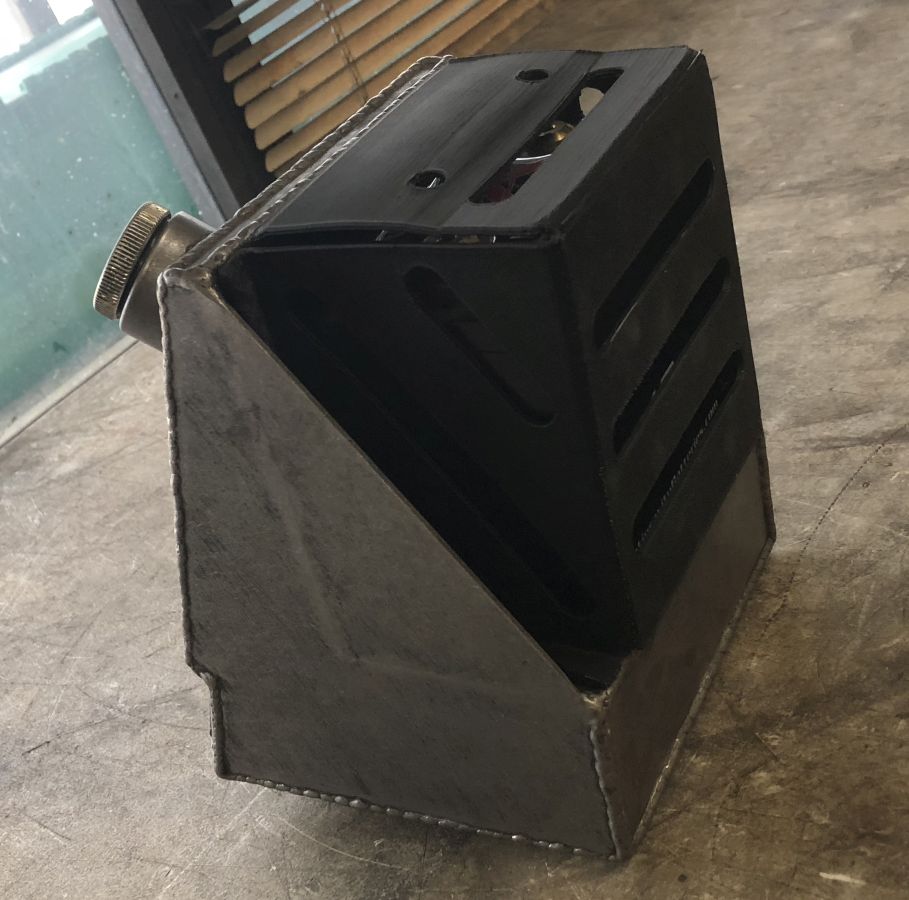
But I did take the tank/batt over to the bike and shoot some pics of it in place.
First pic, just sitting on the table-
Bad ugly.
It has been sitting on my desk most of the week, and I had pretty much decided to go with just a leather strap holding the battery in place....
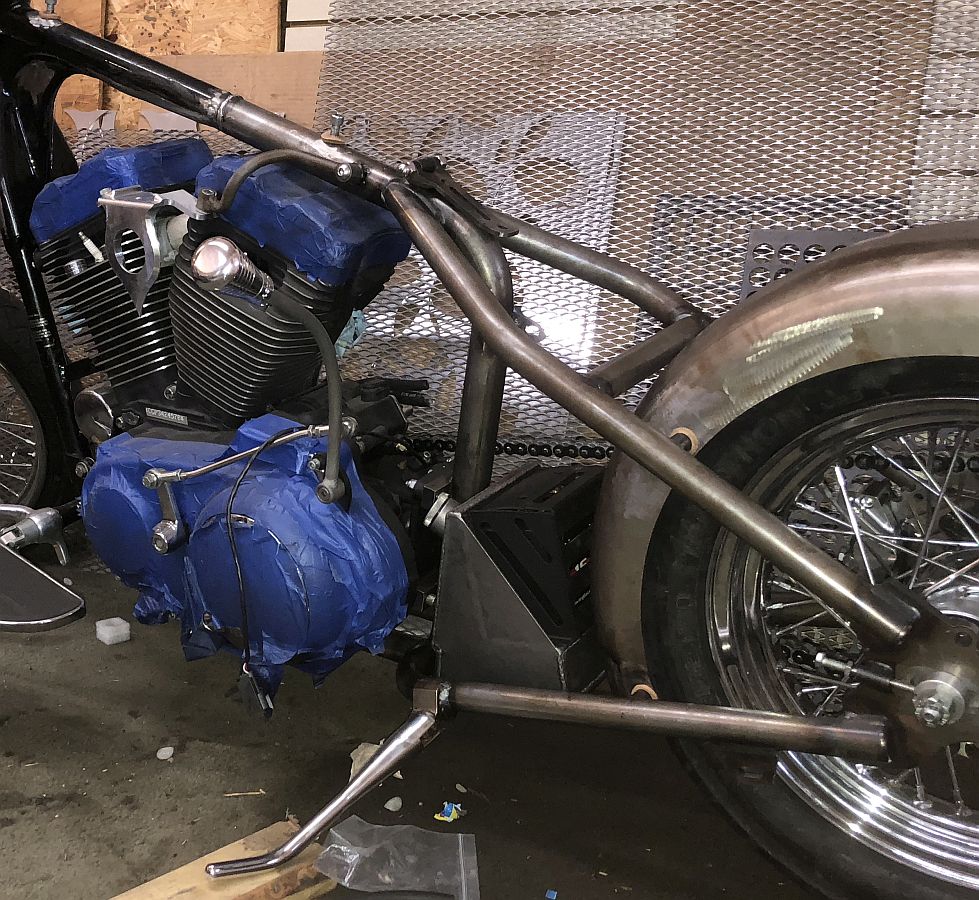
But when I put in in the bike...
...I started having second thoughts...
...I'm thinking it looks pretty good in there.
Something about the lines of the bike, the fender...it does not look so obnoxious, like it does when sitting on the table.
Gonna ruminate on it some.
Kevin
www.DKCustom.com
Gear Up & Ride in! DK Custom 4th Annual Open House, June 8th. 🏍️ Click HERE For The Lowdown.
Call: 662-252-8828 Text: 662-420-4891
Email: Support@DKCustomProducts.com
I like it. I think once it is painted/powdered to match the oil tank it will look like one unit and not stick out as much as the battery would.
Yeah, I'm leaning that direction...but think I will mock it up with a leather strap to see how it looks...also keeping an open mind to some other direction entirely.
Kevin
www.DKCustom.com
Gear Up & Ride in! DK Custom 4th Annual Open House, June 8th. 🏍️ Click HERE For The Lowdown.
Call: 662-252-8828 Text: 662-420-4891
Email: Support@DKCustomProducts.com
Got some more work done on the chop today.
First thing was seeing what it would look like with a leather strap. This is some unfinished leather....I think it would look better with a dark dye on it.
Did not have a second piece of leather handy...so yellow paper to look like a second strap.
And another thought...putting the strap this way.
The above thoughts are instead of using a box around the battery.
Dunno which I like better...still thinking about other ways to secure the batt.
Next thing we did is decide where to position the headlight. We took no photos...but the center of the headlight will be above the top triple tree.
We both thought it looked good there, it exposes the entire neck (which we're thinking of putting a custom badge on) and it makes it easy access for me to see the oil and neutral lights that will be in the light bucket.
We will be fabbing a special headlight bracket that will attach to the handlebar riser bolts, at the bottom of the top tree.
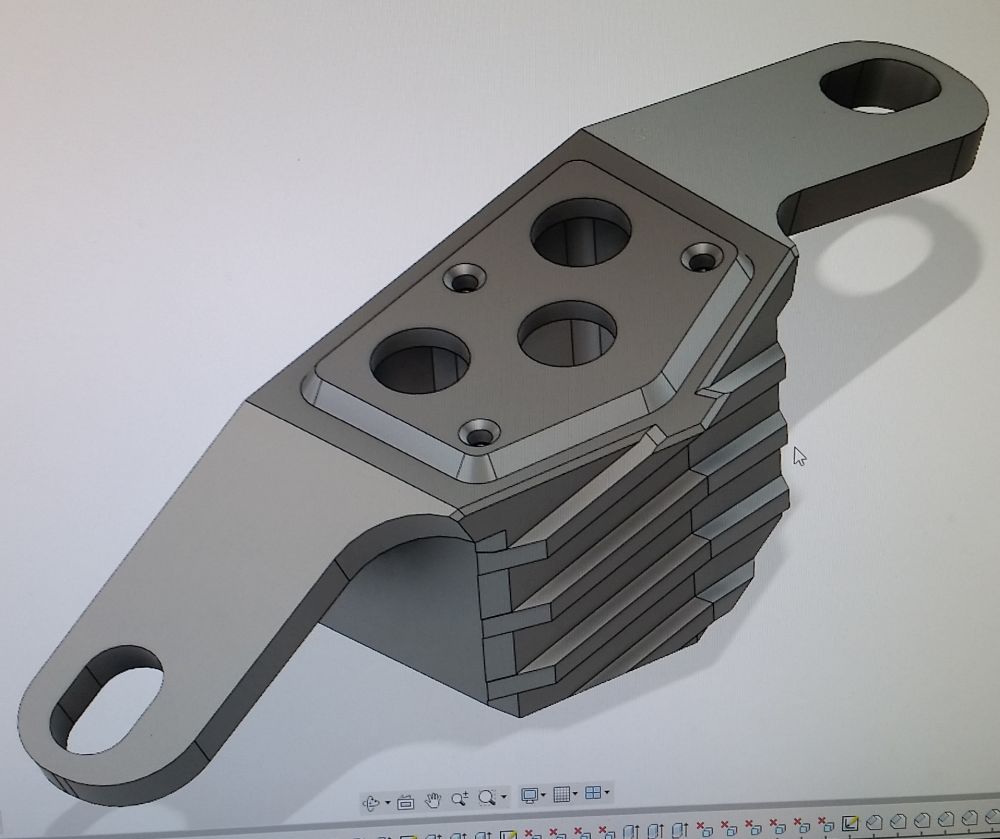
Next up was the final decision to nix the idea of embedding the switches into the frame.
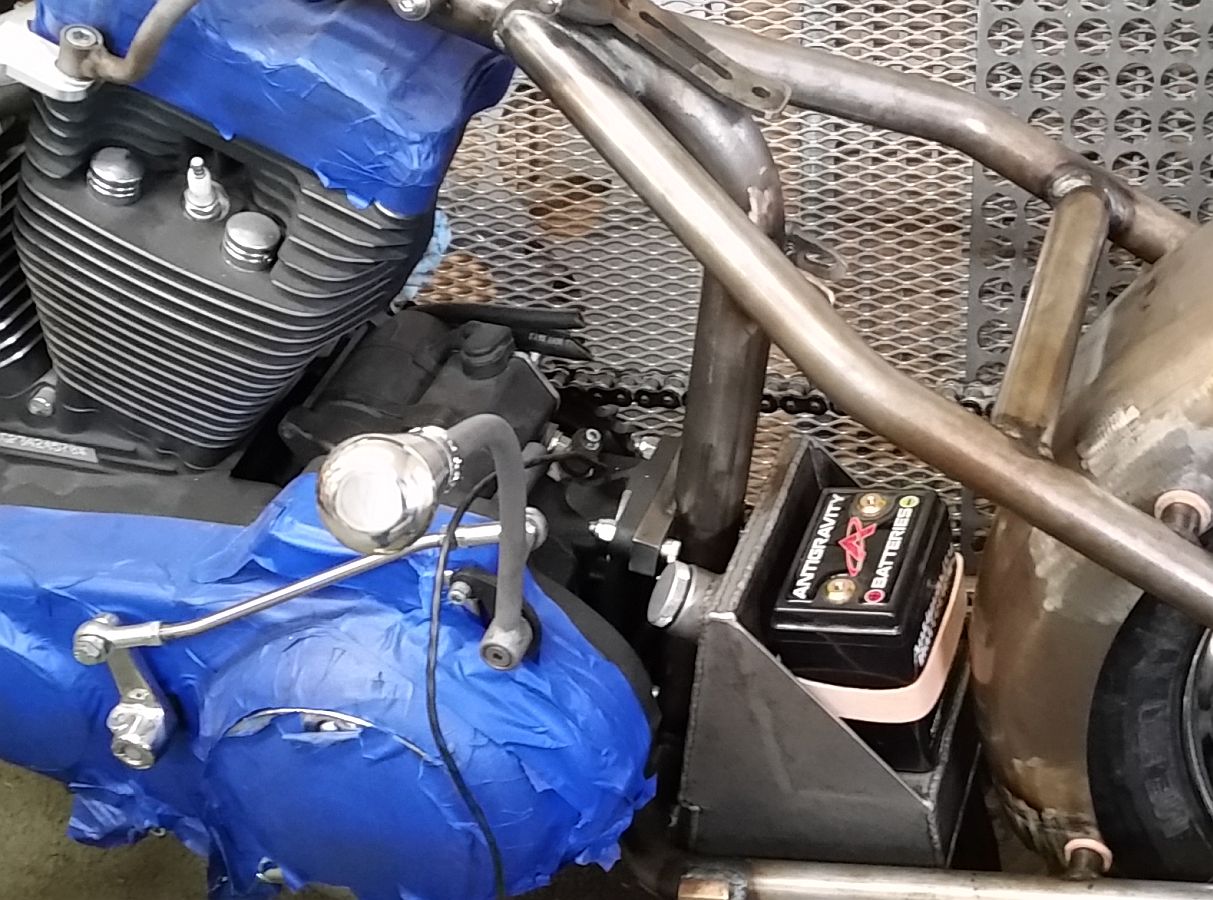
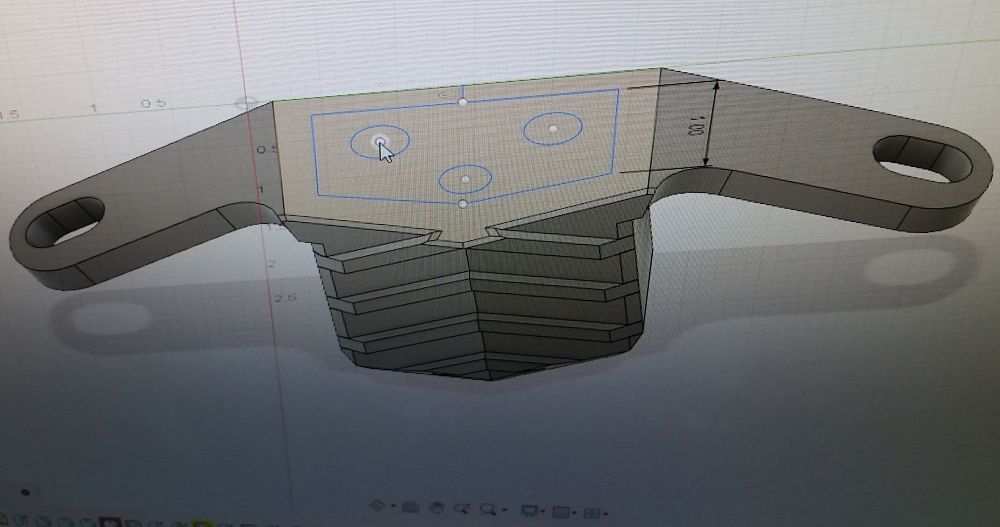
Since we wanted something to tie the cylinders together, we decided to put the switch box there.
The fins on the switch box will be sitting between the cylinder fins and are at the exact same angle as the cylinder fins.
There will be 3 waterproof switches in the top plate. On/Off, left and right blinkers.
Couple of pics showing the cavity for the bottoms of the switches and wiring.
The plan is to make the entire box black, and then finish the edges of the fins and the raised edge of the cap polished, to match the polished edges of the cylinder fins.
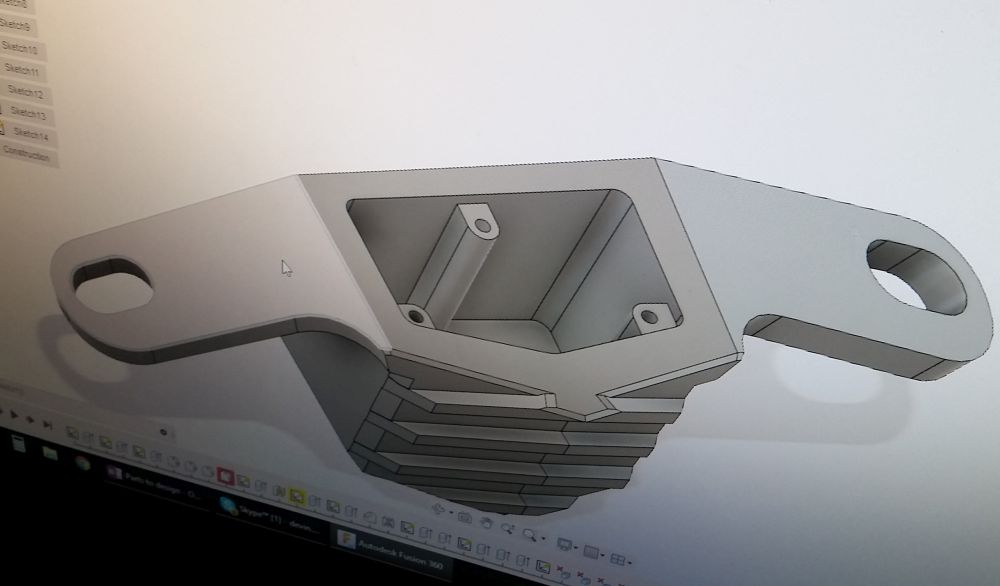
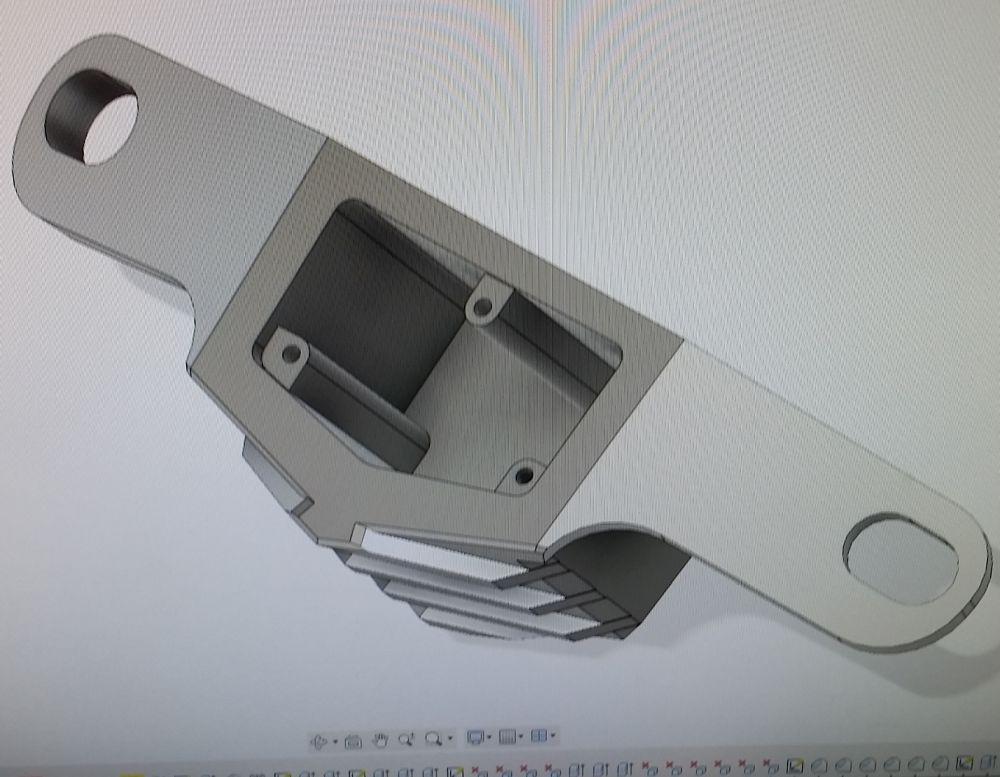
A look at the unit with the switch cap in place...
...and showing a fastener in one of the holes.
Still have a ton to do, but was nice progress today.
Kevin
www.DKCustom.com
Gear Up & Ride in! DK Custom 4th Annual Open House, June 8th. 🏍️ Click HERE For The Lowdown.
Call: 662-252-8828 Text: 662-420-4891
Email: Support@DKCustomProducts.com
Your battery box/oil bag will have a more finished look with the cover you've designed.
A strap, in my opinion only, looks cobbled and not top notch from a fabrication heavy custom chop perspective that you've worked hard on to date.
You're into it this far, why not go the extra step in finishing off this area on the bike, & be done with it.
It isn't likely to get damaged from anything falling onto the battery in an "exposed" state, but if a chain unexpectedly goes south it's in pretty close proximity, just sayin'...
The 3 switch box looks good, too. Assuming you're staying with running wires in frame to the box? Keep up the good work Kevin.
Posting Permissions