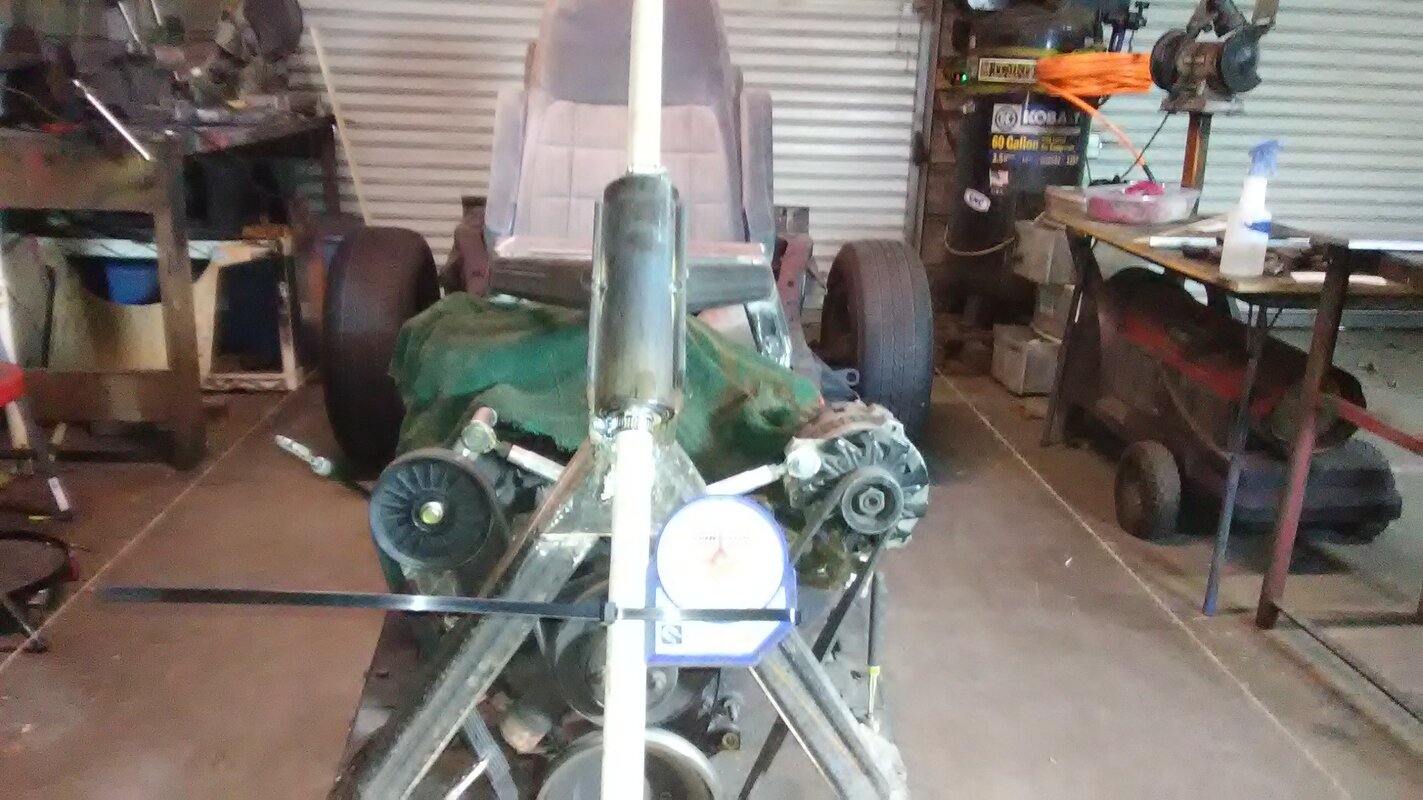
88 blazer trike

So I am up and walking around now.

I hope to work on the neck alignment this weekend

It at 35 degrees so that's good

It is only tacked welded to right now so I can make room to adjust it

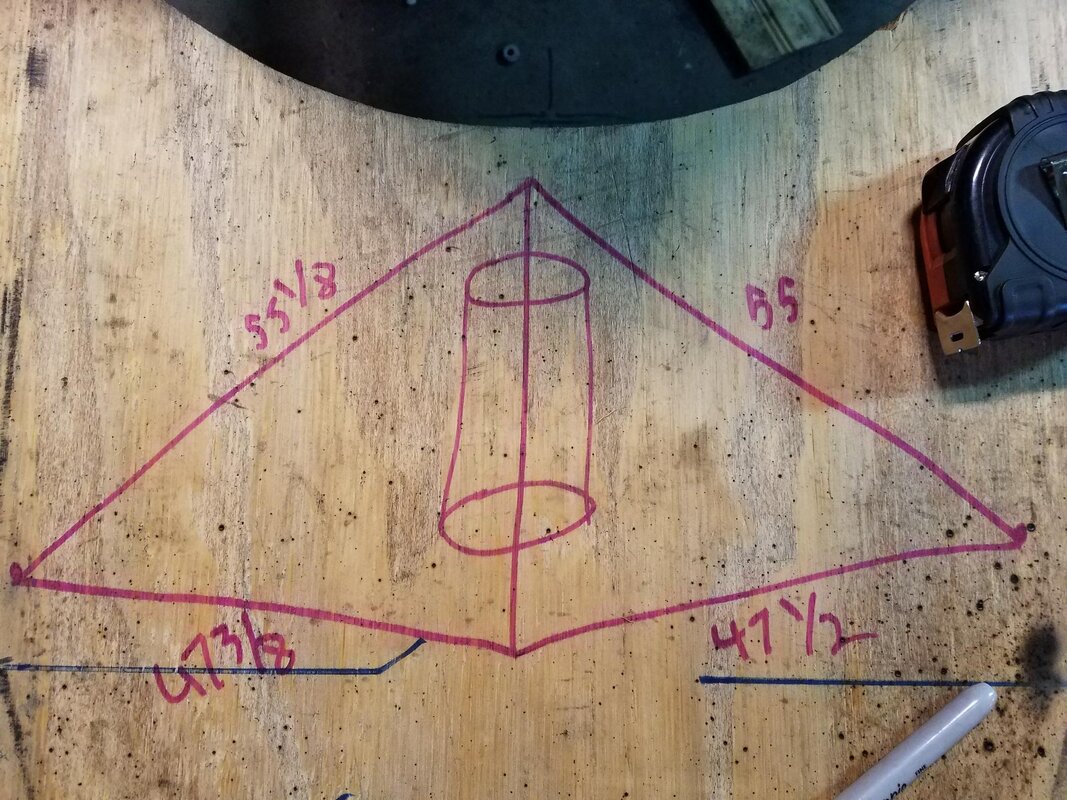
I have the 2 adjustments I am concerned about drawn below

I ran a plumb bob down the center of the neck and that tells me the bottom of the neck is real close

Need to figure out if the top is center also.

Any tips on neck alignment?

View attachment 54307

long as the neck is perpendicular to the ground you should be fine.... if the whole neck is of center a tad i doubt you will even notice it... my honda subaru trike was of set about an inch or so.... never know it
 
long as the neck is perpendicular to the ground you should be fine.... if the whole neck is of center a tad i doubt you will even notice it... my honda subaru trike was of set about an inch or so.... never know it

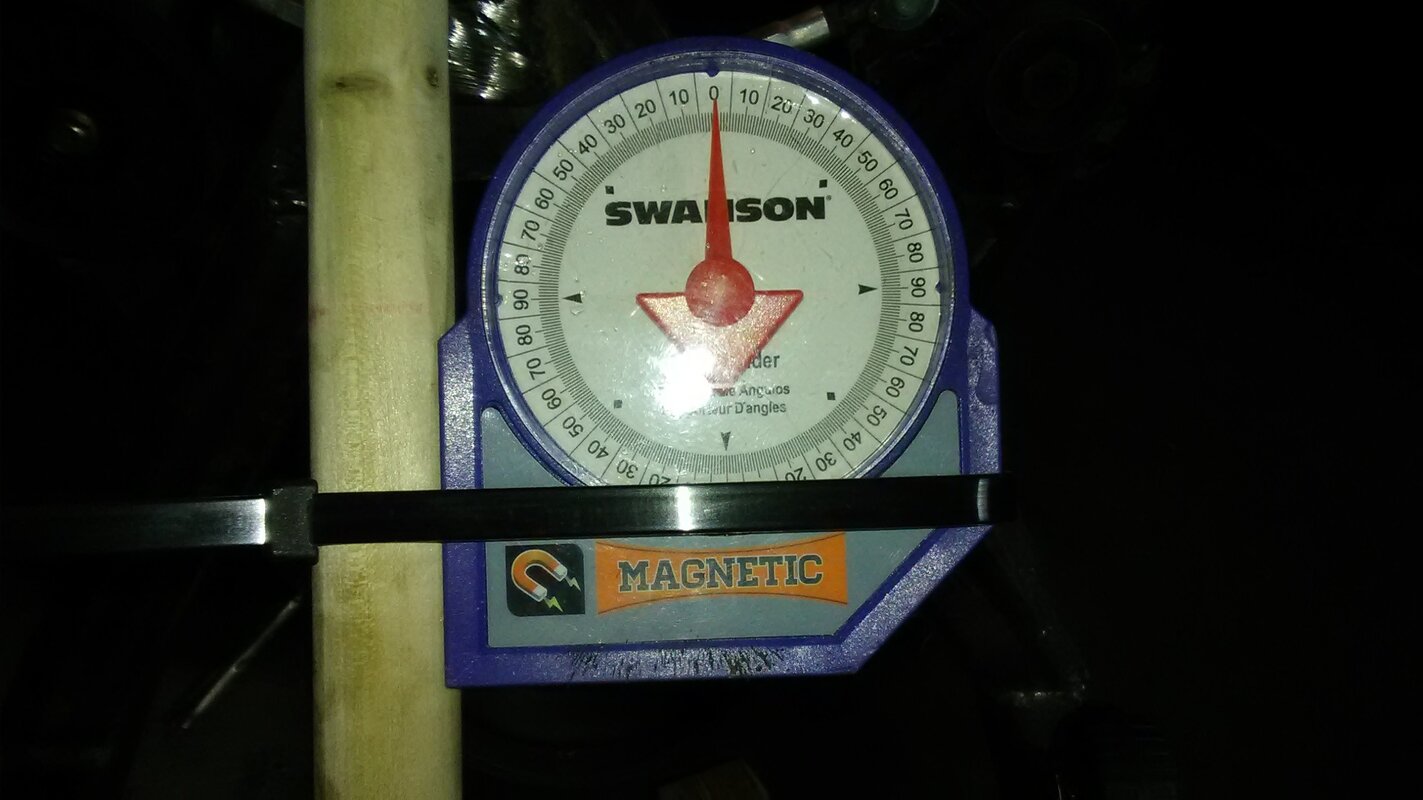
As it sits now it is off center by about 1/8 inch.

But am looking at how I can make sure it is perpendicular

I like Tom's idea of the cones and a long rod.

A while ago someone else suggested a 1 inch pipe through the bearings to the ground. I tried that with a wooden dowel but did not make the proper adjustments before I broke the dowel. (cant find the right size metal pipe)

Im going to think about this more and gather more ideas before I do anything.

Got to clean the shop today to get ready for Boxing tonight.
 
Bob,

That looks good so far. Is the dimension from the rear tire contact point to the dowel rod contact point on the floor on each side the same? With the dowel rod perpendicular as you show it tells you that your frame is symmetrically triangulated and should ride good.

The reason I suggested the cones is that they are self centering in the neck bore and then the bearings aren't subjected to the welding heat.

The frame builders use a frame jig for several reasons, the most obvious being speed and repeatability. By clamping the neck and frame tubes in a rigid jig they can control the stresses in the frame until the welding is complete and the parts are cooled and fixed in place. Have you ever cut a frame apart and had the ends of the tubes "spring"apart? This is welding stresses trapped in the frame.

Without a jig the neck will move around as you weld. For example, when you weld the right side of the neck and gussets the rod will probably move to the left due to the heating of the right side components and the associated expansion. This might be a little or a lot. I had an old school welder show me how much a tube could move around while welding up a dune buggy frame. He was welding up a roll cage and the 3 ft long end of the tube would move a full 1/2 to 3/4 inch out of position as he welded. He would watch the tube and weld on the other side to bring it back into alignment. He wanted to minimize the residual static stresses in the frame.

If you mark the floor for the dowel rod triangulated contact point and keep an eye on it while welding you shouldn't get any surprises.

All that being said, I've seen some home built trikes that looked like they were parked on the side of a hill when they were in a level parking lot and they rode just fine. Part of the "fun" of riding a home built trike is going down the road knowing intimately the condition of all the welds and components! :D:AGGHH:
 
Bob,

That looks good so far. Is the dimension from the rear tire contact point to the dowel rod contact point on the floor on each side the same? With the dowel rod perpendicular as you show it tells you that your frame is symmetrically triangulated and should ride good.

If you mark the floor for the dowel rod triangulated contact point and keep an eye on it while welding you shouldn't get any surprises.

The dimension from the rear to the top center point on the dowel is the same. The dowel is not long enough to reach the ground. But I when I measure from the bottom of the dowel It measures the same on each side also

I cant find a dowel long enough to reach the floor around here. I may buy another one and join them together

I also measured from the top and bottom of the dowel to other fixed points and they are the same on each side.

I also ran a string around the back tires straight past the front like we did back in the day to do a front wheel alignment

I then measured from side to side, The dowel measured in the center

But when I look at it it does not look straight. Part of that is that my seat is not bolted down in the background so that makes it look crooked (need nuts for it). I am headed out in a little to get the nuts

Thanks for the input guys. Keep it coming. I what to get this part right.
 
as vwbug said it will move when you weld but dont worry about not having the jig....before do you any welding it needs to be tacked good from both sides and alternate the tacks... dont tack all one side first

its the same as if it was in the jig... if you welded all one side first the jig couldnt hold it

another thing you can do.. if you cant find a dowel long enough... if you have someone to mark the floor for you... if you have a hole in you triple tree stem you can sight down through the hole and have some mark the floor where u see the floor down through the hole 4 marks r l front and rear.. stand above the neck a ways gives a smaller view.. . you would be surprised how accurate this is..i have use this method all the time for finding that spot on the ground when figuring for trail... more accurate than holding a bar against the neck

if u have no hole in the stem looking through the bearings works too need to have someone hold lower bearing in


hole you can figure that out
 
Awesome Stuff! Keep the photos coming of progress

The progress is slow

I was out of a job for some time and did not have the $$$

Now that money is not as tight (although we are playing catch up now) I do not have as much time

I will be a slow project but that is Ok with me

,,,,,,,,,,,,,,,,,My turn to box Got to go
 
Bob snap a centerline on the floor from the rear to the front of the frame, plus 5' more. Use a plumb bob dropped from the front centerline of the frame. mark the floor, then, repeat for the rear of the frame, then extend that line toward where the front wheel will be. I would double check that the frame is level before checking neck measurements

good advise from the guy's... agree side to side isn't so fussy, but should be perpendicular for looks, if nothing else.

if you use a dowel or shaft make sure you rotate it to check for runout. Rotate for max distance to the left of your chalk line then mark the floor. rotate for max distance to the right, then, mark the floor.......the true center is halfway between the marks, anyhow this is what i did, worked for me......good luck!
 
Bob

Laser pointer doesn't have to be accurate, just relative. Set up a point on the floor generated by the dowel mounted pointer. Then as you weld, any movement in the dowel will show up as dot movement on the floor. Just another way to keep track of what's happening while you weld up the neck. Less chances of surprises when you're done!
 
I have 2 questions. So look below the picture for the 2nd question

1.

I have measured from every angle I can.

All my measurements show the same thing

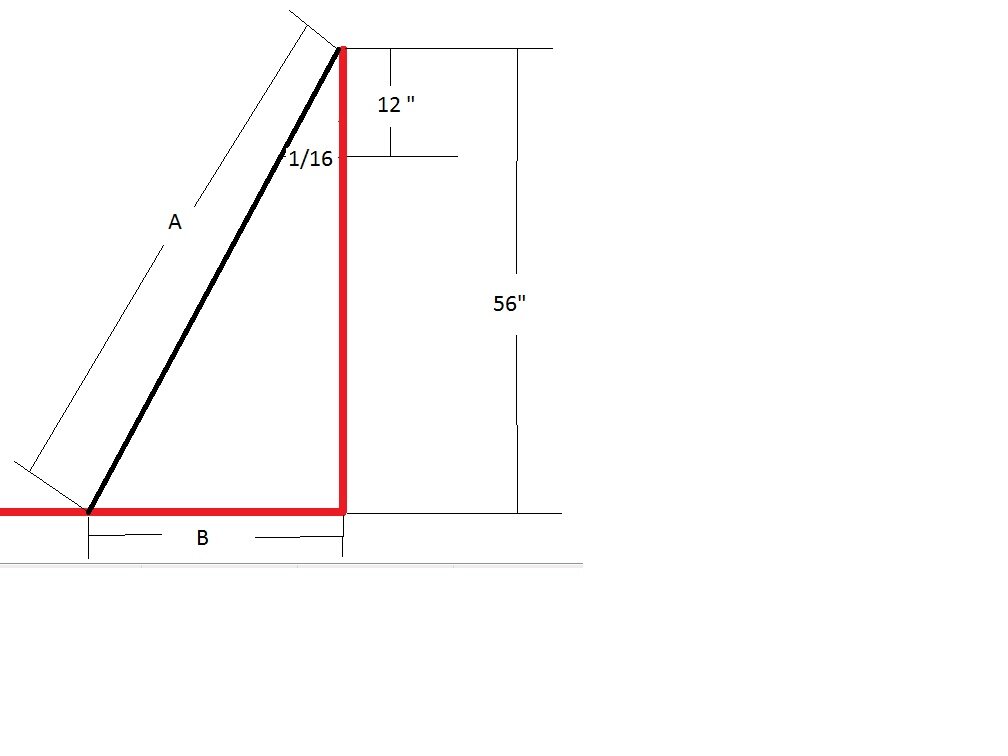
my neck is 1/8 off center to the right on top and 1/8 off center to the left on the bottom

See picture representation below

So if I move it by 1/16 of an inch it should be straight/perpendicular

BUT

Is it worth doing this? Its only 1/16 of a inch.

I'm afraid I will screw it up and not get it as close again.

neck.jpg

2.

the neck is 7 inches long

I am using 1 inch bearings

any suggestions on a neck stem?
 
I think I'd say good enough for Government work at this point. You might be able to draw it over a little with welding heat during the welding process. Hence the laser pointer suggestion.

As for the stem maybe you could use a fine thread grade 8 bolt for the neck stem. Make sure it is long enough to get the bearing surfaces on the unthreaded part of the bolt. Or you could use something like this: https://www.ebay.com/itm/01-Harley-...vidson&hash=item590663e354:g:SV4AAOSwSKtaaedV

This triple tree uses 41mm tubes. Not sure if this is big enough diameter for your application. Also don't know the neck length. Like most of us you've got more time than money but sometimes its easier to buy the hammer than build it. You already have a HD front wheel.

Great build so far. Keep up the good work.
 
Bob, if you are measuring from the top and bottom of the 7 in. neck....1/8 in. in 7 in. is a lot of angle projected to the floor!......if you are only off center 1/8, but perpendicular to the floor then, no big deal. I would project thru the neck to the centerline on the floor using electrical conduit with concentric washers or freeze plugs bored out to fit the pipe. Even clamping a piece of straight angle iron, say 1x1 or 1.5x1.5x 3or 4ft, long to the side of the neck will allow you to eyeball for perpendicularity. just my 02 Larry
 
Bob, if you are measuring from the top and bottom of the 7 in. neck....1/8 in. in 7 in. is a lot of angle projected to the floor!......if you are only off center 1/8, but perpendicular to the floor then, no big deal. I would project thru the neck to the centerline on the floor using electrical conduit with concentric washers or freeze plugs bored out to fit the pipe. Even clamping a piece of straight angle iron, say 1x1 or 1.5x1.5x 3or 4ft, long to the side of the neck will allow you to eyeball for perpendicularity. just my 02 Larry

Actually I have a 12 inch square sitting on top and center of the neck and I have been measuring from the top and bottom of that so the 1/8 is over 12 inches.

I do understand what you are saying. I will find a way to extend it to the floor and measure how far it is off
 
Am I correct?

If its off by 1/8 inch then I need to move it 1/16 inch (half the distance)

1/16 for every 12 inches

I measured from the top of my square on the neck to the floor at at 35 degree angle.

It measured 56 inches (it would actually be a little less because the square extends above the neck)

56 inches divided by 12 = 4.6666

1/16 inch = .0625

4.6666 x .0625=0.2916625

At the ground it would need to move 0.2916625 inch (a little more than 1/4 inch)

If that is correct I think I will leave it and maybe try to adjust some with the axle

My last 2 trikes I just eyeballed with a few measurement but nothing like I am doing this time. They both road straight. in fact I still ride 1 and it is fine

angle1.jpg
 
If i am understanding correctly ,it looks like you should tack the neck tube 3.5in. (halfway down) from the top on left side, fairly heavy tack. then, a very light tack on right side. grind off all other tacks but these 2, then pivot neck on the heavy tack using heat if needed on this tack.....let right tack break, it will be a reference if neck breaks off. according to your figures top of neck should pivot to right ,062 measured 6 in, above the left tack. the bottom of the neck should have swung left the same amount . hope this makes sense???
 

Welcome to the Trike Talk Community

Join our vibrant online community dedicated to all things Trikes! Whether you're a seasoned rider or just starting out, this is the place to share experiences, tips, and stories about your three-wheeled adventures. Explore modifications, maintenance advice, and rides, all while connecting with fellow trike enthusiasts from around the globe

Forum statistics

Threads
55,519
Messages
901,504
Members
22,571
Latest member
Lean Machine

Trike Talk Community

Welcome to a community dedicated to the most diverse and fastest growing powersports segment, Motorcycle Trikes. Come join the discussion about the best makes and models, popular modifications and proven performance hacks, trike touring and travel, maintenance, meetups and more!

Register Already a member? Login

Forum statistics

Threads
55,519
Messages
901,504
Members
22,571
Latest member
Lean Machine
 photo 260e2760-d89e-45b2-8675-2bc26fb3d465.jpg

 photo Trike-Talk-150-x-200.gif

 photo DK Trike Talk Right side banner 19.jpg

Merziere Reverser

 photo 9796095c-0d4b-4a9b-88ed-efe4c498d084.png
 photo f9866e4e-75c5-471a-86f5-5e72a446ecc3.png
Back
Top