Anyone know the part numbers for the engine guards, chrome and black, that fit the freewheeler? I understand it requires a frame attachment for the damper. How hard was it to attach?


 Likes: 3
 Thanks: 0


Anyone know the part numbers for the engine guards, chrome and black, that fit the freewheeler? I understand it requires a frame attachment for the damper. How hard was it to attach?

Hi Marc,Originally Posted by Yosamite

The HD catalog is a bit confusing on engine guards for the freewheeler due to the damper kit you purchase separately, but Harley does offer both the full and the mustache (black and chrome) for the 17 freewheeler. I decided on the chrome mustache for a less bulky look and they work great with my highway peg/heel rest combo. Installation wasnt difficult but pay close attention to how the damper brackets are positioned before you take them off. Other hints... 1) the bottom two bolt holes may have a plastic inserts (throw away) that must be SCREWED out not pulled out. If you mess up the plastic screw inserts (like me) you will have a hard time removing them. 2) the bottom screws that come with the new engine guard require a torx wrench (T-40), don't try to use an allen wrench. 3) be sure you run the clutch cable on the back side of the engine guards or youll have to take the guard back off... yep did that too.
The mustache guard has a place on the top to rest your feet but I found it way to high and too close to the tank for my liking.
Heres some photos of the mustache guard with the highway pegs. It also shows the fork wind deflectors (not yet offered by HD) which I highly recommend if you ride any distance over 50 mph.
Ride safe,
Ron

Is the part number 49155-09a for the freewheeler mustache bar?

http://www.triketalk.com/forum/threa...-Guard-Install
Read here by the members
This should not be a difficult install IMO
HD parts come with very good instructions
You can go to
https://www.harley-davidson.com/stor...000140--1#tabs
here and view the PDF install
Nuff Said," Were Burnin Daylight, Lets Ride"(Sober 37 years)
Current ride : 2021 FREEWHEELER M8, oldest ride 1960 FL
How tall are you? I'm 5ft 6in and originally ordered an engine guard from JP Cycle, but it was too far away from my feet.
Multi Fit but does not list the FLRT
ENGINE GUARD KITS
J026432014-08-04
GENERAL
Kit Number
46549-03, 49050-09, 49050-09A, 49155-09A, 49442-10
Models
For model fitment information, see the P&A Retail Catalog or the Parts and Accessories section of www.harley-davidson.com (English only).
Additional Parts Required
WARNING
The rider's safety depends upon the correct installation of this kit. Use the appropriate service manual procedures. If the procedure is not within your capabilities or you do not have the correct tools, have a Harley-Davidson dealer perform the installation. Improper installation of this kit could result in death or serious injury. (00333a)
NOTE
This instruction sheet references service manual information. A service manual for your model motorcycle is required for this installation and is available from a Harley-Davidson Dealer.
Kit Contents
See Figures 4, 5, and 6 and Service Parts Tables.
REMOVAL
NOTE
This instruction sheet covers several different Harley-Davidson models and years. Be sure to locate and follow the procedures that apply to the motorcycle receiving the new guard.
For Models without Lower Fairings
- Proceed to All Models section.
For Model FLHTCU with Factory-Installed Lower Fairings
- Remove the lower fairings following the instructions in the service manual.
- When the lower fairings have been removed, proceed to For All Models section.
For Models FLHR, FLHT or FLHTC with Harley-Davidson Genuine Motor Accessory Lower Fairings
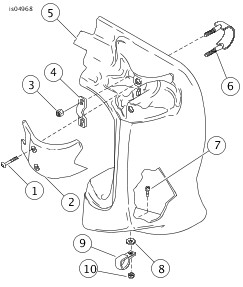
- See Figure 1. Remove the two screws (1) that attach the fairing cap (2) to the lower fairing (5). Remove the cap. Set the parts aside for installation.
- Remove the screw (7), rubber washer (8), locknut (10) and the clamp (9) that attaches the bottom of the lower fairing to the engine guard and set aside.
- Remove the two locknuts (3), U-bolt (6) and U-bolt retainer (4).
- Remove the lower fairing by sliding it out from behind the engine guard.
- Repeat Steps 1 through 4 for the opposite side.
- Proceed to All Models section.
For Model FLTR with Harley-Davidson Genuine Motor Accessory Lower Fairings
Disconnect negative (-) battery cable first. If positive (+) cable should contact ground with negative (-) cable connected, the resulting sparks can cause a battery explosion, which could result in death or serious injury. (00049a)
- Disconnect the battery, negative (-) battery cable first, following the instructions in the service manual.
- Remove the seat following the instructions in the service manual.
- Remove the cable strap holding the clutch cable to the engine guard.
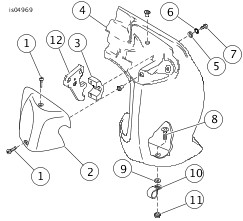
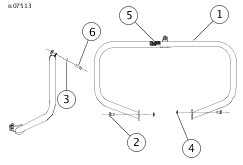
- See Figure 2. Remove the TORX® screw (8), rubber washer (9), locknut (11) and the clamp (10) that attaches the bottom of the lower fairing (4) to the engine guard and set aside.
- Remove the two screws (1) that attach the fairing cap (2) to the lower fairing. Remove the cap. Set the parts aside for installation.
- Remove the screw (7), lockwasher (6) and flat washer (5) from the clamp (3) holding the top of the lower fairing to the bottom upper fairing mounting bracket (12).
- Remove the large clamp (3) from the engine guard.
- Remove the lower fairing from the motorcycle by sliding it out from behind the engine guard.
- Repeat Steps 1 through 8 for the opposite side.
- Proceed to All Models section.
All Models
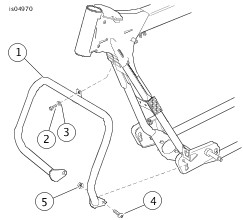
- See Figure 3. Remove and discard the two screws (4) and locknuts (5) that attach the bottom of the stock engine guard (1) to the motorcycle frame.
- Remove and discard the hex socket screw (2) and washer (3) holding the top of the guard. Remove the engine guard from the frame, taking care not to scratch the finish on the motorcycle.
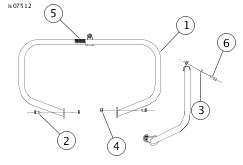
1 Screw (2) 2 Fairing cap 3 Locknut (2) 4 U-bolt retainer 5 Lower fairing 6 U-bolt 7 TORX screw 8 Rubber washer 9 Clamp 10 Locknut
Figure 1. FLHR/I or FLHT/C/I Accessory Lower Fairing
1 Screw (2) 2 Fairing cap 3 Fairing mounting bracket clamp - FLTR 4 Lower fairing 5 Flat washer 6 Lockwasher 7 Phillips head screw (chrome) 8 TORX screw 9 Rubber washer 10 Clamp 11 Locknut 12 Fairing mount bracket - FLTR
Figure 2. FLTR/I Accessory Lower Fairing
INSTALLATION
1. Hold the engine guard in position, and loosely fasten the top of the guard with the new hex socket screw and flat washer from the kit. 2. Install the bottom brackets to the motorcycle frame with the two new TORX screws and locknuts. 3. For Part No. 49155-09A & 49442-10,tighten top mount screws to 3038 N·m (2228 ft-lbs). Tighten bottom two mounts to 20.327.1 N·m (1520 ft-lbs). For Part No. 46549-03, 49050-09 & 49050-09A tighten all three screws to 20.327.1 N·m (1520 ft-lbs).
NOTE
For models without lower fairings, installation is complete.
For Model FLHTCU with Factory-Installed Lower Fairings
- Install the lower fairings following the instructions in the service manual.
For Models FLHR, FLHT or FLHTC with Harley-Davidson Genuine Motor Accessory Lower Fairings
1. Carefully place one lower fairing in position from behind the engine guard. 2. See Figure 1. Install the lower fairing to the top of the new engine guard with the U-bolt (6) from the back, through the holes at the top of the fairing. Install the retainer (4) in position on the U-bolt and secure to the engine guard with the two locknuts (3). Do not tighten the locknuts at this time. 3. Attach the bottom of the fairing to the engine guard with the clamp (9) removed earlier. Install the clamp around the engine guard in the direction shown, with the tabs toward the rear of the vehicle and the flat side of the clamp against the lower fairing. Insert the screw (7) through the lower fairing, rubber washer (8) and clamp (9). Secure the assembly with the locknut (10). Tighten to 16.3 N·m (12 ft-lbs). 4. Tighten the locknuts (3) to 8.1 N·m (6 ft-lbs). 5. Attach the fairing cap (2) to the fairing with the screws (1) removed earlier, and tighten securely. 6. Repeat Steps 1 through 5 for the opposite side of vehicle.
1 Stock engine guard 2 Socket head screw 3 Washer 4 Screw (2) 5 Locknut (2)
Figure 3. Install Engine Guard
SERVICE PARTS
Figure 4. Service Parts: Mustache Engine Guard P/N 49155-09A, 49442-10
Table 1. Kit Contents: P/N 49155-09A, 49442-10
Item Description (Quantity) Part Number 1 Engine guard Not Sold Separately 2 Screw, hex socket head 5/16-18 x 1.0 inch 2708A 3 Washer, flat 5/16 6702 4 Screw, pan head TORX®, 3/18-16 x 7/8 inch (2) 3678 5 Locknut, flanged hex 3/8-16 (2) 7601 6 Rubber pad service kit (2)
(Mustache style only)
- Rubber foot pad (2)
- Adhesive tape (4)
- Installation pin (2)
97015-09
Figure 5. Service Parts: Black Engine Guard P/N 46549-03, 49050-09
Table 2. Kit Contents P/N 46549-03, 49050-09
Item Description (Quantity) Part Number 1 Engine guard assembly, black Not Sold Separately 2 Flat top head tapping screw (2) 3678 3 Plain washer, type A 6702 4 Flange nut (2) 7601 5 Hex socket head cap screw 2708A
Figure 6. Service Parts: Engine Guard, Black P/N 49050-09A
Table 3. Kit Contents P/N 49050-09A
Item Description (Quantity) Part Number 1 Engine guard assembly, black Not Sold Separately 2 Flat top pan head tapping screw (2) 2238 3 Washer, ferrous heat treated 6116 4 Flange nut (2) 7601 5 Hex socket head cap screw 2708A
Here is the instructions
Nuff Said," Were Burnin Daylight, Lets Ride"(Sober 37 years)
Current ride : 2021 FREEWHEELER M8, oldest ride 1960 FL
Hey Ron, thanks for the great diagrams, instructions and pictures. I have to purchase the pan-head torx bolts, but Lowes does not carry these bolts. I guess I have to go back to Harley right?
I got mine at HD, part number 4924, 3.16 plus tax.
My mission in life is not merely to survive, but to thrive; and to do so with some passion, some compassion, some humor, and some style. Maya Angelou
I'm 6' 1" I don't see that the foot pads on top of the mustache bars would work well for anybody other than a temporary place to put you feet for a very short time. However there are a host of engine guard peg extensions that can be adjusted to just about any ones comfort zone. You can even mount some of them inside versus outside the bars depending on the position of the brake pad. The pegs with flip out heel rests can really help too. Do you have the reach seat installed.. that moves you two inches closer as well. Research all the options thoroughly to find what suites you. My mark of success is when I don't even think about my feet or butt when I've been riding for hours. Also got 14 ape hangers that gave me a much better riding position. (no cable rework if you stay with 14 inch or under. I'm now doing 400 plus mile days with no problem (got fork wind deflectors too). Hope this helps! Ron
However there are a host of engine guard peg extensions that can be adjusted to just about any ones comfort zone.
What Ron said here works good
Offset pegs You can get them cheap on Ebay
Mount them turned inboard for a cleaner look
Nuff Said," Were Burnin Daylight, Lets Ride"(Sober 37 years)
Current ride : 2021 FREEWHEELER M8, oldest ride 1960 FL
One of our forum sponsors also sells them in black and chrome.
http://www.dkcustomproducts.com/chro...ky-ca-hp-c.htm
My mission in life is not merely to survive, but to thrive; and to do so with some passion, some compassion, some humor, and some style. Maya Angelou
Ronbo; I am surprised no one asked about the wind deflectors. Where did you get the wind deflectors; are they from Harley? If so, do you have a Harley part number or who is selling them?
https://jescustomaccents.com/Wind-Deflectors_c34.htm
My mission in life is not merely to survive, but to thrive; and to do so with some passion, some compassion, some humor, and some style. Maya Angelou
Posting Permissions