150 Most Recent Posts

Thread AuthorPostersPost AuthorForumThread/Post Link
14TG314TGHarley Tri GlideInstallation of a new Fuel Filter &...
14TG3Jack KlarichHarley Tri GlideInstallation of a new Fuel Filter &...
DrCrazyTrain3Jack KlarichHarley Freewheeler /...True Dual Header
ctdair8Jack KlarichHarley Tri GlideHot Rotors After New Pads
ctdair8ctdairHarley Tri GlideHot Rotors After New Pads
14TG3TrampasHarley Tri GlideInstallation of a new Fuel Filter &...
520fd3Rogue1For Sale & WTB C...FS: Trike Mid-Step
520fd3520fdFor Sale & WTB C...FS: Trike Mid-Step
14TG314TGHarley Tri GlideInstallation of a new Fuel Filter &...
JTJersey5JTJerseyHarley Freewheeler /...Removing Trim Around Oil Cooler
Jack Klarich1Jack KlarichGeneral Harley ChatExhaust Heat Shield
BigN693Jack KlarichEnabled TrikersFull length floorboards
JTJersey5Noodles107Harley Freewheeler /...Removing Trim Around Oil Cooler
ctdair8Old Road DogHarley Tri GlideHot Rotors After New Pads
Phu Cat4Phu CatGeneral DiscussionIs there a TV commercial
TXFIRE765GoldWingrGregHonda TrikesNew to Trikes and needing a convers...
paid4c431GoldWingrGregHonda TrikesDifference in touring between two w...
Donnimac4GoldWingrGregHonda TrikesLehman Monarch II
paid4c410GoldWingrGregHonda TrikesService for differential on a Motor...
DrCrazyTrain3powerhaulicHarley Freewheeler /...True Dual Header
520fd3NotgrownupFor Sale & WTB C...FS: Trike Mid-Step
Yannick25vwbug72501VW Powered TrikesWil-Mac trike kit
520fd3520fdFor Sale & WTB C...FS: Trike Mid-Step
Bear22012Jack KlarichNew Member Introduct...New member
Phu Cat4rhino 2General DiscussionIs there a TV commercial
14TG614TGHarley Tri GlideInstalled Genuine HD Armrest kit
scaldedchevy3Papa ZookLehman Trike2004 Gold Wing Lehman Monarch 2 Sho...
hogmemberisold2cScjhbGeneral DiscussionHow many carry spare headlight bulb...
Phu Cat4cScjhbGeneral DiscussionIs there a TV commercial
DrCrazyTrain3DrCrazyTrainHarley Freewheeler /...True Dual Header
scaldedchevy3scaldedchevyLehman Trike2004 Gold Wing Lehman Monarch 2 Sho...
New Orleans Kevin6MykneesbehurtinHarley Tri Glide2021 114 Triglide Stage 2 Feuling 4...
DK Custom Products362Jack KlarichHarley Tri GlideWhat did you do to Your Tri-Glide T...
ctdair8MykneesbehurtinHarley Tri GlideHot Rotors After New Pads
ctdair8ctdairHarley Tri GlideHot Rotors After New Pads
Seaweed6Jack KlarichHarley Tri GlideLower Fairing Vents
14TG6Jack KlarichHarley Tri GlideInstalled Genuine HD Armrest kit
ctdair8Jack KlarichHarley Tri GlideHot Rotors After New Pads
Phu Cat4trike ladyGeneral DiscussionIs there a TV commercial
ctdair8ctdairHarley Tri GlideHot Rotors After New Pads
scaldedchevy3Papa ZookLehman Trike2004 Gold Wing Lehman Monarch 2 Sho...
AriNV6Papa ZookRider Safety Discuss...Maybe silly but serious question, s...
Phu Cat4Phu CatGeneral DiscussionIs there a TV commercial
TwoBye1TwoByeFor Sale & WTB C...GL1500 Tall windshield
scaldedchevy3MickLehman Trike2004 Gold Wing Lehman Monarch 2 Sho...
Gernerwa11SullyNew Member Introduct...New Member from Bellingham, WA
AriNV6AriNVRider Safety Discuss...Maybe silly but serious question, s...
Jack Klarich2Jack KlarichGeneral DiscussionGreat Day for a ride today
Gernerwa11Jack KlarichNew Member Introduct...New Member from Bellingham, WA
Jarhead17753Jack KlarichHarley Freewheeler /...paint job
hogmemberisold2hogmemberisoldGeneral DiscussionHow many carry spare headlight bulb...
14TG614TGHarley Tri GlideInstalled Genuine HD Armrest kit
14TG6Papa ZookHarley Tri GlideInstalled Genuine HD Armrest kit
AriNV6Papa ZookRider Safety Discuss...Maybe silly but serious question, s...
AriNV6AriNVRider Safety Discuss...Maybe silly but serious question, s...
AriNV6pawsRider Safety Discuss...Maybe silly but serious question, s...
B SMITH10rhino 2Harley Tri GlideTrailering Tri Glide
B SMITH10DK Custom ProductsHarley Tri GlideTrailering Tri Glide
AriNV6Pegasus1300Rider Safety Discuss...Maybe silly but serious question, s...
AriNV6cycle7447Rider Safety Discuss...Maybe silly but serious question, s...
TomyJ16TomyJHome Built TrikesRebel RT
scaldedchevy3scaldedchevyLehman Trike2004 Gold Wing Lehman Monarch 2 Sho...
AriNV13Jack KlarichNew Member Introduct...New to trike
steelpony55553Jack KlarichDetailingCeramic coating
AriNV6Jack KlarichRider Safety Discuss...Maybe silly but serious question, s...
JTJersey5Jack KlarichHarley Freewheeler /...Removing Trim Around Oil Cooler
AriNV6AriNVRider Safety Discuss...Maybe silly but serious question, s...
AriNV6cycle7447Rider Safety Discuss...Maybe silly but serious question, s...
AriNV6AriNVRider Safety Discuss...Maybe silly but serious question, s...
steelpony55553AriNVDetailingCeramic coating
AriNV13AriNVNew Member Introduct...New to trike
JTJersey5Old Road DogHarley Freewheeler /...Removing Trim Around Oil Cooler
paid4c410VulcanscottHonda TrikesService for differential on a Motor...
DK Custom Products362New Orleans KevinHarley Tri GlideWhat did you do to Your Tri-Glide T...
AriNV13Pegasus1300New Member Introduct...New to trike
Jarhead17753GorillaHarley Freewheeler /...paint job
New Orleans Kevin6New Orleans KevinHarley Tri Glide2021 114 Triglide Stage 2 Feuling 4...
TomyJ8Jack KlarichSidecar ForumHackHer
JTJersey5Jack KlarichHarley Freewheeler /...Removing Trim Around Oil Cooler
AriNV4Jack KlarichCan Am Spyder Trike...I'm a total newbie ... Is the Spyde...
ISP-FL2ISP-FLThe Knife EnthusiestBenchmade Warranty
woody13Rmitchell55Maggie Valley Gather...Maggie Valley 2024
New Orleans Kevin6ISP-FLHarley Tri Glide2021 114 Triglide Stage 2 Feuling 4...
woody13Marc HMaggie Valley Gather...Maggie Valley 2024
woody13PosseRiderMaggie Valley Gather...Maggie Valley 2024
ctdair8ctdairHarley Tri GlideHot Rotors After New Pads
New Orleans Kevin6NotgrownupHarley Tri Glide2021 114 Triglide Stage 2 Feuling 4...
New Orleans Kevin6PanheadSteveHarley Tri Glide2021 114 Triglide Stage 2 Feuling 4...
Donnimac4DonnimacHonda TrikesLehman Monarch II
ken g9rhino 2Harley Tri Glidereverse not working
New Orleans Kevin6New Orleans KevinHarley Tri Glide2021 114 Triglide Stage 2 Feuling 4...
ken g9520fdHarley Tri Glidereverse not working
520fd3520fdFor Sale & WTB C...FS: Trike Mid-Step
JTJersey5JTJerseyHarley Freewheeler /...Removing Trim Around Oil Cooler
JTJersey5rhino 2Harley Freewheeler /...Removing Trim Around Oil Cooler
myhonda614TGHarley Tri GlideKuryakyn filler pad
JTJersey5JTJerseyHarley Freewheeler /...Removing Trim Around Oil Cooler
ken g9ken gHarley Tri Glidereverse not working
JTJersey5rhino 2Harley Freewheeler /...Removing Trim Around Oil Cooler
JTJersey5JTJerseyHarley Freewheeler /...Removing Trim Around Oil Cooler
myhonda6Rogue1Harley Tri GlideKuryakyn filler pad
myhonda614TGHarley Tri GlideKuryakyn filler pad
AriNV4AriNVCan Am Spyder Trike...I'm a total newbie ... Is the Spyde...
TFNC12AriNVNew Member Introduct...Just saying hello
Jarhead17753Jarhead1775Harley Freewheeler /...paint job
AriNV13AriNVNew Member Introduct...New to trike
myhonda6Rogue1Harley Tri GlideKuryakyn filler pad
woody13woodyMaggie Valley Gather...Maggie Valley 2024
myhonda6NotgrownupHarley Tri GlideKuryakyn filler pad
New Orleans Kevin6NotgrownupHarley Tri Glide2021 114 Triglide Stage 2 Feuling 4...
Donnimac4MickHonda TrikesLehman Monarch II
Gernerwa11trike ladyNew Member Introduct...New Member from Bellingham, WA
myhonda6Rmitchell55Harley Tri GlideKuryakyn filler pad
Gernerwa11GorillaNew Member Introduct...New Member from Bellingham, WA
Yannick25GorillaVW Powered TrikesWil-Mac trike kit
woody13Marc HMaggie Valley Gather...Maggie Valley 2024
Donnimac4GorillaHonda TrikesLehman Monarch II
Gernerwa11rhino 2New Member Introduct...New Member from Bellingham, WA
Gernerwa11Marc HNew Member Introduct...New Member from Bellingham, WA
Gernerwa11Uncle FesterNew Member Introduct...New Member from Bellingham, WA
MDO100ZammyHarley Freewheeler /...What Did You Do To Your Freewheeler...
Gernerwa11ZammyNew Member Introduct...New Member from Bellingham, WA
AriNV13Phu CatNew Member Introduct...New to trike
New Orleans Kevin6New Orleans KevinHarley Tri Glide2021 114 Triglide Stage 2 Feuling 4...
Jjhooker22DeathBySnuSnuVW Powered TrikesSide shifter assembly for 1980 WilM...
Rodnok12ol' schoolNew Member Introduct...Hello Honda Trike owners!
AriNV13ol' schoolNew Member Introduct...New to trike
TFNC12ol' schoolNew Member Introduct...Just saying hello
AriNV13hardwickbvNew Member Introduct...New to trike
whiskeyneat10ol' schoolNew Member Introduct...Howdy"
Gernerwa11hardwickbvNew Member Introduct...New Member from Bellingham, WA
Gernerwa11ol' schoolNew Member Introduct...New Member from Bellingham, WA
scaldedchevy3MickLehman Trike2004 Gold Wing Lehman Monarch 2 Sho...
Jjhooker22Jjhooker2VW Powered TrikesSide shifter assembly for 1980 WilM...
Jack Klarich2TomyJTires, Wheels, Brake...Motorcycle Tire Reference
New Orleans Kevin6JTJerseyHarley Tri Glide2021 114 Triglide Stage 2 Feuling 4...
Jjhooker22DeathBySnuSnuVW Powered TrikesSide shifter assembly for 1980 WilM...
Gernerwa11GernerwaNew Member Introduct...New Member from Bellingham, WA
New Orleans Kevin6New Orleans KevinHarley Tri Glide2021 114 Triglide Stage 2 Feuling 4...
scaldedchevy3scaldedchevyLehman Trike2004 Gold Wing Lehman Monarch 2 Sho...
scaldedchevy3MickLehman Trike2004 Gold Wing Lehman Monarch 2 Sho...
ken g9OLBLUHarley Tri Glidereverse not working
Jjhooker22Jjhooker2VW Powered TrikesSide shifter assembly for 1980 WilM...
Likes Likes:  4
Thanks Thanks:  0
Results 1 to 6 of 6

Thread: Audio Upgrade Info

  1. #1
    5+ Posts
    Join Date
    Mar 2018
    Location
    Yorkville, IL. 60554
    Posts
    5

    Default Audio Upgrade Info

    I would like to install a ( J L Audio amp) and speakers on my triglide. FLHTCUTG, Does anyone have an instruction thread on how to install these things.

    Like a step by step detail, getting the faring off, install of amp, getting old speakers out.

    Thanks

    Bill

  2. #2
    18000+ Posts
    Tech Contributor
    Gold Club Member
    Jack Klarich's Avatar
    Join Date
    Oct 2016
    Location
    Jax, Fla USA
    Posts
    18,254

    Default

    Welcome to Trike Talk

    Below is Harley's way of updating a stereo

    There are several cautions

    BOOM! AUDIO STAGE II FAIRING SPEAKER KIT (FLTR)

    J060162016-06-28

    GENERAL

    Dealer installation is recommended.

    Kit Number

    76000594A

    Models

    For model fitment information, see the P&A retail catalog or the Parts and Accessories section of www.harley-davidson.com (English only).

    Installation Requirements

    Amplifier Kit (part number 76000523).

    FLTRUSE models only: Separate purchase of harness (part number 69200489) and harness interconnect (part number 69200714) is required.

    Loctite® 243 Threadlocker and Sealant - Blue (Part No. 99642-97).

    NOTE

    DO NOT mix Stage I and Stage II speakers on the same vehicle.

    These speakers are for use ONLY on 2014 and later Harley-Davidson audio systems. Using these speakers on 2006-2013 Harley-Davidson audio systems WILL permanently damage these speakers. Using these speakers on 2005 or earlier Harley-Davidson audio systems WILL permanently damage those systems.

    NOTICE

    Radio EQ MUST be updated by a Harley-Davidson dealer BEFORE operating the audio system. Operating the audio system prior to radio EQ update will IMMEDIATELY damage the speakers. (00645d)

    Radio EQ update using the Digital Technician® II diagnostic tool is:

    • Recommended before speaker INSTALLATION
    • Required before audio system OPERATION.
    • Only available through authorized Harley-Davidson dealers.


    WARNING

    Rider and passenger safety depend upon the correct installation of this kit. Use the appropriate service manual procedures. If the procedure is not within your capabilities or you do not have the correct tools, have a Harley-Davidson dealer perform the installation. Improper installation of this kit could result in death or serious injury. (00333b)

    NOTE

    This instruction sheet refers to service manual information. A service manual for this year/model motorcycle is required for this installation. One is available from a Harley-Davidson dealer.

    Electrical Overload

    WARNING

    When installing any electrical accessory, be certain not to exceed the maximum amperage rating of the fuse or circuit breaker protecting the affected circuit being modified. Exceeding the maximum amperage can lead to electrical failures, which could result in death or serious injury. (00310a)

    NOTICE

    It is possible to overload your vehicle's charging system by adding too many electrical accessories. If the combined electrical accessories operating at any one time consume more electrical current than the vehicle's charging system can produce, the electrical consumption can discharge the battery and cause damage to the vehicle's electrical system. See an authorized Harley-Davidson dealer for advice about the amount of current consumed by additional electrical accessories or for necessary wiring changes. (00211c)

    The purchase of this kit entitles you to a specially developed sound equalization software that is used with the Advanced Audio System. This unique equalization was designed to optimize the performance and sound response of the BOOM! Audio fairing lower speakers. If this kit is not installed by a Harley-Davidson dealer, this special equalization software is available without charge from any dealer through Digital Technician II. Dealer labor rates may apply for the upgrade procedure.

    This amplifier requires up to 8 amps more current from the electrical system.

    Kit Contents

    See Figure 4 and Table 1.

    PREPARATION

    WARNING

    To prevent accidental vehicle start-up, which could cause death or serious injury, remove main fuse before proceeding. (00251b)

    1. See the service manual. Remove main fuse.


    REMOVAL

    1. Remove windshield. Remove outer fairing. See the service manual.
    2. Remove the fairing speaker grille assemblies. See the service manual.
    3. Remove the fairing speakers.

      1. Remove four screws securing speaker to enclosure.
      2. Hold speaker away from enclosure. Disconnect wires. Remove speaker.
      3. Repeat on opposite side.
      4. Discard speakers.


    INSTALLATION

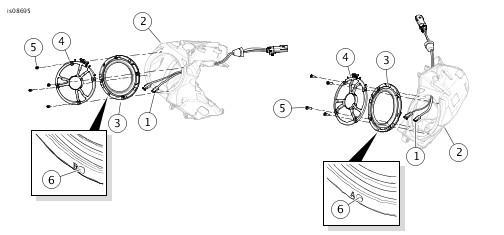
    1. See Figure 1. Attach the speaker harness connectors (1) inside the speaker enclosure (2) to the spade terminals on the back of the woofer (3). Different size spade contacts prevent improper assembly.
    2. Position the speaker over the opening in the speaker enclosure.

    NOTE

    The letters "A" and "B" stamped on the outer rim (6) of the speaker.

    • For the left speaker, rotate so the letter "B" is at the bottom.
    • For the right speaker, rotate so the letter "A" is at the bottom.

    3. Position the midrange speaker mounting assembly (4) over the woofer. Rotate the midrange assembly to align the mounting holes with the woofer. Position the wires at the top of the midrange mounting ring.
    4. Fasten the woofer and midrange speakers to the enclosure with four screws (5). Tighten to 1.6–2.3 N·m (14.2–20.4 in-lbs).


    1 Speaker harness connector (2)
    2 Speaker enclosure (2)
    3 Speaker assembly, midrange/woofer (2)
    4 Midrange mounting assembly (2)
    5 Stamped letters
    6 Screw (8)

    Figure 1. Woofer Speaker Installation

    NOTE

    • The tweeter/speaker grille assemblies are side-specific. The right grille has the text "BOOM! AUDIO STAGE II" to the right of the tweeter housing. The left grille has no text.
    • To ease the midrange to tweeter lead connection in Step 5a, slide back the jacket over the female terminal. Connect the terminals. Slide the jacket forward over the connected terminals.


    1. See Figure 2. Install grille assembly (1):

      1. Connect the two individual leads from the midrange speaker to the tweeter leads on the speaker grille.
      2. Verify that the rubber gasket (2) is in place around the perimeter of the grille. Check that the two clips (3) are in place on the grille tabs (4). Replace components if damaged or missing.
      3. Insert the tweeter wiring and connector into the space between the upper inboard corner of the inner fairing speaker opening and the speaker housing.
      4. Engage tab (4) into the outboard side of the speaker opening.
      5. Engage the grille retainer clips in the slots (5).
      6. Push on the grille in each retainer area until an audible click is heard.
      7. Repeat on the opposite side.


    1 Grille assembly (2)
    2 Gasket
    3 Clip (4)
    4 Tabs
    5 Slot
    6 EQ update label (2)
    7 Harness
    8 Tweeter/Midrange speaker assembly (2)

    Figure 2. Speaker Tweeter/Midrange and Grille

    1. FLTRUSE models: Install rear speaker interconnect harness (part number 69200714) and rear speaker jumper harness (part number 69200489), each purchased separately. The rear jumper harness connects the rear speakers to the fairing amplifier.

      1. Locate the rear audio [162] beneath the passenger backrest and disconnect [162].
      2. Connect [162A] and [162B] to the mating connectors on the rear speaker interconnect harness.
      3. Connect the four-way [162A] on the rear speaker jumper harness to the four-way [162D] on the interconnect harness.
      4. Use a cap to plug the unused four-way [162C] on the interconnect harness.
      5. Route the rear speaker jumper harness [162B] along the wiring caddy to the fairing amplifier. Becoming connection [313] for FLTRUSE model fairings.


    2. See Figure 2. ALL models: Position harness (7) inside inner fairing.
    3. All models except FLTRUSE:Connect the four-way Molex socket connector [313B] of the Y-harness into the amplifier harness rear speaker output socket [313]. FLTRUSE models:Connect the four-way Molex socket connector [313B] of the Y-harness into the amplifier harness rear speaker output socket [162B].


    • The Y-harness connectors are labeled "RH" or "LH" (right side or left side as viewed from the rider position). Or, match the wire colors of the Y-harness to the speaker wire colors. Route each leg of the harness to the correct speaker.


    1. Plug the connectors into each speaker.


    WARNING

    Be sure that steering is smooth and free without interference. Interference with steering could result in loss of vehicle control and death or serious injury. (00371a)

    • Make sure that wires, harnesses or lines do not pull tight when handlebars are turned fully to left or right fork stops.


    1. Verify that steering is smooth and clear from stop to stop.


    1 Left fairing speaker
    2 Left fairing speaker
    3 Amplifier, fairing (purchased separately)
    4 Tweeter midrange [313]
    5 16-way rear audio [162]
    6 Interconnect, CVO only, (part number 6920714)
    7 Jumper, CVO only, (part number 6920489)

    Figure 3. Fairing Speakers, Amplifier and Approximate Connection Locations

    COMPLETION

    NOTE

    To prevent possible damage to the sound system, verify that the ignition is OFF before installing the main fuse.

    NOTICE

    Radio EQ MUST be updated by a Harley-Davidson dealer BEFORE operating the audio system. Operating the audio system prior to radio EQ update will IMMEDIATELY damage the speakers. (00645d)

    1. See the service manual. Install main fuse.
    2. Have a Harley-Davidson dealer update the radio EQ using Digital Technician II.
    3. Turn the ignition ON, but do not start the motorcycle.
    4. Refer to the BOOM! BOX INFOTAINMENT SYSTEM section of the owner's manual. Turn the radio ON. Make sure that all speakers are working and front/rear fader function is operating correctly. If not, check speaker wiring. Understand that buzzing, squeaks and rattles could be heard until outer fairing is installed.
    5. See the service manual. Install outer fairing. Install windshield.


    IN USE

    Avoid direct contact with speaker grilles by a pressure washer. Damage to speakers can result.

    SERVICE PARTS


    Figure 4. Service Parts, BOOM! Audio Stage II Fairing Speaker Kit (FLTR)

    Table 1. Service Parts

    Item
    Description (Quantity)
    Part Number
    1
    Speaker assembly (woofer), fairing (2)
    76000525
    2
    Speaker assembly, midrange (2)
    76000606
    3
    Screw (8)
    10200376
    4
    Tweeter/speaker grille assembly (left) (includes items 5-6)

    Tweeter/speaker grille assembly (right) (includes items 5-6)
    76000595

    76000596
    5

    • Gasket (left)
    • Gasket (right)

    76000456

    76000455
    6

    • Clip (2)

    12200025
    7
    Wire retainer, adhesive back (2)
    69200342
    8
    Cable strap (2)
    10065
    9
    Wire harness, tweeter/midrange speaker
    69200925

    Wiring Diagram Information

    Wire Color Codes

    For Solid Color Wires: See Connector/Wiring Diagram Symbols (Typical) . The alpha code identifies wire color.

    For Striped Wires: The code is written with a slash (/) between the solid color code and the stripe code. For example, a trace labeled GN/Y is a green wire with a yellow stripe.

    Wiring Diagram Symbols

    See Connector/Wiring Diagram Symbols (Typical) . Brackets [] indicate connector numbers. The letter inside the brackets identifies whether the housing is a socket or pin housing.

    A=Pin: The letter A and the pin symbol after a connector number identifies the pin side of the terminal connectors.

    B=Socket: The letter B and the socket symbol after a connector number identifies the socket side of the terminal connectors. Other symbols found on the wiring diagrams include the following:

    Diode: The diode allows current flow in one direction only in a circuit.

    Wire break: The wire breaks are used to show option variances or page breaks.

    No Connection: Two wires crossing over each other in a wiring diagram that are shown with no splice indicating they are not connected together.

    Circuit to/from: This symbol indicates a complete circuit diagram on another page. The symbol is also identifying the direction of current flow.

    Splice: Splices are where two or more wires are connected together along a wiring diagram. The indication of a splice only indicates that wires are spliced to that circuit. It is not the true location of the splice in the wiring harness.

    Ground: Grounds can be classified as either clean or dirty grounds. Clean grounds are identified by a (BK/GN) wire and are normally used for sensors or modules.

    NOTE

    Clean grounds usually do not have electric motors, coils or anything that may cause electrical interference on the ground circuit.

    Dirty grounds are identified by a (BK) wire and are used for components that are not as sensitive to electrical interference.

    Twisted pair: This symbol indicates that the two wires are twisted together in the harness. This minimizes the circuit's electromagnetic interference from external sources. If repairs are necessary to these wires, they should remain as twisted wires.


    1 Connector number
    2 Terminal code (A=pin, B=socket)
    3 Solid wire color
    4 Striped wire color
    5 Socket symbol
    6 Pin symbol
    7 Diode
    8 Wire break
    9 No connection
    10 Circuit to/from
    11 Splice
    12 Ground
    13 Twisted pair

    Figure 5. Connector/Wiring Diagram Symbols

    Table 2. Wire Color Codes

    ALPHA CODE
    WIRE COLOR
    BE
    Blue
    BK
    Black
    BN
    Brown
    GN
    Green
    GY
    Gray
    LBE
    Light Blue
    LGN
    Light Green
    O
    Orange
    PK
    Pink
    R
    Red
    TN
    Tan
    V
    Violet
    W
    White
    Y
    Yellow


    1 Tweeter midrange [313B]
    2 Left side tweeter midrange connector [LH]
    3 Right side tweeter midrange connector [RH]

    Figure 6. Tweeter Midrange Fairing Wire Harness
    Nuff Said," Were Burnin Daylight, Lets Ride"(Sober 37 years)
    Current ride : 2021 FREEWHEELER M8, oldest ride 1960 FL

  3. #3
    99500 + Posts
    Gold Club Member
    rhino 2's Avatar
    Join Date
    Oct 2011
    Location
    Utopia New Jersey USA..
    Posts
    99,842

    Default

    Welcome to Trike-Talk Bill.........I think Jack has you coved....

    Let us know how you made out on your upgrade...........
    Sometimes a Cigar is Just a Cigar.....
    2019 Tri-Glide.......

  4. #4
    Senior Moderator
    Gold Club Member
    Gorilla's Avatar
    Join Date
    Oct 2008
    Location
    Key Largo. Fl,. USA
    Posts
    15,131

    Default

    welcome aboard moving thread to Tri Glide forum this one is for posting problems.
    Stallion #406 // 2013 Tri-Glide

  5. #5
    5+ Posts
    Join Date
    Mar 2018
    Location
    Yorkville, IL. 60554
    Posts
    5

    Default Audio rebuild

    Thanks for the reply, how ever I am not using any "Harley" parts for this audio build. I was looking for instructions on "how to remove the faring, speakers etc from a Triglide" I did my own work on my Ultra two wheeler but then the whole system wasn't like it is with the new Harley set up?

    This is a neat site.

    Bill

    Harley's way of updating a stereo

    There are several cautions

    BOOM! AUDIO STAGE II FAIRING SPEAKER KIT (FLTR)

    J060162016-06-28

    GENERAL

    Dealer installation is recommended.

    Kit Number

    76000594A

    Models

    For model fitment information, see the P&A retail catalog or the Parts and Accessories section of www.harley-davidson.com (English only).

    Installation Requirements

    Amplifier Kit (part number 76000523).

    FLTRUSE models only: Separate purchase of harness (part number 69200489) and harness interconnect (part number 69200714) is required.

    Loctite® 243 Threadlocker and Sealant - Blue (Part No. 99642-97).

    NOTE

    DO NOT mix Stage I and Stage II speakers on the same vehicle.

    These speakers are for use ONLY on 2014 and later Harley-Davidson audio systems. Using these speakers on 2006-2013 Harley-Davidson audio systems WILL permanently damage these speakers. Using these speakers on 2005 or earlier Harley-Davidson audio systems WILL permanently damage those systems.

    NOTICE

    Radio EQ MUST be updated by a Harley-Davidson dealer BEFORE operating the audio system. Operating the audio system prior to radio EQ update will IMMEDIATELY damage the speakers. (00645d)

    Radio EQ update using the Digital Technician® II diagnostic tool is:

    • Recommended before speaker INSTALLATION
    • Required before audio system OPERATION.
    • Only available through authorized Harley-Davidson dealers.


    WARNING

    Rider and passenger safety depend upon the correct installation of this kit. Use the appropriate service manual procedures. If the procedure is not within your capabilities or you do not have the correct tools, have a Harley-Davidson dealer perform the installation. Improper installation of this kit could result in death or serious injury. (00333b)

    NOTE

    This instruction sheet refers to service manual information. A service manual for this year/model motorcycle is required for this installation. One is available from a Harley-Davidson dealer.

    Electrical Overload

    WARNING

    When installing any electrical accessory, be certain not to exceed the maximum amperage rating of the fuse or circuit breaker protecting the affected circuit being modified. Exceeding the maximum amperage can lead to electrical failures, which could result in death or serious injury. (00310a)

    NOTICE

    It is possible to overload your vehicle's charging system by adding too many electrical accessories. If the combined electrical accessories operating at any one time consume more electrical current than the vehicle's charging system can produce, the electrical consumption can discharge the battery and cause damage to the vehicle's electrical system. See an authorized Harley-Davidson dealer for advice about the amount of current consumed by additional electrical accessories or for necessary wiring changes. (00211c)

    The purchase of this kit entitles you to a specially developed sound equalization software that is used with the Advanced Audio System. This unique equalization was designed to optimize the performance and sound response of the BOOM! Audio fairing lower speakers. If this kit is not installed by a Harley-Davidson dealer, this special equalization software is available without charge from any dealer through Digital Technician II. Dealer labor rates may apply for the upgrade procedure.

    This amplifier requires up to 8 amps more current from the electrical system.

    Kit Contents

    See Figure 4 and Table 1.

    PREPARATION

    WARNING

    To prevent accidental vehicle start-up, which could cause death or serious injury, remove main fuse before proceeding. (00251b)

    1. See the service manual. Remove main fuse.


    REMOVAL

    1. Remove windshield. Remove outer fairing. See the service manual.
    2. Remove the fairing speaker grille assemblies. See the service manual.
    3. Remove the fairing speakers.

      1. Remove four screws securing speaker to enclosure.
      2. Hold speaker away from enclosure. Disconnect wires. Remove speaker.
      3. Repeat on opposite side.
      4. Discard speakers.


    INSTALLATION

    1. See Figure 1. Attach the speaker harness connectors (1) inside the speaker enclosure (2) to the spade terminals on the back of the woofer (3). Different size spade contacts prevent improper assembly.
    2. Position the speaker over the opening in the speaker enclosure.

    NOTE

    The letters "A" and "B" stamped on the outer rim (6) of the speaker.

    • For the left speaker, rotate so the letter "B" is at the bottom.
    • For the right speaker, rotate so the letter "A" is at the bottom.

    3. Position the midrange speaker mounting assembly (4) over the woofer. Rotate the midrange assembly to align the mounting holes with the woofer. Position the wires at the top of the midrange mounting ring.
    4. Fasten the woofer and midrange speakers to the enclosure with four screws (5). Tighten to 1.6–2.3 N·m (14.2–20.4 in-lbs).


    1 Speaker harness connector (2)
    2 Speaker enclosure (2)
    3 Speaker assembly, midrange/woofer (2)
    4 Midrange mounting assembly (2)
    5 Stamped letters
    6 Screw (8)

    Figure 1. Woofer Speaker Installation

    NOTE

    • The tweeter/speaker grille assemblies are side-specific. The right grille has the text "BOOM! AUDIO STAGE II" to the right of the tweeter housing. The left grille has no text.
    • To ease the midrange to tweeter lead connection in Step 5a, slide back the jacket over the female terminal. Connect the terminals. Slide the jacket forward over the connected terminals.


    1. See Figure 2. Install grille assembly (1):

      1. Connect the two individual leads from the midrange speaker to the tweeter leads on the speaker grille.
      2. Verify that the rubber gasket (2) is in place around the perimeter of the grille. Check that the two clips (3) are in place on the grille tabs (4). Replace components if damaged or missing.
      3. Insert the tweeter wiring and connector into the space between the upper inboard corner of the inner fairing speaker opening and the speaker housing.
      4. Engage tab (4) into the outboard side of the speaker opening.
      5. Engage the grille retainer clips in the slots (5).
      6. Push on the grille in each retainer area until an audible click is heard.
      7. Repeat on the opposite side.


    1 Grille assembly (2)
    2 Gasket
    3 Clip (4)
    4 Tabs
    5 Slot
    6 EQ update label (2)
    7 Harness
    8 Tweeter/Midrange speaker assembly (2)

    Figure 2. Speaker Tweeter/Midrange and Grille

    1. FLTRUSE models: Install rear speaker interconnect harness (part number 69200714) and rear speaker jumper harness (part number 69200489), each purchased separately. The rear jumper harness connects the rear speakers to the fairing amplifier.

      1. Locate the rear audio [162] beneath the passenger backrest and disconnect [162].
      2. Connect [162A] and [162B] to the mating connectors on the rear speaker interconnect harness.
      3. Connect the four-way [162A] on the rear speaker jumper harness to the four-way [162D] on the interconnect harness.
      4. Use a cap to plug the unused four-way [162C] on the interconnect harness.
      5. Route the rear speaker jumper harness [162B] along the wiring caddy to the fairing amplifier. Becoming connection [313] for FLTRUSE model fairings.


    2. See Figure 2. ALL models: Position harness (7) inside inner fairing.
    3. All models except FLTRUSE:Connect the four-way Molex socket connector [313B] of the Y-harness into the amplifier harness rear speaker output socket [313]. FLTRUSE models:Connect the four-way Molex socket connector [313B] of the Y-harness into the amplifier harness rear speaker output socket [162B].


    • The Y-harness connectors are labeled "RH" or "LH" (right side or left side as viewed from the rider position). Or, match the wire colors of the Y-harness to the speaker wire colors. Route each leg of the harness to the correct speaker.


    1. Plug the connectors into each speaker.


    WARNING

    Be sure that steering is smooth and free without interference. Interference with steering could result in loss of vehicle control and death or serious injury. (00371a)

    • Make sure that wires, harnesses or lines do not pull tight when handlebars are turned fully to left or right fork stops.


    1. Verify that steering is smooth and clear from stop to stop.


    1 Left fairing speaker
    2 Left fairing speaker
    3 Amplifier, fairing (purchased separately)
    4 Tweeter midrange [313]
    5 16-way rear audio [162]
    6 Interconnect, CVO only, (part number 6920714)
    7 Jumper, CVO only, (part number 6920489)

    Figure 3. Fairing Speakers, Amplifier and Approximate Connection Locations

    COMPLETION

    NOTE

    To prevent possible damage to the sound system, verify that the ignition is OFF before installing the main fuse.

    NOTICE

    Radio EQ MUST be updated by a Harley-Davidson dealer BEFORE operating the audio system. Operating the audio system prior to radio EQ update will IMMEDIATELY damage the speakers. (00645d)

    1. See the service manual. Install main fuse.
    2. Have a Harley-Davidson dealer update the radio EQ using Digital Technician II.
    3. Turn the ignition ON, but do not start the motorcycle.
    4. Refer to the BOOM! BOX INFOTAINMENT SYSTEM section of the owner's manual. Turn the radio ON. Make sure that all speakers are working and front/rear fader function is operating correctly. If not, check speaker wiring. Understand that buzzing, squeaks and rattles could be heard until outer fairing is installed.
    5. See the service manual. Install outer fairing. Install windshield.


    IN USE

    Avoid direct contact with speaker grilles by a pressure washer. Damage to speakers can result.

    SERVICE PARTS


    Figure 4. Service Parts, BOOM! Audio Stage II Fairing Speaker Kit (FLTR)

    Table 1. Service Parts

    Item
    Description (Quantity)
    Part Number
    1
    Speaker assembly (woofer), fairing (2)
    76000525
    2
    Speaker assembly, midrange (2)
    76000606
    3
    Screw (8)
    10200376
    4
    Tweeter/speaker grille assembly (left) (includes items 5-6)

    Tweeter/speaker grille assembly (right) (includes items 5-6)
    76000595

    76000596
    5

    • Gasket (left)
    • Gasket (right)

    76000456

    76000455
    6

    • Clip (2)

    12200025
    7
    Wire retainer, adhesive back (2)
    69200342
    8
    Cable strap (2)
    10065
    9
    Wire harness, tweeter/midrange speaker
    69200925

    Wiring Diagram Information

    Wire Color Codes

    For Solid Color Wires: See Connector/Wiring Diagram Symbols (Typical) . The alpha code identifies wire color.

    For Striped Wires: The code is written with a slash (/) between the solid color code and the stripe code. For example, a trace labeled GN/Y is a green wire with a yellow stripe.

    Wiring Diagram Symbols

    See Connector/Wiring Diagram Symbols (Typical) . Brackets [] indicate connector numbers. The letter inside the brackets identifies whether the housing is a socket or pin housing.

    A=Pin: The letter A and the pin symbol after a connector number identifies the pin side of the terminal connectors.

    B=Socket: The letter B and the socket symbol after a connector number identifies the socket side of the terminal connectors. Other symbols found on the wiring diagrams include the following:

    Diode: The diode allows current flow in one direction only in a circuit.

    Wire break: The wire breaks are used to show option variances or page breaks.

    No Connection: Two wires crossing over each other in a wiring diagram that are shown with no splice indicating they are not connected together.

    Circuit to/from: This symbol indicates a complete circuit diagram on another page. The symbol is also identifying the direction of current flow.

    Splice: Splices are where two or more wires are connected together along a wiring diagram. The indication of a splice only indicates that wires are spliced to that circuit. It is not the true location of the splice in the wiring harness.

    Ground: Grounds can be classified as either clean or dirty grounds. Clean grounds are identified by a (BK/GN) wire and are normally used for sensors or modules.

    NOTE

    Clean grounds usually do not have electric motors, coils or anything that may cause electrical interference on the ground circuit.

    Dirty grounds are identified by a (BK) wire and are used for components that are not as sensitive to electrical interference.

    Twisted pair: This symbol indicates that the two wires are twisted together in the harness. This minimizes the circuit's electromagnetic interference from external sources. If repairs are necessary to these wires, they should remain as twisted wires.


    1 Connector number
    2 Terminal code (A=pin, B=socket)
    3 Solid wire color
    4 Striped wire color
    5 Socket symbol
    6 Pin symbol
    7 Diode
    8 Wire break
    9 No connection
    10 Circuit to/from
    11 Splice
    12 Ground
    13 Twisted pair

    Figure 5. Connector/Wiring Diagram Symbols

    Table 2. Wire Color Codes

    ALPHA CODE
    WIRE COLOR
    BE
    Blue
    BK
    Black
    BN
    Brown
    GN
    Green
    GY
    Gray
    LBE
    Light Blue
    LGN
    Light Green
    O
    Orange
    PK
    Pink
    R
    Red
    TN
    Tan
    V
    Violet
    W
    White
    Y
    Yellow


    1 Tweeter midrange [313B]
    2 Left side tweeter midrange connector [LH]
    3 Right side tweeter midrange connector [RH]

    Figure 6. Tweeter Midrange Fairing Wire Harness[/QUOTE]

  6. DKCustoms postbit
  7. #6
    18000+ Posts
    Tech Contributor
    Gold Club Member
    Jack Klarich's Avatar
    Join Date
    Oct 2016
    Location
    Jax, Fla USA
    Posts
    18,254

    Default

    Try here, this is a Sreetglide

    You fairing should come apart similar

    https://www.lawabidingbiker.com/harleybatwingfairing/
    Nuff Said," Were Burnin Daylight, Lets Ride"(Sober 37 years)
    Current ride : 2021 FREEWHEELER M8, oldest ride 1960 FL

Similar Threads

  1. Audio Problem
    By Benchman in forum Honda Trikes
    Replies: 4
    Last Post: 09-10-2017, 08:20 AM
  2. audio
    By Dragon in forum Stallion Trikes
    Replies: 6
    Last Post: 02-01-2015, 10:42 AM
  3. audio speakers?
    By sonny8l3 in forum General Discussion
    Replies: 3
    Last Post: 11-24-2014, 08:46 PM
  4. Tri-Glide Audio
    By roadrageisfun in forum Harley Tri Glide
    Replies: 5
    Last Post: 02-14-2012, 06:45 PM
  5. Fork extension and upgrade info needed ...
    By flyer91 in forum Honda Trikes
    Replies: 17
    Last Post: 10-07-2011, 02:14 AM

Posting Permissions

  • You may not post new threads
  • You may not post replies
  • You may not post attachments
  • You may not edit your posts
  •