Wow ... very impressive.
Navigation
Install the app
How to install the app on iOS
Follow along with the video below to see how to install our site as a web app on your home screen.
Note: This feature may not be available in some browsers.
More options
You are using an out of date browser. It may not display this or other websites correctly.
You should upgrade or use an alternative browser.
You should upgrade or use an alternative browser.
4th generation of my trike
- Thread starter irondad01
- Start date
irondad01
150+ Posts
- Thread starter
- #82
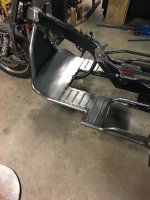
I worked on the storage lid today. I bent the edges over then bead rolled it then bent the sides to 90*. A little weld in the corners and it was done. I have to modify the hinges I had made for the old body to work on this one.
Bending the edges over.
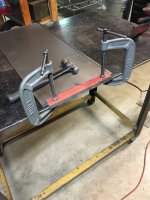
And all done but the little welding.
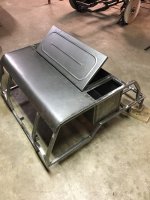
I also got the rear panels cut and half welded on.
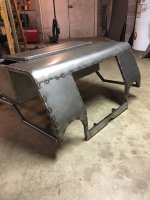
I ordered my fenders on Weds. night from a place in Ramona, CA. They came today. I'm guessing they were shipped from an East coast warehouse. Now I'll be able to work on the sides.
Bending the edges over.

And all done but the little welding.

I also got the rear panels cut and half welded on.

I ordered my fenders on Weds. night from a place in Ramona, CA. They came today. I'm guessing they were shipped from an East coast warehouse. Now I'll be able to work on the sides.
irondad01
150+ Posts
- Thread starter
- #83
I got a fender about where it will be to start figuring the mounting points. It's 5" above the tire. There's only 4" of travel before it hits the bump stops so I should be good. I guess I could leave the fenders long so it looks like those tail draggn' bikes at Sturgis. I don't think I'll do that.
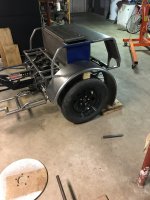
The ends of the box won't be able to be painted once the sides are welded on. They will be hidden so I just threw on some paint I had hanging around to stop any rust.
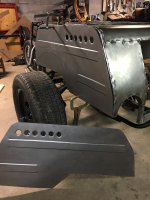
I also cut out the sides and put the ridges on them like the kubelwagen has. I put six 1" holes in for air flow and dimpled them. It's kind of nerve racking because if you mess up there's no way to save it. You start with a new piece of steel.
Next up is a bunch of welding.

The ends of the box won't be able to be painted once the sides are welded on. They will be hidden so I just threw on some paint I had hanging around to stop any rust.

I also cut out the sides and put the ridges on them like the kubelwagen has. I put six 1" holes in for air flow and dimpled them. It's kind of nerve racking because if you mess up there's no way to save it. You start with a new piece of steel.
Next up is a bunch of welding.
You do some nice metal work.
irondad01
150+ Posts
- Thread starter
- #86
Thanks, I enjoy working with metal. A few years ago I was doing another project and built this English wheel.
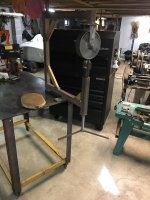
It's basically a big C clamp. I went Tractor Supply and got a big caster wheel and a three point hitch ball and put it together. That's a leather bag with lead shot in it that I sewed together. You beat on the metal on the bag to start a compound curve. It ends up with walnut shaped bumps on it. You roll the metal between the rollers and it smooths every thing out.
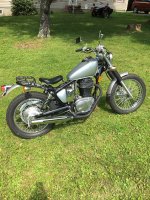
I made the fenders for this bike and the front fender for the trike when it was white. I did a lot of other mods. on this bike too.

It's basically a big C clamp. I went Tractor Supply and got a big caster wheel and a three point hitch ball and put it together. That's a leather bag with lead shot in it that I sewed together. You beat on the metal on the bag to start a compound curve. It ends up with walnut shaped bumps on it. You roll the metal between the rollers and it smooths every thing out.

I made the fenders for this bike and the front fender for the trike when it was white. I did a lot of other mods. on this bike too.
irondad01
150+ Posts
- Thread starter
- #87
I had a failure yesterday. I had a piece of aluminum that I tried to make the sides for my passenger seat out of. I cut them out and then bent them. They cracked. I guess I shouldn't have tried to bend them cold.
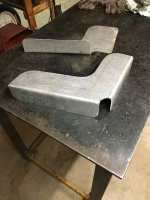
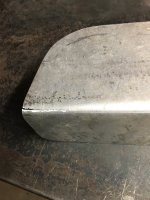
I can't weld aluminum so I have to come up with a new plan. Another mistake I made, and I know better, is I scored the aluminum with a scribe. That gives it a spot to crack. A bigger radius on the bend would have helped too.
Oh well, there's always plan B.


I can't weld aluminum so I have to come up with a new plan. Another mistake I made, and I know better, is I scored the aluminum with a scribe. That gives it a spot to crack. A bigger radius on the bend would have helped too.
Oh well, there's always plan B.
peteg59
Meme Master
Trying hard not to sound like I'm playing Armchair Quarterback here and not sure what your plan "B" is but, if you have time and material to do over, okay.
But why not just bring them to someone who can weld aluminum? The weld(s) can be ground and buffed out to where they're not noticeable, and the time needed to do over could be spent on another part on your trike...:Shrug:
But why not just bring them to someone who can weld aluminum? The weld(s) can be ground and buffed out to where they're not noticeable, and the time needed to do over could be spent on another part on your trike...:Shrug:
What grade of aluminum sheet did you use?
6061 dont bend well.
5052 does pretty good.
3003 is more malleable.
6061 dont bend well.
5052 does pretty good.
3003 is more malleable.
irondad01
150+ Posts
- Thread starter
- #91
I have no idea what aluminum it is. It's a piece that someone gave me that was in my scrap so no big loss. It has some numbers on it I can just barely see. Alcoa QQ-A-250/5 .125". It might be hard for someone to weld if they don't know what it is. I guess I should stick to the old saying " Build it stout out of stuff you know about."
irondad01
150+ Posts
- Thread starter
- #92
Round 2 went a lot better. I went to a surplus place near here and they had random pieces of aluminum plate and deck plate. I bought 2 pieces of the plate. I think it is the same aluminum as the deck plate and you can bend that pretty easy.
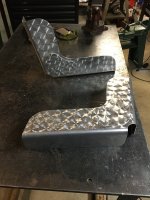
I cut it, bent it, then I figured it was going to get scratched so I pre-scratched it with a sanding disc in my drill press. It matches my switch panel and the belt guard. I riveted the little extra piece on the sides for looks and to add a bit of strength.
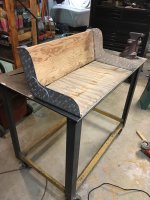
I cut out some plywood. The seat will be 30" wide. I have to make some mounting brackets and get it upholstered to match the front seat.

I cut it, bent it, then I figured it was going to get scratched so I pre-scratched it with a sanding disc in my drill press. It matches my switch panel and the belt guard. I riveted the little extra piece on the sides for looks and to add a bit of strength.

I cut out some plywood. The seat will be 30" wide. I have to make some mounting brackets and get it upholstered to match the front seat.
Zammy
20500+ Posts
You're moving right along Carl, quite the skill set you have.
You're moving right along Carl, quite the skill set you have.
+1
irondad01
150+ Posts
- Thread starter
- #96
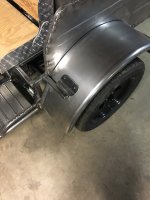
I got the fenders trimmed to size and welded the mounts in place.
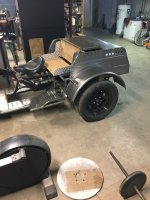
This is how I decided to do the mounts. the fenders will be bolted to the body in a couple of places too. Because it's military looking I left the mounts exposed. On another type of bike I would have tried to hide them some.
I'm getting close to having all the fabrication work done. I still have to finish some body patches and do the seat mounts. I have some hinges to make for the engine hood and modify the hinges for the storage lid. Probably some other small stuff and then it's lots of clean-up and prep for paint. I don't know how I'll do the painting in the basement without fumigating myself.

This is how I decided to do the mounts. the fenders will be bolted to the body in a couple of places too. Because it's military looking I left the mounts exposed. On another type of bike I would have tried to hide them some.

I'm getting close to having all the fabrication work done. I still have to finish some body patches and do the seat mounts. I have some hinges to make for the engine hood and modify the hinges for the storage lid. Probably some other small stuff and then it's lots of clean-up and prep for paint. I don't know how I'll do the painting in the basement without fumigating myself.
I got the fenders trimmed to size and welded the mounts in place.
View attachment 80361
This is how I decided to do the mounts. the fenders will be bolted to the body in a couple of places too. Because it's military looking I left the mounts exposed. On another type of bike I would have tried to hide them some.
View attachment 80362
I'm getting close to having all the fabrication work done. I still have to finish some body patches and do the seat mounts. I have some hinges to make for the engine hood and modify the hinges for the storage lid. Probably some other small stuff and then it's lots of clean-up and prep for paint. I don't know how I'll do the painting in the basement without fumigating myself.
You could build a plastic "tent" area and get a tyvek suit with a respirator. There's a place here in town you can rent a respirator for use in spray painting. The tent might be unnecessary if you don't mind it being the same color as your trike ...
- Moderator
- #98
Taking shape looken good
:clapping::wave4:
It is so nice when all does come together. Just love watching it come together and all your handy work in action.Yes here in NV, wind blows to much for a outside paint job unless it is small or you like sandy grit type finish, okay at least in my area, LOL.I seen the neighbor do a paint tent, he used some 2x2 wood and then paint drop cloths to cover it, yes the wend did it in a few days later.Next was he used a canopy frame, actually a couple of them, anchored them to the ground and covered them, and all did work well for what he was doing.I remember the day when a friend worked for a auto paint shop, it seemed many of us got weekend paint jobs at his work place, a different time that I miss.I do not paint, maybe I can spray some, a little by hand, but not any real paint job. The best to you and your efforts and Happy Holidays to All!
Welcome to the Trike Talk Community
Join our vibrant online community dedicated to all things Trikes! Whether you're a seasoned rider or just starting out, this is the place to share experiences, tips, and stories about your three-wheeled adventures. Explore modifications, maintenance advice, and rides, all while connecting with fellow trike enthusiasts from around the globe
Forum statistics
Trike Talk Community
Welcome to a community dedicated to the most diverse and fastest growing powersports segment, Motorcycle Trikes. Come join the discussion about the best makes and models, popular modifications and proven performance hacks, trike touring and travel, maintenance, meetups and more!
Register Already a member? LoginForum statistics


