150 Most Recent Posts

Thread AuthorPostersPost AuthorForumThread/Post Link
TomyJ16TomyJHome Built TrikesRebel RT
scaldedchevy2scaldedchevyLehman Trike2004 Gold Wing Lehman Monarch 2 Sho...
AriNV13Jack KlarichNew Member Introduct...New to trike
steelpony55553Jack KlarichDetailingCeramic coating
AriNV3Jack KlarichRider Safety Discuss...Maybe silly but serious question, s...
JTJersey4Jack KlarichHarley Freewheeler /...Removing Trim Around Oil Cooler
AriNV3AriNVRider Safety Discuss...Maybe silly but serious question, s...
AriNV3cycle7447Rider Safety Discuss...Maybe silly but serious question, s...
AriNV3AriNVRider Safety Discuss...Maybe silly but serious question, s...
steelpony55553AriNVDetailingCeramic coating
AriNV13AriNVNew Member Introduct...New to trike
JTJersey4Old Road DogHarley Freewheeler /...Removing Trim Around Oil Cooler
paid4c49VulcanscottHonda TrikesService for differential on a Motor...
DK Custom Products362New Orleans KevinHarley Tri GlideWhat did you do to Your Tri-Glide T...
AriNV13Pegasus1300New Member Introduct...New to trike
Jarhead17752GorillaHarley Freewheeler /...paint job
New Orleans Kevin5New Orleans KevinHarley Tri Glide2021 114 Triglide Stage 2 Feuling 4...
TomyJ8Jack KlarichSidecar ForumHackHer
JTJersey4Jack KlarichHarley Freewheeler /...Removing Trim Around Oil Cooler
AriNV4Jack KlarichCan Am Spyder Trike...I'm a total newbie ... Is the Spyde...
ISP-FL2ISP-FLThe Knife EnthusiestBenchmade Warranty
woody13Rmitchell55Maggie Valley Gather...Maggie Valley 2024
New Orleans Kevin5ISP-FLHarley Tri Glide2021 114 Triglide Stage 2 Feuling 4...
woody13Marc HMaggie Valley Gather...Maggie Valley 2024
woody13PosseRiderMaggie Valley Gather...Maggie Valley 2024
ctdair7ctdairHarley Tri GlideHot Rotors After New Pads
New Orleans Kevin5NotgrownupHarley Tri Glide2021 114 Triglide Stage 2 Feuling 4...
New Orleans Kevin5PanheadSteveHarley Tri Glide2021 114 Triglide Stage 2 Feuling 4...
Donnimac3DonnimacHonda TrikesLehman Monarch II
ken g9rhino 2Harley Tri Glidereverse not working
New Orleans Kevin5New Orleans KevinHarley Tri Glide2021 114 Triglide Stage 2 Feuling 4...
ken g9520fdHarley Tri Glidereverse not working
520fd1520fdFor Sale & WTB C...FS: Trike Mid-Step
JTJersey4JTJerseyHarley Freewheeler /...Removing Trim Around Oil Cooler
JTJersey4rhino 2Harley Freewheeler /...Removing Trim Around Oil Cooler
myhonda614TGHarley Tri GlideKuryakyn filler pad
JTJersey4JTJerseyHarley Freewheeler /...Removing Trim Around Oil Cooler
ken g9ken gHarley Tri Glidereverse not working
JTJersey4rhino 2Harley Freewheeler /...Removing Trim Around Oil Cooler
JTJersey4JTJerseyHarley Freewheeler /...Removing Trim Around Oil Cooler
myhonda6Rogue1Harley Tri GlideKuryakyn filler pad
myhonda614TGHarley Tri GlideKuryakyn filler pad
AriNV4AriNVCan Am Spyder Trike...I'm a total newbie ... Is the Spyde...
TFNC12AriNVNew Member Introduct...Just saying hello
Jarhead17752Jarhead1775Harley Freewheeler /...paint job
AriNV13AriNVNew Member Introduct...New to trike
myhonda6Rogue1Harley Tri GlideKuryakyn filler pad
woody13woodyMaggie Valley Gather...Maggie Valley 2024
myhonda6NotgrownupHarley Tri GlideKuryakyn filler pad
New Orleans Kevin5NotgrownupHarley Tri Glide2021 114 Triglide Stage 2 Feuling 4...
Donnimac3MickHonda TrikesLehman Monarch II
Gernerwa9trike ladyNew Member Introduct...New Member from Bellingham, WA
myhonda6Rmitchell55Harley Tri GlideKuryakyn filler pad
Gernerwa9GorillaNew Member Introduct...New Member from Bellingham, WA
Yannick24GorillaVW Powered TrikesWil-Mac trike kit
woody13Marc HMaggie Valley Gather...Maggie Valley 2024
Donnimac3GorillaHonda TrikesLehman Monarch II
Gernerwa9rhino 2New Member Introduct...New Member from Bellingham, WA
Gernerwa9Marc HNew Member Introduct...New Member from Bellingham, WA
Gernerwa9Uncle FesterNew Member Introduct...New Member from Bellingham, WA
MDO100ZammyHarley Freewheeler /...What Did You Do To Your Freewheeler...
Gernerwa9ZammyNew Member Introduct...New Member from Bellingham, WA
AriNV13Phu CatNew Member Introduct...New to trike
New Orleans Kevin5New Orleans KevinHarley Tri Glide2021 114 Triglide Stage 2 Feuling 4...
Jjhooker22DeathBySnuSnuVW Powered TrikesSide shifter assembly for 1980 WilM...
Rodnok12ol' schoolNew Member Introduct...Hello Honda Trike owners!
AriNV13ol' schoolNew Member Introduct...New to trike
TFNC12ol' schoolNew Member Introduct...Just saying hello
AriNV13hardwickbvNew Member Introduct...New to trike
whiskeyneat10ol' schoolNew Member Introduct...Howdy"
Gernerwa9hardwickbvNew Member Introduct...New Member from Bellingham, WA
Gernerwa9ol' schoolNew Member Introduct...New Member from Bellingham, WA
scaldedchevy2MickLehman Trike2004 Gold Wing Lehman Monarch 2 Sho...
Jjhooker22Jjhooker2VW Powered TrikesSide shifter assembly for 1980 WilM...
Jack Klarich2TomyJTires, Wheels, Brake...Motorcycle Tire Reference
New Orleans Kevin5JTJerseyHarley Tri Glide2021 114 Triglide Stage 2 Feuling 4...
Jjhooker22DeathBySnuSnuVW Powered TrikesSide shifter assembly for 1980 WilM...
Gernerwa9GernerwaNew Member Introduct...New Member from Bellingham, WA
New Orleans Kevin5New Orleans KevinHarley Tri Glide2021 114 Triglide Stage 2 Feuling 4...
scaldedchevy2scaldedchevyLehman Trike2004 Gold Wing Lehman Monarch 2 Sho...
scaldedchevy2MickLehman Trike2004 Gold Wing Lehman Monarch 2 Sho...
ken g9OLBLUHarley Tri Glidereverse not working
Jjhooker22Jjhooker2VW Powered TrikesSide shifter assembly for 1980 WilM...
Yannick24Jjhooker2VW Powered TrikesWil-Mac trike kit
myhonda6SeaweedHarley Tri GlideKuryakyn filler pad
Donnimac3DonnimacHonda TrikesLehman Monarch II
ken g9rhino 2Harley Tri Glidereverse not working
BigN692GorillaEnabled TrikersFull length floorboards
woody13Marc HMaggie Valley Gather...Maggie Valley 2024
14TG514TGHarley Tri GlideInstalled Genuine HD Armrest kit
B SMITH9rhino 2Harley Tri GlideTrailering Tri Glide
B SMITH9CasperHarley Tri GlideTrailering Tri Glide
Seaweed6DCR2013Harley Tri GlideLower Fairing Vents
myhonda6myhondaHarley Tri GlideKuryakyn filler pad
14TG5SeaweedHarley Tri GlideInstalled Genuine HD Armrest kit
Seaweed6SeaweedHarley Tri GlideLower Fairing Vents
14TG5TrampasHarley Tri GlideInstalled Genuine HD Armrest kit
scaldedchevy2scaldedchevyLehman Trike2004 Gold Wing Lehman Monarch 2 Sho...
14TG5Papa ZookHarley Tri GlideInstalled Genuine HD Armrest kit
14TG514TGHarley Tri GlideInstalled Genuine HD Armrest kit
BigN692BigN69Enabled TrikersFull length floorboards
TomyJ8TomyJSidecar ForumHackHer
Sully11cScjhbBBQ, Grilling, Cooki...One Has To Go ???
MDO1001dn5upHarley Freewheeler /...What Did You Do To Your Freewheeler...
Seaweed6DK Custom ProductsHarley Tri GlideLower Fairing Vents
14TG5New Orleans KevinHarley Tri GlideInstalled Genuine HD Armrest kit
MDO100Noodles107Harley Freewheeler /...What Did You Do To Your Freewheeler...
msocko354SullyBBQ, Grilling, Cooki...A Little Outdoor Cooking
Papa Zook1451dn5upThe Gun EnthusiastGun Owners
woody13Smitty901Maggie Valley Gather...Maggie Valley 2024
14TG514TGHarley Tri GlideInstalled Genuine HD Armrest kit
Wingrider554BurnerboyRoadsmith Trikes
...
Speed Bleeders
woody13Motorcycle MikeMaggie Valley Gather...Maggie Valley 2024
Papa Zook145ZammyThe Gun EnthusiastGun Owners
woody13jjvwMaggie Valley Gather...Maggie Valley 2024
Seaweed6David792Harley Tri GlideLower Fairing Vents
Seaweed6SeaweedHarley Tri GlideLower Fairing Vents
Sunman7SunmanHarley Freewheeler /...Value of 2015 Freewheeler
Seaweed6SeaweedHarley Tri GlideLower Fairing Vents
Seaweed6OLBLUHarley Tri GlideLower Fairing Vents
Seaweed6SeaweedHarley Tri GlideLower Fairing Vents
AriNV2AriNVOther Rallies & ...Any Nevada trikers' association
woody13PosseRiderMaggie Valley Gather...Maggie Valley 2024
AriNV2evermillOther Rallies & ...Any Nevada trikers' association
AriNV13AriNVNew Member Introduct...New to trike
Papa Zook96SullyBBQ, Grilling, Cooki...Whats for supper?
AriNV131dn5upNew Member Introduct...New to trike
AriNV13SullyNew Member Introduct...New to trike
Burnerboy4BurnerboyRoadsmith Trikes
...
Too Pa Pa Zook
Burnerboy4BurnerboyRoadsmith Trikes
...
Too Pa Pa Zook
Grandpot9Jack KlarichHonda TrikesFront tire?
DK Custom Products3621dn5upHarley Tri GlideWhat did you do to Your Tri-Glide T...
Sully11woodyBBQ, Grilling, Cooki...One Has To Go ???
DK Custom Products362Jack KlarichHarley Tri GlideWhat did you do to Your Tri-Glide T...
AriNV4AriNVCan Am Spyder Trike...I'm a total newbie ... Is the Spyde...
AriNV13AriNVNew Member Introduct...New to trike
Sully11Ol' Man JebBBQ, Grilling, Cooki...One Has To Go ???
ken g9Old Road DogHarley Tri Glidereverse not working
DK Custom Products3621dn5upHarley Tri GlideWhat did you do to Your Tri-Glide T...
AriNV13trike ladyNew Member Introduct...New to trike
AriNV13GorillaNew Member Introduct...New to trike
AriNV4GorillaCan Am Spyder Trike...I'm a total newbie ... Is the Spyde...
Grandpot9Papa ZookHonda TrikesFront tire?
Likes Likes:  6
Thanks Thanks:  2
Results 1 to 15 of 15

Thread: "C" CLAMP USE

  1. #1
    90+ Posts
    Join Date
    Jun 2018
    Location
    Forney, Texas, USA
    Posts
    95
    Thanks
    0
    Thanked 0 Times in 0 Posts

    Default "C" CLAMP USE

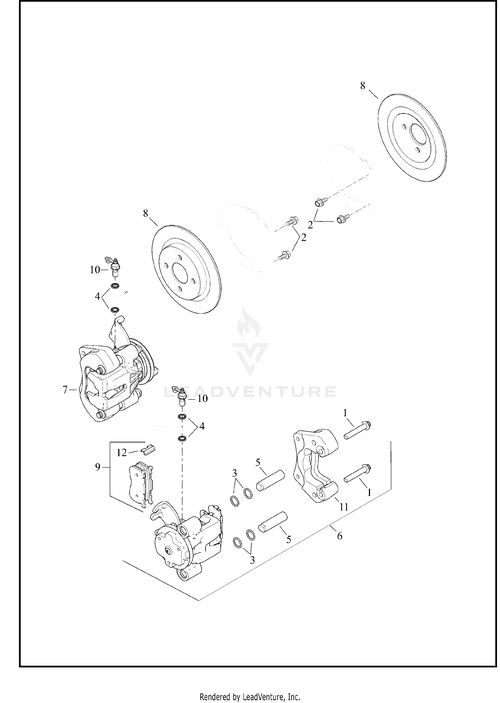
    On my 2014 Tri-Glide, I am having a difficult time getting the left rear wheel caliper piston to recess and seat inside its caliper housing. As mentioned to me in an earlier inquiry, I do not see two (2) holes or indentions in the piston's front facing surface area, so I don't think the piston has to be first turned "clock-wise" to recess into the caliper housing. In turn, as a possibility, I am considering the use of a "C" clamp to recess and seat the rear caliper piston. Has anyone used a "C" clamp to recess/seat the rear wheel caliper piston(s) when replacing their Trike's disc rotor(s) and brake pads or is the use of a "C" clamp a definite "NO-NO". I would appreciate and look forward to receiving your responses. Thank you, Allen S.

  2. #2
    18000+ Posts
    Tech Contributor
    Gold Club Member
    Jack Klarich's Avatar
    Join Date
    Oct 2016
    Location
    Jax, Fla USA
    Posts
    18,240
    Thanks
    0
    Thanked 1 Time in 1 Post

    Default

    I have used a large channel lock pliers as well as a c clamp

    put 1 old pad against the piston to push against, and a small block of wood @ the back side of the caliper if you are concerned about scratches
    Nuff Said," Were Burnin Daylight, Lets Ride"(Sober 37 years)
    Current ride : 2021 FREEWHEELER M8, oldest ride 1960 FL

  3. #3
    99500 + Posts
    Gold Club Member
    rhino 2's Avatar
    Join Date
    Oct 2011
    Location
    Utopia New Jersey USA..
    Posts
    99,784
    Thanks
    0
    Thanked 1 Time in 1 Post

    Default

    Quote Originally Posted by Jack Klarich View Post
    I have used a large channel lock pliers as well as a c clamp

    put 1 old pad against the piston to push against, and a small block of wood @ the back side of the caliper if you are concerned about scratches
    Yep.. i’ve done it that way many of time👍… but another hint to make it easier to push them back take the cover off of the brake reservoir. Make sure you have some rags around it when you push the pistons back in some fluid might come up but that’ll take the pressure off the pistons..
    Sometimes a Cigar is Just a Cigar.....
    2019 Tri-Glide.......

  4. #4
    90+ Posts
    Join Date
    Jun 2018
    Location
    Forney, Texas, USA
    Posts
    95
    Thanks
    0
    Thanked 0 Times in 0 Posts

    Default

    Jack,

    At this point (Trike raised, new disc rotor/new brake pads installed), would any additional "slackening" of the emergency brake cable help?

    Also, I am assuming some Harley caliper pistons have the two (2) small holes/indentions and some do not. I cannot find "piston holes/indentions" or "turning piston clockwise" mentioned in the 2014 Trike Service Supplement manual. I have looked for Internet pictures of these type of caliper pistons. The only pictures I have found of a caliper piston (IE: car, motorcycle, etc...) having two indentions (not round holes), the two (2) indentions are cut in a rectangular shape on the outside edges of the piston directly across from each other. Is this what I should be looking for? Also, will the caliper piston recess all the way back into the caliper housing creating a flat surface area inside the caliper housing?

    I am a little hesitant (as mentioned by my brother-in law) about using a "C" clamp. Is it possible the "C" clamp, with used brake pad covering the piston, could damage the caliper piston or some other part if too much pressure is applied to the piston?

    I will be looking forward to your response.

    Thank you,

    Allen S.

  5. #5
    18000+ Posts
    Tech Contributor
    Gold Club Member
    Jack Klarich's Avatar
    Join Date
    Oct 2016
    Location
    Jax, Fla USA
    Posts
    18,240
    Thanks
    0
    Thanked 1 Time in 1 Post

    Default

    More slack on the e brake will help, if you use an old pad against the piston you will be OK, it will push equally on the piston, you should not have to use brute force to push the piston in, if it does not move we need to find out why

    If your pistons are totally flat faced with no indents 180 degrees from each other the pistons should push in provided the E brake actuator is not binding, you can check that by trying to move it forward and back, does the piston move in and back out easy

    Keep in mind the piston does not have to travel far in to be seated, you should be able to tell by how much force you are applying also by the look of the piston and outer boot

    When using a C clamp make sure the back side does not come in contact with the parking brake actuator, protect it

    I am confused by the first part of your post, do you in fact already have the new pads installed with the rotors?
    Nuff Said," Were Burnin Daylight, Lets Ride"(Sober 37 years)
    Current ride : 2021 FREEWHEELER M8, oldest ride 1960 FL

  6. DKCustoms postbit
  7. #6
    18000+ Posts
    Tech Contributor
    Gold Club Member
    Jack Klarich's Avatar
    Join Date
    Oct 2016
    Location
    Jax, Fla USA
    Posts
    18,240
    Thanks
    0
    Thanked 1 Time in 1 Post

    Default

    # 7 is your caliper? You see the bellcrank where the E Brake cable attaches, that must move freely for the piston to move in, slacken the cable, you should see the crank move opposite direction to take the tension off the piston, you can check this by tugging on the cable @ the bell crank it should move the lever

    Nuff Said," Were Burnin Daylight, Lets Ride"(Sober 37 years)
    Current ride : 2021 FREEWHEELER M8, oldest ride 1960 FL

  8. #7
    100+ Posts
    Join Date
    Jun 2022
    Location
    South Carolina
    Posts
    106
    Thanks
    0
    Thanked 0 Times in 0 Posts

    Default

    I have one of these el cheapo tools, it is also useful for splitting M8 crankcases.

    https://www.amazon.com/Acymner-Insta...%2C107&sr=8-56
    US Navy Veteran
    Airframe and Powerplant Mechanic 43 years
    1989 FLSTC
    2019 FLHT
    2022 Tri Glide

  9. #8
    90+ Posts
    Join Date
    Jun 2018
    Location
    Forney, Texas, USA
    Posts
    95
    Thanks
    0
    Thanked 0 Times in 0 Posts

    Default

    Jack,

    Yes, I removed the two (2) bolt disc mounting bracket, removed the old disc rotor, installed the new disc rotor over the four (4) wheel lugs, and reinstalled the disc mounting bracket with the new disc rotor fitting inside the disc mounting bracket grooves. Then, I inserted the new brake pads inside the disc mounting bracket's brake pad top/bottom channel grooves (one pad on the backside/one pad on front side of the new disc rotor) secured by the new pad spring inserted inside between the top brake pad channel groove and brake pads. This installation is correct? Right? Thanks, Allen S.

    Quote Originally Posted by Jack Klarich View Post
    More slack on the e brake will help, if you use an old pad against the piston you will be OK, it will push equally on the piston, you should not have to use brute force to push the piston in, if it does not move we need to find out why

    If your pistons are totally flat faced with no indents 180 degrees from each other the pistons should push in provided the E brake actuator is not binding, you can check that by trying to move it forward and back, does the piston move in and back out easy

    Keep in mind the piston does not have to travel far in to be seated, you should be able to tell by how much force you are applying also by the look of the piston and outer boot

    When using a C clamp make sure the back side does not come in contact with the parking brake actuator, protect it

    I am confused by the first part of your post, do you in fact already have the new pads installed with the rotors?

  10. #9
    18000+ Posts
    Tech Contributor
    Gold Club Member
    Jack Klarich's Avatar
    Join Date
    Oct 2016
    Location
    Jax, Fla USA
    Posts
    18,240
    Thanks
    0
    Thanked 1 Time in 1 Post

    Default

    Quote Originally Posted by keikat2 View Post
    Jack,

    Yes, I removed the two (2) bolt disc mounting bracket, removed the old disc rotor, installed the new disc rotor over the four (4) wheel lugs, and reinstalled the disc mounting bracket with the new disc rotor fitting inside the disc mounting bracket grooves. Then, I inserted the new brake pads inside the disc mounting bracket's brake pad top/bottom channel grooves (one pad on the backside/one pad on front side of the new disc rotor) secured by the new pad spring inserted inside between the top brake pad channel groove and brake pads. This installation is correct? Right? Thanks, Allen S.
    Yes, when I put a floating rotor on I use a spacer on 1 of the lug studs and nut to keep the rotor square while installing the caliper, it helps keep things in their natural plane

    Nuff Said," Were Burnin Daylight, Lets Ride"(Sober 37 years)
    Current ride : 2021 FREEWHEELER M8, oldest ride 1960 FL

  11. #10
    90+ Posts
    Join Date
    Jun 2018
    Location
    Forney, Texas, USA
    Posts
    95
    Thanks
    0
    Thanked 0 Times in 0 Posts

    Default

    O.K. Jack, as advised, I screwed the emergency brake cable's locking nut and long cylinder screw as far forward to the front of the trike as I could. Then I went back over to the left rear caliper housing and turned, what I hope, was the round "bellcrank" having the white brake cable installed in its channel. The "bellcrank" turned freely for about a quarter to almost half a full turn and, when released, it snapped back to its starting position. Was this correct? Thanks, Allen S.

    Yes, I removed the two (2) bolt disc mounting bracket, removed the old disc rotor, installed the new disc rotor over the four (4) wheel lugs, and reinstalled the disc mounting bracket with the new disc rotor fitting inside the disc mounting bracket grooves. Then, I inserted the new brake pads inside the disc mounting bracket's brake pad top/bottom channel grooves (one pad on the backside/one pad on front side of the new disc rotor) secured by the new pad spring inserted inside between the top brake pad channel groove and brake pads. This installation is correct? Right? Thanks, Allen S.[/QUOTE]

  12. #11
    18000+ Posts
    Tech Contributor
    Gold Club Member
    Jack Klarich's Avatar
    Join Date
    Oct 2016
    Location
    Jax, Fla USA
    Posts
    18,240
    Thanks
    0
    Thanked 1 Time in 1 Post

    Default

    Yes, you are good to go
    Nuff Said," Were Burnin Daylight, Lets Ride"(Sober 37 years)
    Current ride : 2021 FREEWHEELER M8, oldest ride 1960 FL

  13. #12
    90+ Posts
    Join Date
    Jun 2018
    Location
    Forney, Texas, USA
    Posts
    95
    Thanks
    0
    Thanked 0 Times in 0 Posts

    Default

    Jack, as you suggested, I put one of the wheel lugs back on and screwed it up against the new disc rotor to keep it in place. Then, I turned the "bellcrank" wheel and the white e-brake cable moved up and away from the "bellcrank" channel. In turn, I pulled on the white cable to loosen it up more. Then, I removed the rear brake master cylinder reservoir cap and used a "wood-working" clamp, similar to a "C" clamp, with front/rear rubber end pieces and was able to move the caliper piston in just enough so the caliper housing would slide up onto the disc mounting bracket around the new inside/outside brake pads. YEAH!!!!! I wanted to let all the responders know.

    Next, I will use the white grease lube to coat the bushing o-rings, pin bushing inner channels and the pin bushing surfaces themselves and install them. After that I will start on the Trikes right side caliper and perform the same processes. Then, I can bleed both front calipers' rear pistons and finally the two (2) rear caliper pistons adding brake fluid as needed and reinstall the rear tires. Lastly, I will tighten back up the emergency brake cable. If I face any new challenges on the rear right side I cannot figure out, I will get back in touch with you.

    I would like to say a special "Thank You" to all the responders. I do not believe I would have figured it out without all your help, written assistance, and instruction. Best of luck to all of you in the future. Allen S.

  14. #13
    18000+ Posts
    Tech Contributor
    Gold Club Member
    Jack Klarich's Avatar
    Join Date
    Oct 2016
    Location
    Jax, Fla USA
    Posts
    18,240
    Thanks
    0
    Thanked 1 Time in 1 Post

    Default

    Good deal, adjust the E brake first to hold 2-4 clicks down, release and bleed the rear brakes

    You can slight crack both bleeders open and let it gravity bleed, then close them, pump the brakes to seat the pistons, use slow 1/2 pumps til firm pedal, re bleed each rear caliper a bit more til you see no air bubbles present

    Using the slow pump of brakes insures no air bubbles, 1/2 pumps insures not scoring the master cylinder by over extending the piston cup

    You have it under control now, I will catch up here later, I am going for my afternoon ride
    Nuff Said," Were Burnin Daylight, Lets Ride"(Sober 37 years)
    Current ride : 2021 FREEWHEELER M8, oldest ride 1960 FL

  15. #14
    90+ Posts
    Join Date
    Jun 2018
    Location
    Forney, Texas, USA
    Posts
    95
    Thanks
    0
    Thanked 0 Times in 0 Posts

    Default

    Jack,

    First of all, a special "Thank You" for all your responses, written instruction, and helpful "tips", especially the one about the bell-cranks needing to turn freely, to allow the rear caliper pistons to recess. Also, last evening, I advanced back the emergency brake's long cylinder screw (emergency brake pedal lowered to first click, felt resistance, followed by lowering pedal to 4th click and rear wheel would not turn) and secured the cylinder screw in position with the locking nut.

    This morning, I am going to start the rear brake bleeding process. However, before opening the rear left/right bleeder valves, don't I have to first bleed the front calipers' rear brake bleeder valves?

    I will be following your instructions to, (1). "Slightly crack both bleeders open and let them gravity bleed and then close them. (2). Pump the rear brakes to seat the pistons using "slow" 1/2 pumps until firm pedal. (3). Re-bleed each rear caliper a bit more until you see no air bubbles present. (4). The slow pump of brakes ensures no air bubbles plus 1/2 pumps ensure not scoring the master cylinder by over-extending the piston cup".


    I will let you know how everything turns out. Once again, "thank you" for all your help.

    Allen S.

  16. #15
    18000+ Posts
    Tech Contributor
    Gold Club Member
    Jack Klarich's Avatar
    Join Date
    Oct 2016
    Location
    Jax, Fla USA
    Posts
    18,240
    Thanks
    0
    Thanked 1 Time in 1 Post

    Default

    Quote Originally Posted by keikat2 View Post
    Jack,

    First of all, a special "Thank You" for all your responses, written instruction, and helpful "tips", especially the one about the bell-cranks needing to turn freely, to allow the rear caliper pistons to recess. Also, last evening, I advanced back the emergency brake's long cylinder screw (emergency brake pedal lowered to first click, felt resistance, followed by lowering pedal to 4th click and rear wheel would not turn) and secured the cylinder screw in position with the locking nut.

    This morning, I am going to start the rear brake bleeding process. However, before opening the rear left/right bleeder valves, don't I have to first bleed the front calipers' rear brake bleeder valves?

    I will be following your instructions to, (1). "Slightly crack both bleeders open and let them gravity bleed and then close them. (2). Pump the rear brakes to seat the pistons using "slow" 1/2 pumps until firm pedal. (3). Re-bleed each rear caliper a bit more until you see no air bubbles present. (4). The slow pump of brakes ensures no air bubbles plus 1/2 pumps ensure not scoring the master cylinder by over-extending the piston cup".


    I will let you know how everything turns out. Once again, "thank you" for all your help.

    Allen S.
    Yes, sounds like you got this done good

    I will check your thread later today, best of luck, glad to help

    Front- left

    Front-right

    ------------------------------

    If you continue to do rear brakes :

    Front - left (lower bleeder)

    Front - right (lower bleeder)

    Rear left

    Rear right
    Nuff Said," Were Burnin Daylight, Lets Ride"(Sober 37 years)
    Current ride : 2021 FREEWHEELER M8, oldest ride 1960 FL

  17. DKCustoms postbit

Similar Threads

  1. "F" "L" "R" "T" ????
    By Noodles107 in forum Harley Freewheeler / Road Glide 3
    Replies: 13
    Last Post: 02-23-2023, 04:37 PM
  2. ***DK Custom-Blacked-Out Highway Peg Mounting Kit - Hinged Clamp & Clevis***
    By DK Custom Products in forum DK Custom Products
    Replies: 2
    Last Post: 01-30-2019, 03:37 PM
  3. Replies: 5
    Last Post: 10-02-2018, 04:42 PM
  4. Muffler Clamp Question.
    By Quietrider in forum Harley Tri Glide
    Replies: 5
    Last Post: 08-31-2017, 07:26 PM
  5. oil cooler OEM spring clamp worn-out
    By eagle1 in forum Harley Trike Conversions
    Replies: 1
    Last Post: 10-04-2012, 04:12 PM

Posting Permissions

  • You may not post new threads
  • You may not post replies
  • You may not post attachments
  • You may not edit your posts
  •