What did you do to Your Tri-Glide Today?

Finished the install on the Oil Crank and Cool. Went well posted in that thread about it.

Right after I got don with putting tools away, Don came by and was a little disappointed I had finished it. Me too, he's got smaller hands and he likes the ground.

I told him I still have the rocker lockers to do, he was excir=ted about that. I went into the house to get the kit. He started on the tank removal, 3/4 full of fuel :AGGHH:

I put my phone down when I was looking for where I put the rocker lockers, and left it in the house, so I didn't get any pics of the install. Pretty straight forward, but, tight in time spots. With both of us, took right at two hours. Lots of manual reading and head scratching, but, not that tough. The little teflon thingie worked pretty well, I can see where it would be tougher without it.

To be honest, I'm not sure it's much quieter. I'm a little deaf, so the radio is usually up pretty high :AGGHH:. Don said he thought the "ticking" might be a tad less, but, didn't think it was bad to begin with. My 14 Ultra Limited was a big "ticker". So no, it has not become Gold Wing, but, for a Harley, it's pretty quiet and when you get on it, not that I ever do that (Angel), it's got a Deep rumble.
 
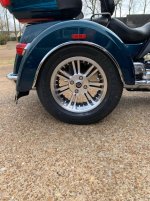
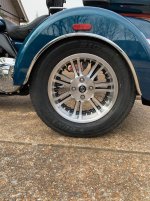
RJS Originals polished wheel discs

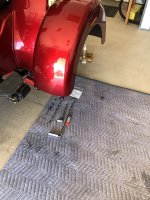
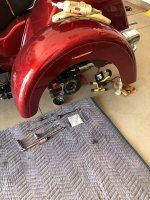
So today I installed the wheel discs I've had for a couple months. Just waiting for that new knee to cooperate so I could get down on the floor . . . and then get back up, lol. I did and it was no problem.
 

Attachments

  • IMG_0256.jpg
    IMG_0256.jpg
    563.7 KB · Views: 159
  • IMG_0257.jpg
    IMG_0257.jpg
    634.9 KB · Views: 151
So today I installed the wheel discs I've had for a couple months. Just waiting for that new knee to cooperate so I could get down on the floor . . . and then get back up, lol. I did and it was no problem.

They look great were did you get them ? Thanks
 
Attack Mode

That Cut-off is truly a unique road. Looking forward to hearing how you like it with the new set-up.

Kevin

It was a spectacular day today. Sunny and 72 degrees. Perfect for a test of my new suspension on one of the most fun roads ever built.

When I put the new bars on I gained about 10 MPH through the curves on the Cut-off. The shocks just added another 5 plus they smoothed out many of the undulations in the road surface.

There is one major issue I have that only $$$ can cure as a result of the new rear suspension. It has made me very aware of what a piss poor front suspension I have. Time to research what I will need to match front and rear.

I believe the Texas Hill Country and I are going to become fast friends.

Kurt

P.S. I really need to video the Cut-off in full attack mode soon and link it for all to see.
TALK TO GEORGE AT PRO ACTION HE HAS THE ANSWER I have had this discussion with him Fred
 
I'm not sure why sometimes the pictures end up half cocked, or why it bugs me ... LOL ... but hope this helps with the sore necks.

IMG_0256.jpg

IMG_0257.jpg

Okay ... now that I've earned my keep ... LOL ... those look awesome. Might just have to get me a set. Be interested to see if it helps keep the wheels cleaner. The McKey's wheel sealer has helped a lot, but, brake dust still ruins the look, even if it comes off easier at the car wash.
 
Weirdest Thing

Last night was Bible Study night. As a creature of habit, I did my "night out". Went to Village Inn for dinner and some pre study reading. When I left there I past the HD dealer on the way to the Study. The Fat Bottom Girl just pulled into the shop and to the end where the parts counter is. Hmmmmm ... wonder what she's telling me???

Like most women, she just wanted some bling (just kidding gals, be nice). So, I did order her the chrome water pump cover. I've always thought that would look good and would be easier to get road grime off than the mat black thing that it comes with. When I did the cooler install, I was shocked how much oil had run down there and now was covered in dirt and bugs. The chrome one will still get bugs and dirt in there, but, with the filter relocated, oil won't. I'm gonna put the ceramic stuff on it before I swap it out.

My dealer has taken to not stocking accessories. I'm not sure why. I think it's probably driven by the corporate office, but, it's nuts. You used to go to the Dealer on a day in March like yesterday (64* and sunny) and see lots of folks wandering around the displays with "stuff" in their hands. Yesterday, I was the only person who didn't work there in the whole place ... kind of scary.
 
I'm not sure why sometimes the pictures end up half cocked, or why it bugs me ... LOL ... but hope this helps with the sore necks.

View attachment 84178

View attachment 84179

Okay ... now that I've earned my keep ... LOL ... those look awesome. Might just have to get me a set. Be interested to see if it helps keep the wheels cleaner. The McKey's wheel sealer has helped a lot, but, brake dust still ruins the look, even if it comes off easier at the car wash.

Thanks for fixing the photos Alan.
icon14.png
Now if you can explain to me how to do it I sure would appreciate it.
icon7.png
 
Last night was Bible Study night. As a creature of habit, I did my "night out". Went to Village Inn for dinner and some pre study reading. When I left there I past the HD dealer on the way to the Study. The Fat Bottom Girl just pulled into the shop and to the end where the parts counter is. Hmmmmm ... wonder what she's telling me???

Like most women, she just wanted some bling (just kidding gals, be nice). So, I did order her the chrome water pump cover. I've always thought that would look good and would be easier to get road grime off than the mat black thing that it comes with. When I did the cooler install, I was shocked how much oil had run down there and now was covered in dirt and bugs. The chrome one will still get bugs and dirt in there, but, with the filter relocated, oil won't. I'm gonna put the ceramic stuff on it before I swap it out.

My dealer has taken to not stocking accessories. I'm not sure why. I think it's probably driven by the corporate office, but, it's nuts. You used to go to the Dealer on a day in March like yesterday (64* and sunny) and see lots of folks wandering around the displays with "stuff" in their hands. Yesterday, I was the only person who didn't work there in the whole place ... kind of scary.

I know you'll post some photos after you get it installed. I think it'll add a nice touch. Unfortunately it only fits up to MY 2018 so I'm sol. :mad:
 
I know you'll post some photos after you get it installed. I think it'll add a nice touch. Unfortunately it only fits up to MY 2018 so I'm sol. :mad:

Apparently, they weren't a big seller. I kind of understand. I was gonna get on for my 15, but never did because the oil dribbles down to it when you change it, I don't care how careful you are. even if it doesn't get on the outside, it will get on the backside. I'd be willing to bet, anyone who takes their water pump cover off will find the backside of it with an oil film. I was shocked what was on the backside of mine. Several bugs, a couple twigs, and even a few feathers. Lots of dirt with all that, which got stuck there in the oil residue. I had planned to get pictures of the goop, but, when I discovered the issue with the cooler bracket, I just, slapped it back together and put everything away until that got resolved. When I get the Chrome one, I'll snatch some pictures of the residue. As well as, the new Chrome one mounted.

About the pictures, I have no idea how they get turned. It happened to me once, so I just turned the picture on it's side, even though it looked straight before I did. I uploaded it again and it posted straight :Shrug:. I have no clue why it worked. Over time, I have tried this method for other's pics, Sometimes I have to rotate them 90*, sometimes 180*. Sometimes when I download peoples pics to fix them, they download straight, and I have to rotate the straight one I downloaded to make it crooked to get it to post straight :Shrug:. In the case of your pics, they downloaded crooked, I rotated them straight and reposted them, and they posted straight.

I used to try to get them posted correctly in the person's post, but gave up on that, too many weird things happened, including once when I fixed one once and uploaded to the original post, I ended up with the original crooked one laying on it's right side, a crooked one laying on it's left side, and one that was straight. When I tried to delete the two that were crooked, I ended up with just the original one laying on it's right side ... really weird, kind of reminded me of a hall of mirrors ... maybe paws is right ... I live in my own twilight zone ... personally ... I think it's BBQ withdrawal. I'm not sure if technically it's part of my "moderator job" ... LOL (I'm still in training), but, I really get bugged by the crooked pics and it gives my brain something to concentrate on, if only for a little while.

I use the preview app on the Mac to rotate them. I'm guessing it's like a poor man's Photoshop.
 
I'm using a PC not a MAC so I don't know if I have 'preview' or not. I'm with you in not understanding why the photos 'turn.' They were fine on my iPhone then on my computer when I loaded them on it and even what I saw on the forum when I selected the photo. But after selecting 'upload' they turned???? Hard to figure what's going on. Thanks again.
icon14.png

Maybe try to resize ??? Some pics on here are so large . I try to resize all mine. By the way, my shocks were at 3. After talking to u I cranked up to 22 . Is that what u told me ??? Have not ridden at that setting yet
 
Maybe try to resize ??? Some pics on here are so large . I try to resize all mine. By the way, my shocks were at 3. After talking to u I cranked up to 22 . Is that what u told me ??? Have not ridden at that setting yet

I don’t recall that but I put mine at 25 which is about what the manual chart suggests for us two up. Horrible ride. Dialed it back to 14 and much much better. Will continue to play with different settings.
 
I don’t recall that but I put mine at 25 which is about what the manual chart suggests for us two up. Horrible ride. Dialed it back to 14 and much much better. Will continue to play with different settings.

Great , I will back it off to 14. Have not ridden it with the 22' only 43* ,so not real excited about getting out. Calling for snow showers tomorrow . If this keeps up we will trailer down to tx. Saved me a rough ride,Jerry. Thanks.
 
New DK additions

The DK Pro-Action Shocks and Bearing Retainer plates came last Monday (2nd) and Life got in the way until Thursday when I finally got started on R & R (remove and replace; not rest and recreation!). Up on the jack stands, off with the old shocks and on with the new. The OEM air shocks are 7 model years and 36K miles old. I don't recall any warnings about the OEM shocks, but when I tossed them on the floor after taking them off, they leaked oil out the air connection ports. Clean up time!

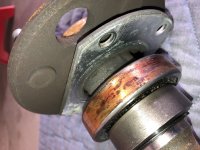
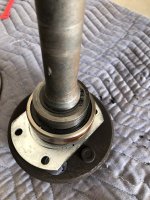
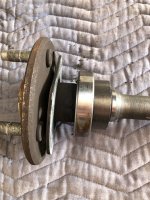
Shocks on, it was time to tackle the retainer plates. Gettin' late and time for dinner, gotta clean up. Tomorrow is another day.Friday came and bowling league started at 9:00, so pulling the axles delayed for later in the day. A certain aftermarket parts supplier, to be unnamed, sent the wrong rear axle bearings, so after bowling it was a hot shot run to Freedom H-D in N. Canton for the right ones. Only two dealers in the State of OH had the rear Triglide Bearings. Getting home, I pulled the axles.

IMG-2863.JPGIMG-2864.JPG

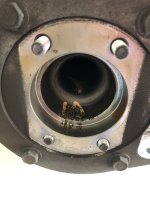
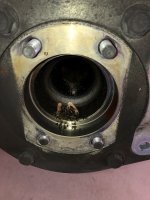
The "grit" at the bottom of the bearing seat appeared to be small asphalt particles. Could be something else, but it got cleaned out, just the same.

IMG-2865.JPGIMG-2867.JPGIMG-2868.JPG

Bearings had corrosion on them, the bearing plates were scarred and appeared to be bulged or warped.

IMG-2871.JPG

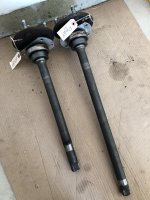
Axles, DK "Enhanced" Bearing Retainer Plates and all associated parts for the axle re-installation are at Driveline and Axle Service to have the bearings R & R'd. Get them back Monday (9th). Then, it's put it all back together and wait for the weather to quit precipitating next week for the new shocks to get thier first workout and evaluation.

As an aside to doing this mod, whenever I have to get on the floor and move from one side of the bike to another to get something done, I've gotten a "moving pad/blanket" from Harbor Freight. It gets laid out on the floor and all the necessary tools/parts, etc. get put on the pad. When I finish on one side, I just drag it around to the other. No picking up tools, parts, etc. They're all on the pad!

IMG-2872.JPGIMG-2873.JPG

Now, to finish up on Monday!
 
Paint Protection Film - PPF

On Thursday I took a little trip (310 miles) to Springfield, MO, to have paint protection film (PPF) installed on my 2020 TG. Yeah I know that's a long way to go to have this done but 1) I don't know anyone here locally I'm confident with to do this to my expectations and 2) the vendor for the film kit I selected is located there.

I chose this company to supply the film kit: www.HOGSKINSPaintProtection.com for several reasons. In addition to the 'standard' type kit with similar pieces to the H-D kit they offer a 'full kit' that includes film for the entire outer fairing, the fairing lowers. the gas tank area where it meets the seat and the tour-pak lid. I chose the full kit and had it installed by Michael at Glass Tint USA. Michael's family owns the store. Terry, the owner of Hog Skins worked with Glass Tint USA to develop the kits, researching areas that most need protection, taking careful measurements and making patterns for film sections so they fit correctly, etc., and the kits are cut there.

The kit is designed and sold for DIY installation and there are several very good videos on the Hog Skins website. I had installed the H-D kit on my 2018 TG and was comfortable in doing that but with the full kit I balked at doing the outer fairing and the fairing lowers and wanted a professional installation.

I talked to Terry several times before I made my decision. He is a wealth of information and was happy to answer all my questions and educate me about the product and the process. He does have some pre-selected and vetted installers in some locations but unfortunately none closer to me than where he is there in Springfield.

DISCLAIMER: I have no affiliation with nor financial involvement with either of these vendors. I'm posting this only because of my favorable experience and thinking it might be of value to fellow riders / owners.

Here is contact information: Terry Sicman, Hog Skins Paint Protection, 417-725-0555
 
Cool! Look forward to hearing how you like it.

Kevin

Had some family issues , finally got the stage 3 kit done Saturday, rode today put 65 miles on it ,tried to ride slow to break it in , I am happy so far plenty of power did one speed run it goes good . Im thinking of putting a power vision on with auto tune , there is no tune for this in the screaming eagle tuner for a 2020 tri glide with a stage 3 ?
 
Chrome Water Pump Cover

Finally my back has calmed down enough for me to get on the ground.

So, After putting 2 coats of ceramic sealer on it, I mounted it. You have to be a little more careful with this one, mainly because it doesn't have the flexibility the black plastic does.

Here it is close up

Closeup.jpg

This is it as if you where standing near it and just looked down

From Distance.jpg

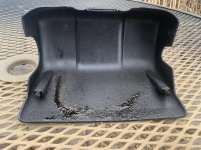
Remember I said there was lots of oil and goop inside the OEM cover. I didn't wipe it down when I did the cooler, just removed bugs and leaves.

Here's what it looked like with the big stuff removed. I think if I had the stock filter location, I'd add cleaning this after every oil change to the maintenance item.

2020-03-10 09.50.06.jpg

I'm letting it soak in the ZEP Citrous Cleaner, then I'll clean it up and store it incase I need it some day ... :D ... one of the few OEM removal parts I don't have in the "boxes".

Just for the record, I didn't get this for the bling, although I'm sure the Fat Bottom Girl appreciates it, I purchased this thing with the hope that chrome and ceramic will not hold onto the road grime as much.
 

Welcome to the Trike Talk Community

Join our vibrant online community dedicated to all things Trikes! Whether you're a seasoned rider or just starting out, this is the place to share experiences, tips, and stories about your three-wheeled adventures. Explore modifications, maintenance advice, and rides, all while connecting with fellow trike enthusiasts from around the globe

Forum statistics

Threads
55,544
Messages
901,988
Members
22,604
Latest member
stumphumper

Trike Talk Community

Welcome to a community dedicated to the most diverse and fastest growing powersports segment, Motorcycle Trikes. Come join the discussion about the best makes and models, popular modifications and proven performance hacks, trike touring and travel, maintenance, meetups and more!

Register Already a member? Login

Forum statistics

Threads
55,544
Messages
901,988
Members
22,604
Latest member
stumphumper
 photo 260e2760-d89e-45b2-8675-2bc26fb3d465.jpg

 photo Trike-Talk-150-x-200.gif

 photo DK Trike Talk Right side banner 19.jpg

Merziere Reverser

 photo 9796095c-0d4b-4a9b-88ed-efe4c498d084.png
 photo f9866e4e-75c5-471a-86f5-5e72a446ecc3.png
Back
Top