Did my 2015 almost the same. Secured the front wheel down to the floor, floor jacks (plural) at the normal jacking point and supported the rear at the bumper brackets. Didn't deal with the park brake bracket. I just loosened the lower shock mount bracket enough to get the bottom bolt out. Left side took almost an hour and a half. Knew what to do on the right side, 20 minutes. Have ridden only twice since but love there is no more bottoming out, even 2up, and sooooo much smoother on secondary roads where we ride the most. I put them in right out of the box. Was going to firm them up first but thought if they wanted all that info first, why not try it. Thank you DK Customs.
I laughed out loud when I read your post about the time it took to install the shocks. Just put the Bitumos on about a week ago and it was the same thing.
About one and a half hours for the first side and less than half an hour for the other side.
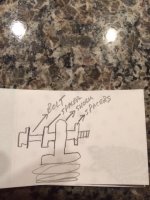
Bill G had a great tip about shortening the bolts.
They were tough as hell to get out because of the length.
")