2008 GL1800 headlight adjustment with R/S

camplejeune

New member
Apr 26, 2016
68
36
Monroe, NC , Union
Hello everyone, I just purchased a used 2008 GL 1800 with the R/S kit. The ride is awesome compared to my 2007 Suzuki c90 Lehman with the solid rear axle, I love this longer wheel base and IRS. My question for you all: can these headlights be mechanically adjusted upwards? Looking at the bike I see that with this kit and the 5.5 degree rake the front end is pointing low. Living in the country of NC I like my headlights to be a little higher than what they currently are with the headlights adjusted at their highest point. My adjuster does work so it is not the control. I was wondering if the headlight assembly can be shimmed at the bottom to raise the aim point giving me the ability to have adjustment as needed? Or is there an adjustment on the trike kit that lowers the rear?

Thanks,

Brian
 
Although I haven't taken the head lights apart, I would suspect that maybe adding a washer or something to the bottom mounting points would do the trick. I doubt it would take much of a "shim" to get them back to where the adjuster would actually be functional again, as opposed to just being set to raise the headlights to the highest point. I'd shoot to raise them enough to where your adjuster would be in the mid point when the trike is on level ground. That would give you back some adjustment for varying loads, two up, trunk loaded, etc.
 
Mechanical Adjustment

Yes, there is a mechanical adjustment. I had to do the same thing on mine.

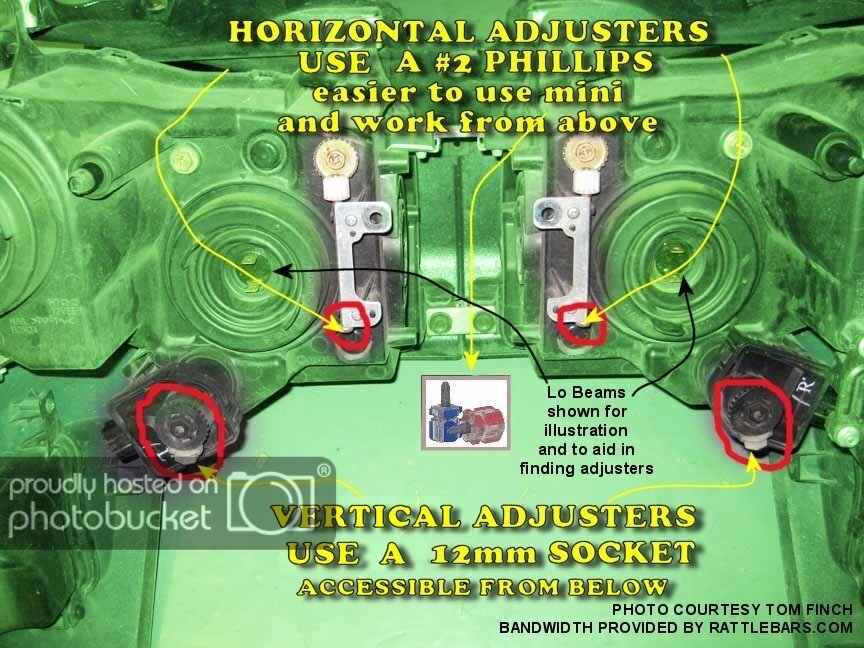
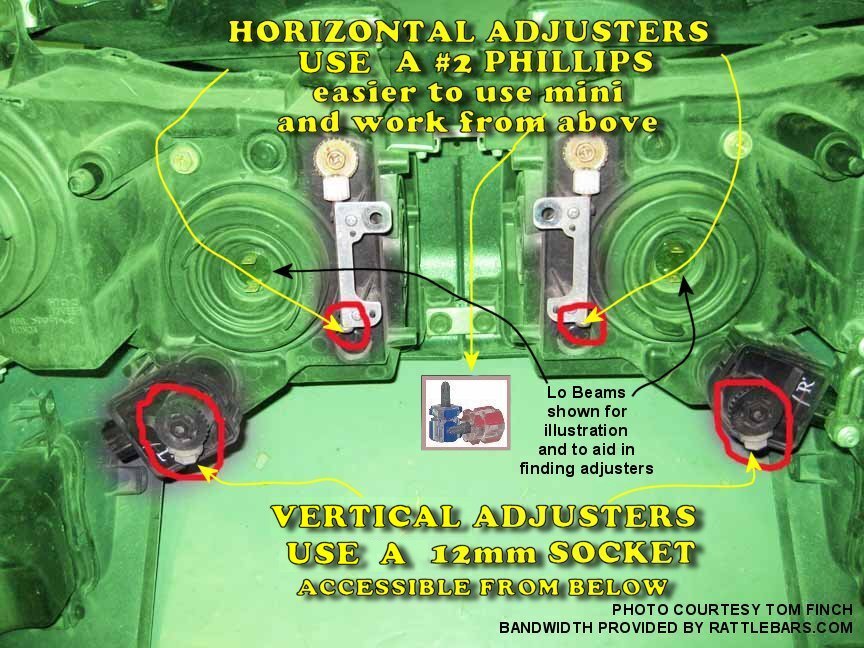
If you look up under the front cowling you will see two adjustments on each side. One for vertical and one for horizontal, don't remember which is which. One takes a phillips screwdriver the other is, I believe, a 10 or 12 mm socket. I use to have a picture of that, but can't find it.

Park the trike on a level surface, approximately 20 to 25 feet away from a wall, garage door, etc....

Measure the distance from the level surface to the center of your low-beam

Mark that measured distance on the wall

Place your headlight adjustment knob to the center position (on the console), notice where the low beam is shining.

Turn the horizontal and vertical manual adjustments (Under the front cowling) to place the low beam where it should be. I placed mine about two inches below the mark on the wall. (Note: I had to cover up the headlight I was not working on to see the one I was working on and when both were adjusted, made fine adjustments to line them up.

There is no separate adjustment for the high beam. It follows the low beam.

Hope this helps.
 
HEADLAMP AIM PROCEDURE


Proper headlamp aim is achieved by adjusting the upper(high) beams.

Bike needs to be on a level floor, standing upright, loaded as you normally ride. (re, 1up-you for most), with pre load set as you ride 1up, placed 25' from a wall to the headlamp lens in front of the upper beam. I would suggest the auto adjust dial be set in the middle position for this aiming.

Measure the distance from the floor up to the center of the upper beam bulbs. Mark this height on the wall and draw a horizontal line at this height.

Sight a point on the wall that is on the centerline of the bike. Draw a vertical line on the wall placed on this center line.

turn on the upper beams.

Cover one of the headlamps.

Use the manual adjusters accessed under the front of the fairing.

Adjust the vertical until the hot spot of the upper beam bulb is just under the horizontal line on the wall.

Adjust the horizontal until the upper beam hot spot is just to the right of the vertical line on the wall.

Cover the headlamp just completed, and repeat procedure on the other headlamp.

Make a small mark on the auto adjust panel so you can return to the 1up setting.

Now have both headlamps uncovered and have the usual passenger you carry sit on the bike w/you, set the preload for 2up, and dial in the auto adjust dial for proper aim and mark that position on the panel by the dial. You can repeat this for loaded 1up, loaded 2up, trailer, etc.

You get what you get for low beam aim depending on how good the headlamp design was to start with!
 
How do you get to those adjustments? I can't imagine you need to pull the whole nose? I just had mine mostly apart and couldn't get to those ... LOL

Hmmm ... maybe that's why the little piece in the middle bottom of the nose is there?
 
How do you get to those adjustments? I can't imagine you need to pull the whole nose? I just had mine mostly apart and couldn't get to those ... LOL

Hmmm ... maybe that's why the little piece in the middle bottom of the nose is there?

You access 2 of the manual adjusters behind and from underneath the fairing using a 12mm socket and 2 from above behind the fairing using a #2 phillips screw driver. You do not need to remove anything.

headlightadjusters.jpg
 

Welcome to the Trike Talk Community

Join our vibrant online community dedicated to all things Trikes! Whether you're a seasoned rider or just starting out, this is the place to share experiences, tips, and stories about your three-wheeled adventures. Explore modifications, maintenance advice, and rides, all while connecting with fellow trike enthusiasts from around the globe

Forum statistics

Threads
55,567
Messages
902,128
Members
22,546
Latest member
trvman

Trike Talk Community

Welcome to a community dedicated to the most diverse and fastest growing powersports segment, Motorcycle Trikes. Come join the discussion about the best makes and models, popular modifications and proven performance hacks, trike touring and travel, maintenance, meetups and more!

Register Already a member? Login

Forum statistics

Threads
55,567
Messages
902,128
Members
22,546
Latest member
trvman
 photo 260e2760-d89e-45b2-8675-2bc26fb3d465.jpg

 photo Trike-Talk-150-x-200.gif

 photo DK Trike Talk Right side banner 19.jpg

Merziere Reverser

 photo 9796095c-0d4b-4a9b-88ed-efe4c498d084.png
 photo f9866e4e-75c5-471a-86f5-5e72a446ecc3.png
Back
Top