Did You Know the Road King Passing lamp bars Fit

NJtony

New member
Oct 29, 2021
104
115
Manahawkin
Well , Kind of , The original plan was to rewire the Passing lamps and turn signal lights on the bar.

I bought a 2008 Road King Passing Lamp Bar from Marketplace to rebuild and use on the Freewheeler. I wanted to use the turn signal lights on the bar but, they hang down in front of the original turn signals and touch them. I did not want to take off the OEM lights because I am not sure if I could get a cover to hide the holes left by the lights. So , I decided to take off the turn signal lights on the bar and I am the process of fabricating flat pieces to cover the opening where the lights were.

There was a mod I had to make for the passing lamps: When I installed the passing lamps I noticed that the lamps had some movement, so I removed them and used Tacky Tape half way around the passing lamps behind the ring. This gave a good waterproof seal and the lamps were in tight.

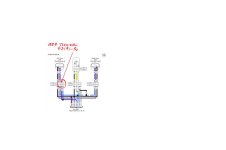
The wiring: I went to the Harley dealer and asked for the correct connector for the accessory plug under the tank, He gave me the part for one under the right side of the bike.

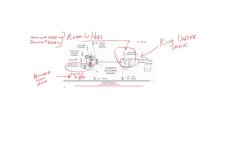
The correct place to install the wire for the passing lamps is on the left hand side of the bike by the fork , the bottom connector pin 5Passing lamp circuit.jpg (blue black stripe) there is also a hole for a switch in the back of the forks
 
The Passing lamps can be of the older (pre '14) touring mount style as well.

Also the pin you selected for your wiring, correct me if I am wrong, it only becomes active if in fact you install the switch assembly that is wired into the plug assembly 109A (White 4 socket connector with R/Y, BK & BE/GY colored wires) which is tucked up under the left side, front of the tank.. This then provides the signal to the BCM to activate pin #5 & 6 of the plug you are referring to.

IMG_2219.jpgPassing Lamps.jpgIMG-3815.jpg
 
Thank you I stand corrected

I am not sure if you need the switch to turn on the lamps. The blue black stripe is the power (not sure if it is hot only when the bike is on).The lamps I have only have 1 wire each from the lights. The lights have a ground in the bucket . They should only need the 12 VDC to turn the lamps on. (Last famous words) I do intend to install a switch for the passing lamps.

I did go to my dealer and asked for the plug under the tank and he gave the plug that goes on the right side cover (69201599A) . I have my heated grips plugged in there.

I will ask for the plug for 109A and see what happens. The parts dept. at the dealer said the pins are too long (7319-96) he cannot find the 109A plug , he is also telling me 18 gauge wire is not the correct size(IT IS) and that I may need 22 gauge wire for the lights.


I NEED TO FIND A DIFFERENT DEALER.
 
2017 wiring diagram

Lamps_1.jpgLamps_2.jpgLamps_3.jpg This is on a 2017 Freewheeler (check your year for the correct information) from what I can tell 31 LB is coming from the lamps in the front. It looks like 5 and 6 (both blue with black stripe) on 31 LA Front Lighting are tied together and go to the BCM. The blue / blk stripe also goes to 7A Rear Lighting and 312A (not specified) and to J3 ( Running light power) to the BCM I am going to a different dealer to ask about the circuit for the lamps(J3). I am aware the electronics are very sensitive, and I do not want to give the wrong information. I also want to check to see if the connector numbers are in fact the same as the dealers.
 
Went to a different Dealer

I went to a dealer a little closer to me , when I asked the first parts guy about the wiring he looked confused and got some one else. The second guy asked if I wanted the switch for the lights and asked if there was a hole for it. He was surprised to find there were two (on my bike anyway ) His wife has has a Freewheeler so he wanted to help. I ordered the switch and they told me to pull the tank off and and when I find the 109A plug to take a pictures and they will give me the correct plug and pins. I think he wanted to know so he can put a set on his wife's Freewheeler.

I have to ride a little more to use the 5 gallons I put in so I can remove the tank.

to be continued
 
Tony,

So you have the switch, that's awesome, but for them to tell you to go home and take your tank off and take a pic is pretty funny.

You may not need to take tank off. at the front of the left side of tank, the wire loom coming from under the tank has a wire that is looped back to under the tank. Pull gently forward on the wire that is looped back and you may be able to pull out connector # 109A it is a White 4 socket connector.


Here are diagrams and all of what you need.
 

Attachments

  • Light socket.jpg
    Light socket.jpg
    30.9 KB · Views: 124
  • Untitled1.jpg
    Untitled1.jpg
    20.7 KB · Views: 116
  • turn sig plug.jpg
    turn sig plug.jpg
    13 KB · Views: 90
  • Light schematic.jpg
    Light schematic.jpg
    52 KB · Views: 85
That was easy

The switch was from Harley 75122-08 was about $50 It is Keyed

the pin was from the turn Signals side pins

the install was simple

Install the switch and connect the plug 109A (no need to take the tank off)

connect the pin to the wire and put it in position 5 (blue gray stripe) on the left side bottom connection

Connect the wires from to passing lamps and the wire from Position 5 Then Test!!!! If all is well , replace the wire ties, you had to cut , tuck the wires from the switch, And get a beer for a job well done

Thank you Free Joe you made this simple for me

IMG_0838.jpgIMG_0840.jpgIMG_0841.jpgIMG_0844.jpgIMG_0845.jpgIMG_0846.jpg
 

Attachments

  • Light bar.zip
    601.5 KB · Views: 84
Glad all worked out my friend. Glad to help!

NJ, Is that part # 75122-08 the switch assembly that includes the lock nut, wire assembly and connector ? If so I need to ad that to my parts list. I was searching and searching for that.

Funny how many dealerships don’t know what can and can not be done to these, or many, of their brand bikes yet they are master technicians.

I guess they don’t teach them to read schematics and search parts…

Looks great. Enjoy the new lights!!
 
Passing Lamp switch

The switch came with the wires and the plug and the wires were in the correct locations with the lock nut. The pin connector is from the turn signal

It only took about 10 mins to do. The hardest thing was getting the switch in. (very tight and the switch is keyed and goes in one way) I bought the crimper you suggested . The wires were easy to be crimped

It is all about getting the correct parts and tools, the job will go easy. Again Thank you Joe.
 
Last edited:
Complete parts list

The switch was from Harley 75122-08 was about $50 It is Keyed

the pin was from the turn Signals side pins

the install was simple

Install the switch and connect the plug 109A (no need to take the tank off)


connect the pin to the wire and put it in position 5 (blue gray stripe) on the left side bottom connection

Connect the wires from to passing lamps and the wire from Position 5 Then Test!!!! If all is well , replace the wire ties, you had to cut , tuck the wires from the switch, And get a beer for a job well done

Thank you Free Joe you made this simple for me

View attachment 104957View attachment 104958View attachment 104959View attachment 104960View attachment 104961View attachment 104962

Could you give me a list of all the parts and Harley part numbers you used, looking forward to doing the

same when the weather gets a little cooler.
 
Parts used for Passing Lamps

1 Harley switch

75122-08

1 Wago with 2 or 3 connectors

1 piece of 18 Gauge wire about 8-12 inches

1 wire Connector pin for the 31LB (same connector pin that is from the turn signal light)

1 Light bar (I used LED lights for the passing lamps)

some Black tie wraps

the two wires from the passing lamps both connect to the18 gauge wire you put the pin on and connected to 31LB port 5 Blue- gray stripe (the top two are empty in the 31LA it is the bottom plug on the left side )

connect the switch to the 319A plug (look for a wire going back from the harness kind of under tucked barley under the tank )

Joe may have the number of the wire connector pins

Hope this helps Tony
 

Welcome to the Trike Talk Community

Join our vibrant online community dedicated to all things Trikes! Whether you're a seasoned rider or just starting out, this is the place to share experiences, tips, and stories about your three-wheeled adventures. Explore modifications, maintenance advice, and rides, all while connecting with fellow trike enthusiasts from around the globe

Forum statistics

Threads
55,566
Messages
901,923
Members
22,548
Latest member
PERuss

Trike Talk Community

Welcome to a community dedicated to the most diverse and fastest growing powersports segment, Motorcycle Trikes. Come join the discussion about the best makes and models, popular modifications and proven performance hacks, trike touring and travel, maintenance, meetups and more!

Register Already a member? Login

Forum statistics

Threads
55,566
Messages
901,923
Members
22,548
Latest member
PERuss
 photo 260e2760-d89e-45b2-8675-2bc26fb3d465.jpg

 photo Trike-Talk-150-x-200.gif

 photo DK Trike Talk Right side banner 19.jpg

Merziere Reverser

 photo 9796095c-0d4b-4a9b-88ed-efe4c498d084.png
 photo f9866e4e-75c5-471a-86f5-5e72a446ecc3.png
Back
Top