Land Rover Discovery 1 based Diesel Trike

Grump

New member
Mar 1, 2022
15
39
Wick, Caithness, Scotland
As promised in the new members section, here's my rather odd idea of turning an old and fairly knackered Discovery, with a 200tdi 2.5 litre diesel engine into a trike.....as far as I'm aware this hasn't been attempted before....mainly because it's a pretty ridiculous thing to try to achieve.

Here is a picture of the discovery before I started...

Disco1.jpg

As you can see it was in an amazing condition....or not :D

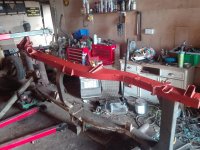
So I dragged it into my small Barn and ripped the body off of it...here's a pic of the wonderful chassis (frame)

Disco2.jpg

As you can see it's in need of a fair bit of work to even make the chassis usable.

The idea is to use the full rear axle and suspension setup, along with the original engine, gearbox and transfer box, all sitting in their original places on the chassis.

The front axle has been removed, and I will be attempting to build a leading link front end that includes one of the original front wheels/ hubs/ brakes from the Disco as well....this could prove tricky....I also intend to use as many other original Land Rover parts in some form or another, to build this beast up.

As it stands at the moment this trike is going to be just over 6 feet wide at the back, 15' 6" long and 4' high to the top of the engine....

Further details will be added later as I have some weird ideas for the controls etc that I'll need to sort out as I go....

I'll keep this thread updated, and, if you don't object to a bit of swearing and cussing, you can watch the entire build so far on my Youtube channel

 
Well Grump, I will say that this will be a very interesting thread to keep an eye on. I wish you the best of luck getting it to fruition.
 
Progress Continues

....I've been working on this trike again over the past few days, and have cut off several of the unwanted outriggers from the chassis. I've also cleaned one side of the chassis and rust treated it....thankfully the cleaning only showed up one area that will need some welding later. All of the details of this are in the video below.

 
...just a couple of photos of how the chassis is starting to come together....

Heres one showing the cleaned up chassis leg with a swift coat of primer to stop it flash rusting

IMG_20220307_135043-2.jpg

...and one of the rot I found hiding behind the rear coil spring seat

IMG_20220307_135133.jpg

...this will obviously be cut out and welded up later, but for now the primer should help it to not get any worse for now.

I've also started cleaning the other side of the chassis now....more pics will follow later of the rot I've discovered there :gah:
 

Attachments

  • IMG_20220307_135043.jpg
    IMG_20220307_135043.jpg
    983.7 KB · Views: 86
Well I've made some more progress....the video is here for those who would like to see it


....and for those that don't here are a few pics of progress...

IMG_20220320_134019.jpg

...found a nice rust hole behind this rear spring mount...

IMG_20220320_134009.jpg

....and several holes behind the rear shock top mount, thankfully that was it, apart from 2 other pretty small holes

IMG_20220322_150207.jpg

....this is the chassis (frame) after complete cleaning and rust treatment, all it needs now is a quick coat of primer before I set about repairing the holes.

Once I've repaired the rust damage, I'll be ripping apart the rear axle, cleaning it all up and refurbing it before putting it back on....this might take awhile as it needs a few replacement parts that I'll need to find some cash to buy..

...so while I'm waiting I'll start sorting out the leading link front end that I'll need to build.

Thankfully I have most of the parts for that already!
 
Latest Progress....

Well I've gotten a bit done of late, but progress has been slow to say the least....I've cleaned up, rust treated, painted and re-installed the gearbox crossmember....and have no pics to show you (I deleted them whilst cleaning up my folders to make more space :blush: )

However, I've been getting on with repairing the few bits of rot on the chassis (frame).

This is what one side of the rear suspension crossmember looked like after rot removal

IMG_20220628_155452.jpg

...and after a lot of buggering about, cutting, welding and grinding later it looked like this

IMG_20220703_155248.jpg

...until finally it looked much better....

IMG_20220706_203354.jpg

The other side had even more rot cut out, and after the initial repair pieces were tacked in looked like this...

IMG_20220717_205036.jpg

The almost finished repair looked something like this...

IMG_20220727_210619.jpg

I still have to grind back the welds on that last one and there are a few more holes to repair before the chassis is finally done.

Then I can get on with re-building the back axle, as that is what I've decided to sort before I start on the leading link front end.....yup, I know I'm a coward, but that front end is going to be a very intensive PITA to sort out!:laugh:

On a lighter note, I recently managed to get hold of something that will look great as a front headlamp holder....

IMG_20220626_160229.jpg

I just had to have it :D .....will look great with twin headlights in (It's actually a cow drinker....and it's definitely going to hold my headlamps!)

Videos of all the work so far are up on my Youtube Channel, as ever
 
...the build goes on

Despite the fact that I've not posted in ages, I'm still getting on with the trike....the chassis (frame) is now fully repaired, the rear axle has been fully rebuilt/ repaired and I'm well on my way to sorting the front end.

Just today I finally got around to welding on the main frame member that will hold my steering stem and started to make the stem as well.

IMG_20230820_171328.jpg

The pic is how it looked before the welding....my decidedly dodgy welding can be seen in my latest video


The rest of the steering tube fabrication should hopefully happen in the next day or so....

Grump
 
Thanks guys...with this project I need all the encouragement I can get....it's a stupid idea that I just couldn't resist doing!

I've just spent the day boring out tubes for my headstock bearings with a mini mill made from the finest chocolate grade chinesium...it has been a nightmare having to nursemaid the machine just to ensure that it doesn't strip its NYLON gears...:xzqxz: (The milling machine is what you guys probably know as an X2....and they can be made usable by changing the gears to metal and adding a belt drive to the spindle, but that costs plenty and I'm spending too much already on this fun project!)

More pics and a new video will be along in a few days, by which time I should have the headstock ready for mounting....hopefully :D

Grump
 
....the steering head is now finished.....and what a pain in the parts it was to get done....

headstock.jpg

...full story in the video below....and just a quick reminder guys, I do tend to swear a lot in my videos, so if you don't like curse words please don't watch it!


Grump
 

Welcome to the Trike Talk Community

Join our vibrant online community dedicated to all things Trikes! Whether you're a seasoned rider or just starting out, this is the place to share experiences, tips, and stories about your three-wheeled adventures. Explore modifications, maintenance advice, and rides, all while connecting with fellow trike enthusiasts from around the globe

Forum statistics

Threads
55,566
Messages
901,942
Members
22,548
Latest member
PERuss

Trike Talk Community

Welcome to a community dedicated to the most diverse and fastest growing powersports segment, Motorcycle Trikes. Come join the discussion about the best makes and models, popular modifications and proven performance hacks, trike touring and travel, maintenance, meetups and more!

Register Already a member? Login

Forum statistics

Threads
55,566
Messages
901,942
Members
22,548
Latest member
PERuss
 photo 260e2760-d89e-45b2-8675-2bc26fb3d465.jpg

 photo Trike-Talk-150-x-200.gif

 photo DK Trike Talk Right side banner 19.jpg

Merziere Reverser

 photo 9796095c-0d4b-4a9b-88ed-efe4c498d084.png
 photo f9866e4e-75c5-471a-86f5-5e72a446ecc3.png
Back
Top