88 blazer trike

like the chain look!.....the down turned bars look like a comfortable angle, but may need a small disc on the bar ends to keep the hands from slipping off. Nice to use what you have on hand. roller chain is made of good steel plus heat treated....so plenty strong. nice to see a build underway!

Just curious...Bob what is that silver tube with a black band on the right side of your last pic?
 
Last edited:
like the chain look!.....the down turned bars look like a comfortable angle, but may need a small disc on the bar ends to keep the hands from slipping off. Nice to use what you have on hand. roller chain is made of good steel plus heat treated....so plenty strong. nice to see a build underway!

Just curious...Bob what is that silver tube with a black band on the right side of your last pic?

yep I will need to do more work on the actual hand grips. for 1 thing I need to reduce them down to 1 inch, right now they are 1 1/8 inch.

I will put some type of end cap on them, not sure what yet or how long I will make the grips.

So the Silver tube is Moai, he is for my boxing workouts. The black band is one of my old worn out hand wraps

see link below

https://www.triketalk.com/forum/threads/33920-Moai?highlight=moai
 
Good thread on Moai! all new to me.....my 1st thought was, thats an odd place for a chimney! I am feeding a wood stove in the shop every day, all day. All I think about is wood, stoves, and should I clean the the chimney! then time to push snow,blow snow and shovel snow. Not getting much else done. The boxing looks to be a good way to stay in shape. the wood and snow give me enough exercise for now. lol..
 
Good thread on Moai! all new to me.....my 1st thought was, thats an odd place for a chimney! I am feeding a wood stove in the shop every day, all day. All I think about is wood, stoves, and should I clean the the chimney! then time to push snow,blow snow and shovel snow. Not getting much else done. The boxing looks to be a good way to stay in shape. the wood and snow give me enough exercise for now. lol..

I wish I could put in a wood stove

a few years back I was going to do it but the Ol'Lady suggested I contact our home owners insurance. They told me it would void our insurance or something like that it was a while back and my memory is not that great
 
I wish I could put in a wood stove

a few years back I was going to do it but the Ol'Lady suggested I contact our home owners insurance. They told me it would void our insurance or something like that it was a while back and my memory is not that great

Have you considered an outside wood fired hot water system? Google DIY outside wood furnace or boiler. Lots of interesting ideas. Insurance will probably be OK if combustion source is outside of building.
 
All is looking good, love the chain idea, it does add that look to it that makes it work.

Nice way to use the mind. The down bars, hummm, have to turn them down some or might find a 1 1/4 size set of grips.

Wood stove in the house, does cost more on home owners insurance, I know because I pay for the one I have. Yes all seems to have to be installed by a professional now if insurance is to cover it...…..such crap over here in NV.

I do most all work myself, so I do have discussion sessions with my insurance agent more than most. It is like I want to use the sun to heat water for my hot tub, but they fight me about covering it, they think it is a high risk for damage.

New insurance company soon, well at least I am going shopping for a better company.
 
I just wanted a little wood stove in the shop nothing to big.

The Ol'Lady does not want one in the house and the outside ones are just to much work.

I have a torpedo looking heater now. It uses Kerosene or Diesel. Sometimes the fumes from it are to much for me and I just deal with the cold
 
heating the garage is a pain and I have gotten myself a bit short on Oxygen with the propane heater running to long, so not the best one for long term usage, but great for those short stays out in the garage when you need to take the chill off.

The best and safest heater I have found is the Radiator style electric heater. They are filled with a oil that is heated up by electricity. Not a fast source of heat, but I get up early and go out and turn it on so when all are up and I can make noise the garage is warm enough for me, well not the entire garage just were I want to work, LOL
 
I just wanted a little wood stove in the shop nothing to big.

The Ol'Lady does not want one in the house and the outside ones are just to much work.

I have a torpedo looking heater now. It uses Kerosene or Diesel. Sometimes the fumes from it are to much for me and I just deal with the cold

Torpedo heaters are great for a quick warm up or short shop stay but they are dangerous for carbon monoxide and oxygen depletion. Outside wood furnace doesn't have to be that difficult.

https://www.findclip.net/video/fn4CerxpNug/barrel-s.html

I've used something like this in a portable carport shelter (tent) with good results. Not that efficient but if wood is free/cheap, who cares? Barrel stove kit is about $65-70. Great solution for "shop days".
 
have to work this weekend and next.

Working weird hours though. have to work around production. When they are down I can do what I need to do.

If I get time I want to finish up my handle bars.

Then its on to the next part of the build.

I want to do the rear suspension, link setup, coilovers and so on but the concrete is cold to lay on and I have some more money to save up for the coilovers

So now it has leaf springs

My idea is to get everything at the right angles while connected to the leaf springs, then add the link bars and then the coilovers

I can by some cheap wedges to change the angle of the rear end while still on the leafs

After all is in place I remove the leaf springs

I was originally planning to use a double cardan drive shaft to compensate for the angles but I moved the engine forward a while back making the drive shaft longer and changing the angles

so I may not have to do that. I will have to take new measurements and see
 
Interesting, most all is new to me, so it is interesting to me to see what other's minds think up.

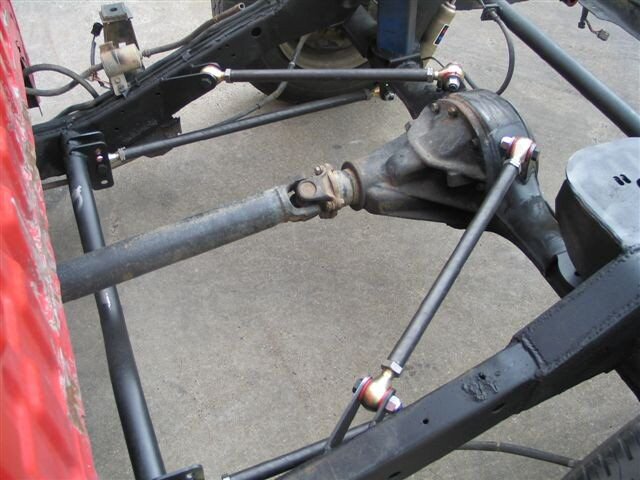
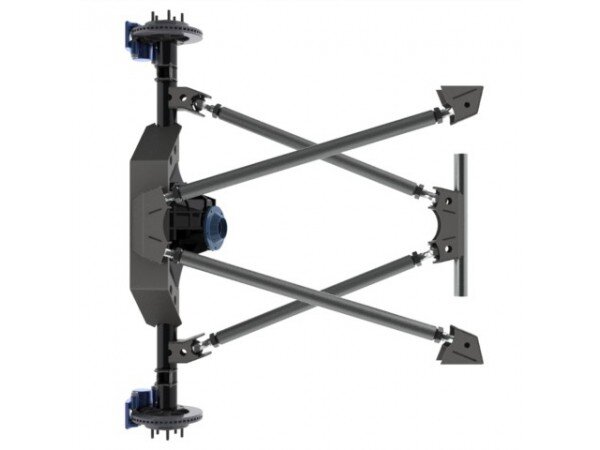
I like how much cleaner looking the first set up is as compared to the last pic. The last pic looks to bizzy and croweded with all crossing over each other, but that is me. What matters is what will provide the most strength and stabelness to the rear end. Learning more every day.:D

I hear that. I am learning as I build this thing.
 
one difference that I see is the last pic shows equal length bars, weather that makes the pinion angles stay more consistent, I don't know. But I remember seeing a u-tube that said the side view angle of the bars should project to the front of the vehicle?? Someone here will know for sure...:xzqxz:
 
one difference that I see is the last pic shows equal length bars, weather that makes the pinion angles stay more consistent, I don't know. But I remember seeing a u-tube that said the side view angle of the bars should project to the front of the vehicle?? Someone here will know for sure...:xzqxz:

pretty sure they should point to center of gravity... this is critical for drag racing but for what we are doing here doesnt mean diddly squat
 
I did a measurement of the angles.

At the rear of the trany is 0 degrees

At the pinion its 6 degrees

The distance between the Trany yoke and the pinion yoke is 24.375 inches

SO I have to drop the pinion down 6 degrees

I have ordered 6 degree leaf spring shim

I have been doing some research and watched a number of videos. This one is a simple version

 
Yesterday I could not make it to work due to the road conditions.

So I worked on the trike some

for a few days I have been squirting the U bolts on the leaf with PB Blaster

yesterday I tried to break them free. Man they were tight. I used a long cheater bar and broke 2 of them

I got mad and cut the rest of them off

So much for adding the spacers

Now I need to ensure my rear end is positioned exactly before moving on.

Before I started any of this I made sure the frame was level and made reference marks on the frame

I will measure everything a number of times then tack rebar here and there to hold it in place until I put the 4 link on

and I was able to get the pinion angle down to 0

I remeasured everything,

from yoke to yoke it is 25 inches

I have a 2 inch drop

I figured it out at home but that is about a 4.5 degree angle. That means I can use a normal drive shaft not the double cardan as I was originality planning to do. That will save me about $500
 
That all sounds confusing to me, but than again if I had to get into it I might understand what you are saying.

A lot of work either way, glad to see it moving along for you.:D
 

Welcome to the Trike Talk Community

Join our vibrant online community dedicated to all things Trikes! Whether you're a seasoned rider or just starting out, this is the place to share experiences, tips, and stories about your three-wheeled adventures. Explore modifications, maintenance advice, and rides, all while connecting with fellow trike enthusiasts from around the globe

Forum statistics

Threads
55,530
Messages
838,880
Members
22,639
Latest member
RMR12

Trike Talk Community

Welcome to a community dedicated to the most diverse and fastest growing powersports segment, Motorcycle Trikes. Come join the discussion about the best makes and models, popular modifications and proven performance hacks, trike touring and travel, maintenance, meetups and more!

Register Already a member? Login

Forum statistics

Threads
55,530
Messages
838,880
Members
22,639
Latest member
RMR12
 photo 260e2760-d89e-45b2-8675-2bc26fb3d465.jpg

 photo Trike-Talk-150-x-200.gif

 photo DK Trike Talk Right side banner 19.jpg

Merziere Reverser

 photo 9796095c-0d4b-4a9b-88ed-efe4c498d084.png
 photo f9866e4e-75c5-471a-86f5-5e72a446ecc3.png
Back
Top