kerryb
New member
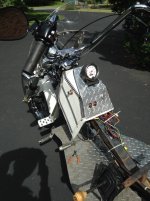
Wil-Mac wouldn't fit on the insurance card...So she's named Wilma...officially! I have a good friend with a BIG truck and a race car trailer who kindly took me to Pa. to bring her home. Bought her from a nice gent (70) who didn't think he could use it anymore.  Test rides on his street made me think I lost my shifting touch. Got her home and registered and still couldn't find second from first...something must be amiss. Put about 45 miles on in two rides and knew that longer h-bars were in order. I could lean back against the seat, or grab the bars and steer, but not both. So a trip to my friendly neighborhood cycle shop produced some 18" apes and a well-used shorty riser for mock-up. This is where stuff started to get interesting
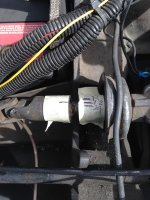
To get to the wiring I realized the body had to come off. I don't know what it weighs but a Harbor Freight block and tackle hung from the shop ceiling did the trick. After a couple of hours of staring, poking, unwrapping tape, and following wires to their source, (remember its 39 years old and there is no wiring diagram) I found at least two separate wiring harnesses. Many wires changes color several times from end to end and some just ended...a piece of electrical tape sealing off the dead wire! Found four brand new relays that sort of lead to the signal lights but not functional anymore because of clipped leads. So after ripping out all the wires not in use, and adding wires for the idiot lights, I got all the control wires to the bars extended a foot each with proper soldered splices and bullet connectors for the removable parts. Only took three evenings work!
Somewhere in there I got to looking at the shifter setup and realized the bracket was broken and the were no spacers to account for the vw tunnel metal it used to be bolted to. A little fabrication and welding repair along with some washers allowed the reverse lockout to function properly ( no more reverse for second gear!) Almost forgot, the plactic bushing was toast so the linkage was real sloppy...made a new bushing out of plastic electrical conduit with my trusty little lathe. Maybe I won't be spending $40 for the cool bronze bushing on the internet, we'll see. Sorry, no pics of that right now.
Sorry for the long post, but its exciting to have some success. The bars worked out perfect, the wiring all works, well... almost, and I can shift with abandon without grinding any teeth.
When the new longer brake lines get here I can get it inspected and figure out which white-face tach and speedo to put on to replace the current speedo which swings wildly or sits dormant. No, I couldn't find the loose wire that must be somewhere in the rats nest.
And so begins the journey that will be filled with discovery. What to do, what NOT to do (not too much gas on launch!) and how far I can get in a day on three wheels. Wish me luck, this should be fun.
Test rides on his street made me think I lost my shifting touch. Got her home and registered and still couldn't find second from first...something must be amiss. Put about 45 miles on in two rides and knew that longer h-bars were in order. I could lean back against the seat, or grab the bars and steer, but not both. So a trip to my friendly neighborhood cycle shop produced some 18" apes and a well-used shorty riser for mock-up. This is where stuff started to get interestingTo get to the wiring I realized the body had to come off. I don't know what it weighs but a Harbor Freight block and tackle hung from the shop ceiling did the trick.
After a couple of hours of staring, poking, unwrapping tape, and following wires to their source, (remember its 39 years old and there is no wiring diagram) I found at least two separate wiring harnesses. Many wires changes color several times from end to end and some just ended...a piece of electrical tape sealing off the dead wire! Found four brand new relays that sort of lead to the signal lights but not functional anymore because of clipped leads. So after ripping out all the wires not in use, and adding wires for the idiot lights, I got all the control wires to the bars extended a foot each with proper soldered splices and bullet connectors for the removable parts. Only took three evenings work!Somewhere in there I got to looking at the shifter setup and realized the bracket was broken and the were no spacers to account for the vw tunnel metal it used to be bolted to. A little fabrication and welding repair along with some washers allowed the reverse lockout to function properly ( no more reverse for second gear!) Almost forgot, the plactic bushing was toast so the linkage was real sloppy...made a new bushing out of plastic electrical conduit with my trusty little lathe. Maybe I won't be spending $40 for the cool bronze bushing on the internet, we'll see. Sorry, no pics of that right now.
Sorry for the long post, but its exciting to have some success. The bars worked out perfect, the wiring all works, well... almost, and I can shift with abandon without grinding any teeth.
When the new longer brake lines get here I can get it inspected and figure out which white-face tach and speedo to put on to replace the current speedo which swings wildly or sits dormant. No, I couldn't find the loose wire that must be somewhere in the rats nest.
And so begins the journey that will be filled with discovery. What to do, what NOT to do (not too much gas on launch!) and how far I can get in a day on three wheels. Wish me luck, this should be fun.

")


