Stallion Headlight cover.

WildBillH

TOI - California
Joined
Aug 26, 2008
Messages
254
Reaction score
3
Location
Sacramento CA USA
During the summer after I noticed the headlights don’t just attract bugs but they cook and shred them. Cleaning the headlights was getting old.

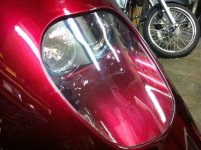
I made a headlight cover out of Plexiglas just to see if I could and how it fit. The flat Plexiglas needs to be heated and curved slightly to fit. I’m sure the Plexiglas will eventually break (big bugs). I will make another one from Lexan with the template I made later. The hardest part was taking the headlight housing apart and putting it back together without breaking any of the posts.

1. Disconnect the wiring from the Headlights and the wire tie holding the wiring harness so it is out of the way.
2. Remove the three snap rings that adjust the headlights and the headlights will come off and you will not loose your headlight setting.
3. Carefully remove the screws holding the headlight housing to the hood.
4. I cut out the back of a cereal box and used it to create a template for the headlight cover.
5. The headlight cover will fit in a notch between the headlight housing and the hood.
6. transfer the cereal box template to the Lexan and cut it out. You can choose the weapon your most comfortable with for this task.
7. Use a propane torch to carefully heat the headlight cover and bend it to fit the headlight housing. I would heat it until my hand got warm and bend it by hand from the outside edges. After about 6 or 7 heating and fittings I got the cover to fit the way I wanted it.
8. I used some plastic windshield polish to polish up the headlight cover and masking tape to hold it in place while it put everything back together.
9. Be very careful to start the screws straight. Put it back together like you going to torque it down. Start all the screws and tighten them up a little at a time until it fits snug. Do not over tighten.
10. Remove masking tape.

Easy to take apart. 1 cold beverage to make and fit the cover. 4 cold beverages to put it back together.
 

Attachments

  • Light Cover.jpg
    Light Cover.jpg
    70.2 KB · Views: 291
Its really harder to install them than to make the cover.

I'd be interested in how many people would actually try putting them in. The risk is in putting it back together. after seeing how all the tabs were broke off inside the skin of my trunk lid, I'm not sure I'd want to try repairing them. Buying a new headlight housing would not be cheep.
If the tabs were twice the diameter the screw would probably strip out before it broke the tab.
A stripped tab could be filled and the hole drill again.
 
Last edited:
I had the top post of the headlight assy break and just the 2 bottom ones holding it on, now the advantage to not having the cover allowed me to use a plastic tie wrap to hold the light assy on until I made it back to TBMS to get it fixed, they replaced the whole bezel piece and had to paint it to match the color of the Stallion. now that it is done I would be very interested in getting a cover for my lights. possible the force of the air when at speed helps to break the headlight assy and this could help TBMS is less repairing of this problem as there would be NO air pressure against the headlights with a cover.

so as I said count me in.
my Stallion is a 09' with ABS plastic.
 
Bill how thick was the plexiglas you used? This is a great idea bugs are every where and they always go for the lights.
 
Bill,
Is it possible to just attach 4 small plexi or lexan guides on each of the sides or in the corners and then just use silicone to seal and hold the shield in place? That would see to save a boat load of work. Did I miss something? Did you have a specific reason for all that work?
 
Hello Unwired,

I used 1/8 Plexiglas, because I has some. I would use 1/8 Lexan in the future.

Mattel... I was going for the invisible look. This is for the ABS bodies. I do not know if it can be adapted for the fiberglass bodies.

Cutting the cover out and shaping it only takes about 30 minutes. Taking the headlight assembly out took less than 30 minutes. Putting it back together took about 4 hrs. I put in a few screws and snugged them up but, the lens would not stay tight. I found out that some of the screws missed the hole, the threads were actually holding against the sides of the tab. I used a mirror and a led light mounted between my eyes to check the location of the screw holes so I wouldn't miss them. It is amazing how nice it fits when you hit the hole. Once you get it started you can start tightening them up. The lens should fit in the grove between the outer shell of the headlight assembly and not move.
 
Last edited:
so Bill
your part, if you make them, is the easy part and yes out of Lexan.
our part is the hard part.
OK so what else is new.
I'm still for it.

now you have to come up with a price?
 
It looks real nice bill. real good post also. Thanks for sharing it with us.


dancerjim
stallion #765
Ct.
 
That is a great mod. I had always wondered why TMS designed the headlights that way. I wonder if it will improve gas mileage some as it is now more aerodynamic.

Dennis

38 dtg Dubai

39 dtg London

136 dtg Dubai

137 dtg Home
 
That is a great mod. I had always wondered why TMS designed the headlights that way. I wonder if it will improve gas mileage some as it is now more aerodynamic.

Dennis

Dennis, being a gear head I am sure you know any inprovement in areodynamics will improve gas millage. Loose weight or even wax your stallion. The only question is ...... how much? This mod cannot provide any significant reduction in drag, as the top lip causing the friction is not very large. At best it will cause turbulance, or in the case of the cover it will reduce turbulance. The larger question may be if it reduces the wind boom?

This is a great question, now that I am looking at this issue I may be closer to solving the wind boom issue for the passanger. Their is a cool product that breaks up the wind that crosses the trailing edge of the windshield.

here is it:

SAENG/TA, Sport Touring Accessories - Micro-Swirl™| Edging | Grade-2

It is called a micro swril. has anyone used this on a Stallion? I am considering putting this on my Multistrada, I may take the plunge and try it on my Stallion and see what it does to the air flow.
 
I put the SAENG edging on my Stallion about a year ago to reduce the rain going over the lip and getting everything wet under the windshield. it does not stop it but it does reduce the rain getting inside.
 
Hello All,

I been doing some testing with the headlight covers for the Stallion ABS body.

The first cover I made was with thicker material and I had to heat and shape it to the curve of the body over the headlight. I was lucky the first one fit and saw room for improvement. I also noticed the heat caused the headlight cover to warp slightly. I wanted to eliminate the warp and I was concerned about the heat from the headlight warping the cover. I shopped around to find another material that would not warp and would tolerate the heat from the headlight. A plastics shop recommended the material I’m currently using to make the covers. I have made several and test fitted them to my Stallion and they have all fit great and looked good. So far the heat from the headlight does not appear to affect the headlight cover.

I also discovered that I do not need to completely remove the headlight housing. I only need to loosen the screws about one full turn and remove one screw to get enough clearance to slide the headlight cover between the body and the headlight housing.

The headlight cover will fit in the 1/8 notch that goes around the headlight housing.


So if your interested in testing a headlight cover for the ABS Stallion email me at Bill.Hickok@Comcast.net

I only have a few at this time and will let you know when they are gone.
 
Last edited:
Hi Mattel,

I'm using a Polycarbonate that is UV stabilized with a heat deflection temperature of 270 degrees. It's primary engineered for high impact window glazing and exterior sign applications.

If you interested email me your mailing address.
 
Last edited:
Hello ABS Stallion owners,

The Test headlight covers have all been sent out and I am waiting for feedback. I do not expect any problems with the cover.

The main problem I'm concerned with is how difficult they are to install. I found a way to install them without removing the headlight housing. If the housing is only loosened the headlight cover can be slid in between the headlight housing and body fitting into the 1/8 notch around the headlight housing. If you have to take the headlight housing off, I had a heck of a time getting it back on. Of course that is your choice. The other risk is 'do not over tighten the screws', Its plastic.

I will post an add in the Classifieds for the Headlight cover in the next few days.

Right now I am out of material to make them. I should be getting more next week.

Best Trike Forum on the net. Bill
 

Trike Talk Community

Welcome to a community dedicated to the most diverse and fastest growing powersports segment, Motorcycle Trikes. Come join the discussion about the best makes and models, popular modifications and proven performance hacks, trike touring and travel, maintenance, meetups and more!

Register Already a member? Login

Forum statistics

Threads
55,570
Messages
901,966
Members
22,550
Latest member
stag man
 photo 260e2760-d89e-45b2-8675-2bc26fb3d465.jpg

 photo Trike-Talk-150-x-200.gif

 photo DK Trike Talk Right side banner 19.jpg

Merziere Reverser

 photo 9796095c-0d4b-4a9b-88ed-efe4c498d084.png
 photo f9866e4e-75c5-471a-86f5-5e72a446ecc3.png
Back
Top