Bleeding Brake System on 2008 GL1800 Lehman Monarch II Trike

B25bsaboy

New member
Joined
Apr 27, 2018
Messages
51
Reaction score
23
Location
Calgary, Alberta
Good evening,

Went to find some technical instructions on how to bleed the brake system on my Lehman Monarch II trike that has a Honda Goldwing GL-1800.

Only thing thus far that I have found is in the instruction book in building a Lehman trike.

Can someone direct me to a site/link that better explains the step by step process.
Rick, I have built a couple hundred of the Monarch II conversions and the instructions that are available only cover the basics. A lot of it is 'feel' and experience that tells you where the air actually is. The GL1800 linked brake system is visually complicated but simple hydraulics. I will find a post of the brake bleeding procedures and re-post here soon. If you need immediate help, call me at work.
 
Lehman Monarch II Rear Brake Bleeding Procedure


Once you have introduced air into the linked brake system, there are no shortcuts to bleeding the system. This REQUIRES two people to complete properly. I have found that using a vacuum bleeder is a great way to flush the system but does not help in removing all of the air.

Preparation:

Remove rear wheels for access to caliper bleed screws,

Remove front fender and wheel caliper covers,

Remove the bolt for the rear brake fluid reservoir for ease of access.

One person will operate the pedal, the other will bleed the brake system. Two easy pumps and hold prior to opening the bleed screws. The bleed screws are delicate on the rear calipers so don’t over-tighten or you may break the caliper itself. You only need to open the screws enough to let air out and by paying close attention you can hear air escape during each bleed.


Procedure:


Give command to pump ( two times) and hold prior to opening each fitting.

Continue at each location until fluid is visibly flowing and proceed to next location.

Make sure that fluid reservoir is maintained during the procedure.

1) Right rear caliper upper bleeder until fluid is present, then lower bleeder,

2) Left rear caliper upper bleeder until fluid is present , then lower bleeder,

3) Left front caliper 8mm bleed screw until fluid is present ,

4) Left front anti-dive bleed screw until fluid is present,

5) Right front caliper 10mm bleed screw until fluid is present .

(Note) It take a while for any air to be chased out the front of the system. That is why this procedure cannot be performed just once.

1) Right rear caliper upper bleeder until steady fluid flow, then lower bleeder,

2) Left rear caliper upper bleeder until steady fluid flow , then lower bleeder,

3) Left front caliper 8mm bleed screw until steady fluid flow,

4) Left front anti-dive bleed screw until steady fluid flow ,

5) Right front caliper 10mm bleed screw until steady fluid flow.

Repeat above procedure at least two times until pedal is solid and does not pump up.

Focus attention to the front because the air you are chasing has a long way to escape at the front wheel.

Good morning Jim and Thank you for the procedure, as I thought this was going to be a two man procedure?

I did the clutch slave bleed yesterday which from the fluid coming out was long over due. Guess some people seem to think oil lasts forever which from experience it doesn't. Rather nervous about the brake line bleed, but will deal with that when we start the process!:drama:
 
My bad as it should have said Brake Fluid! Was only on my first cup of freshly ground java! Oh I enjoy my coffee:)(heart)

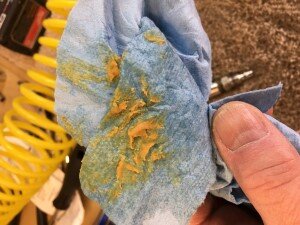
Went into the shop yesterday and with Jim's instructions followed the step by step instructions. Had to do the process three times and tice for the had brake as they haven't been done since the Honda GL-1800 was new. It never ceases to amaze me why folks think more about added bling to their rides rather than maintaining the equipment. The crap (excuse my language) that came out of the lines was well just that - crap!

If I can figure out how to down size my photos, will start attaching to make my points!:Crap:

This is what I am talking about, when you don't maintain your equipment. This came from the bottom of the rear brake fluid reservoir:mad:

IMG_0130 (300 x 225).jpg
 
Are you sure that wasn't from the bottom of a bottle of Gerbers squash ???? EWWEE !!:clapping:

Positive!

Took the trike out for a shake down ride after cleaning the old brake fluid out of the brake lines and the hydraulic slave clutch lines. Brakes now feel like brakes and it’s shifting so much better. The harsh clunk is still somewhat there but not a pronounced as before.

:drama:
 
Good job on getting that nasty junk out of your system

I have always said too many neglect IMO one of the MOST important fluid on our bikes;)
 

Trike Talk Community

Welcome to a community dedicated to the most diverse and fastest growing powersports segment, Motorcycle Trikes. Come join the discussion about the best makes and models, popular modifications and proven performance hacks, trike touring and travel, maintenance, meetups and more!

Register Already a member? Login

Forum statistics

Threads
55,571
Messages
901,985
Members
22,553
Latest member
Glockjock
 photo 260e2760-d89e-45b2-8675-2bc26fb3d465.jpg

 photo Trike-Talk-150-x-200.gif

 photo DK Trike Talk Right side banner 19.jpg

Merziere Reverser

 photo 9796095c-0d4b-4a9b-88ed-efe4c498d084.png
 photo f9866e4e-75c5-471a-86f5-5e72a446ecc3.png
Back
Top