This is maybe my third thread, I'm still new here, but thanks everyone for welcoming me. 
I have wanted a Freewheeler for years. It's going to sound nuts but I always wanted to make it a solo bike, and run the exhaust up behind me in two vertical stacks, with rain flaps, that shoot fire. Like some sort of Mad Max setup.
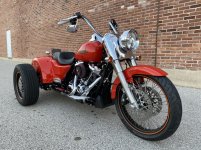
Anyway, when the Performance Orange came out this year, I decided it was time. I recently got the bike .. and while the stacks are going to take some time .. I got right to chopping. I started a thread to share how I deleted the passenger grab handles for a cleaner look. Since then, here is a running tally of all the chopping I've done:
1. Deleted the "Harley-Davidson" logo on the trunk, as well as the reflectors under the trunk latch, and on the fenders. (If you want to do this -- I used a heat gun on the lowest setting, and Stoner's Tarminator to remove the adhesive.
2. Removed the passenger boards and mounts. (If you want to do this, I want to say it was a 5/16" hex, and I needed my impact wrench to break the bolts free from their Loctite.)
3. Deleted the grab handles. (Here's my post on how I did it.)
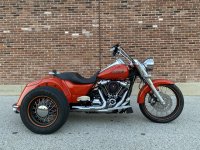
4. Installed the H-D Black Diamond solo passenger seat (P/N 52000248). You'll see when I attach pictures below that the fitment isn't perfect -- yet. When you remove the seat, there are two screw holes that are set up for 1/4"-20t.p. screws, I think I used 1.25" length chrome screws from Home Depot. You screw them in from underneath and then the seat includes two nice thumbscrews that fasten the seat down on them.
The problem is that the new seat doesn't hit the tank at a steep enough angle. You can shove it on there without harming anything, but as you can see in the pictures the diamond pattern isn't perfectly square to the tank. I'm gonna pull out my Dremel soon and widen the slot on the bottom of the seat, so it's a little more forgiving when it hooks onto the tank. I expect this will solve the fitment and will update this thread as I go.
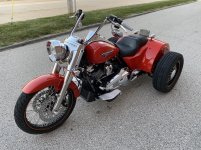
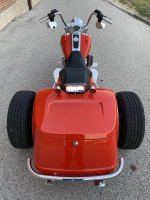
5. So now it's getting a bit more radical. The fenders had to go .. now it looks like a really mean bike! It was really pretty easy. Bought a floor jack at Home Depot, I jacked it at the frame member nearest each of the rear wheels. Take the wheels off. There are five or six Torx screws that can be easily removed with a small hand ratchet, but be sure to unhook, and unclip the turn signal / rear light assembly first so you can set the fender on the ground when the screws come out!
It looks like the factory folks use some heavy duty two-sided tape to hold the fenders in place while they screw them in. You have to remove that. Learn from my mistake and USE A PLASTIC SCRAPER along with heavy application of Stoner's Tarminator which basically turns that strong adhesive to butter (but is clear coat safe). I used a plastic scraper for 3 of the 4, but made the mistake of using a standard sticker-pusher razor on the first one, and now I have to go get some super fine sandpaper and buff out a few small scratches hidden behind the wheel.
(Any recommendations on how to get best results?)
So where it's at now is --
- Need to Dremel the part of the solo seat where it hooks to the tank, to allow for more adjustment / slack / fitment.
- Need to fab up some kind of low-profile cowl for where the passenger pillion was.
- Row of tiny scratches hidden on the orange panel behind passenger wheel -- need to sand / buff these out somehow.
- Need to fab up a simple, ultra low profile metal piece that screws in where the passenger pillion did. License plate holder and two holes on each side. I ordered up the small "bullet style" turn signals from H-D and wired them in perfectly using the logic boards from the stock rear lights. (I will write up how to do this soon. It is not hard. Soldering and weatherproofing them will be medium skill.) Essentially relocating the lamps and license plate to right where the passenger pillion used to screw in.
Sorry a couple of the pictures are sideways but I can't figure out how to rotate them!


I have wanted a Freewheeler for years. It's going to sound nuts but I always wanted to make it a solo bike, and run the exhaust up behind me in two vertical stacks, with rain flaps, that shoot fire. Like some sort of Mad Max setup.
Anyway, when the Performance Orange came out this year, I decided it was time. I recently got the bike .. and while the stacks are going to take some time .. I got right to chopping. I started a thread to share how I deleted the passenger grab handles for a cleaner look. Since then, here is a running tally of all the chopping I've done:
1. Deleted the "Harley-Davidson" logo on the trunk, as well as the reflectors under the trunk latch, and on the fenders. (If you want to do this -- I used a heat gun on the lowest setting, and Stoner's Tarminator to remove the adhesive.
2. Removed the passenger boards and mounts. (If you want to do this, I want to say it was a 5/16" hex, and I needed my impact wrench to break the bolts free from their Loctite.)
3. Deleted the grab handles. (Here's my post on how I did it.)
4. Installed the H-D Black Diamond solo passenger seat (P/N 52000248). You'll see when I attach pictures below that the fitment isn't perfect -- yet. When you remove the seat, there are two screw holes that are set up for 1/4"-20t.p. screws, I think I used 1.25" length chrome screws from Home Depot. You screw them in from underneath and then the seat includes two nice thumbscrews that fasten the seat down on them.
The problem is that the new seat doesn't hit the tank at a steep enough angle. You can shove it on there without harming anything, but as you can see in the pictures the diamond pattern isn't perfectly square to the tank. I'm gonna pull out my Dremel soon and widen the slot on the bottom of the seat, so it's a little more forgiving when it hooks onto the tank. I expect this will solve the fitment and will update this thread as I go.
5. So now it's getting a bit more radical. The fenders had to go .. now it looks like a really mean bike! It was really pretty easy. Bought a floor jack at Home Depot, I jacked it at the frame member nearest each of the rear wheels. Take the wheels off. There are five or six Torx screws that can be easily removed with a small hand ratchet, but be sure to unhook, and unclip the turn signal / rear light assembly first so you can set the fender on the ground when the screws come out!
It looks like the factory folks use some heavy duty two-sided tape to hold the fenders in place while they screw them in. You have to remove that. Learn from my mistake and USE A PLASTIC SCRAPER along with heavy application of Stoner's Tarminator which basically turns that strong adhesive to butter (but is clear coat safe). I used a plastic scraper for 3 of the 4, but made the mistake of using a standard sticker-pusher razor on the first one, and now I have to go get some super fine sandpaper and buff out a few small scratches hidden behind the wheel.
(Any recommendations on how to get best results?)
So where it's at now is --
- Need to Dremel the part of the solo seat where it hooks to the tank, to allow for more adjustment / slack / fitment.
- Need to fab up some kind of low-profile cowl for where the passenger pillion was.
- Row of tiny scratches hidden on the orange panel behind passenger wheel -- need to sand / buff these out somehow.
- Need to fab up a simple, ultra low profile metal piece that screws in where the passenger pillion did. License plate holder and two holes on each side. I ordered up the small "bullet style" turn signals from H-D and wired them in perfectly using the logic boards from the stock rear lights. (I will write up how to do this soon. It is not hard. Soldering and weatherproofing them will be medium skill.) Essentially relocating the lamps and license plate to right where the passenger pillion used to screw in.
Sorry a couple of the pictures are sideways but I can't figure out how to rotate them!