2010 Harley CVO Softail Convertible with Qtec-Engineering Kits (front and rear)

terebit

60+ Posts
Joined
Jan 25, 2022
Messages
60
Reaction score
137
Location
Chandlersville, Ohio 43727
2010 Harley CVO Softail Convertible with Qtec-Engineering Kits (front and rear)

Hello all, in this thread I'm documenting the build on a Qtec Q4. If there's a better place to put this, admin please move it there. The Qtec-Engineering kits are primarily the domain of American Bike and Trike in Gilbert Arizona. They are a dealer and distributor. They sell multiple brands, but for the purpose of this discussion, they will convert your Harley Softail to a Qtec trike or quad or they distribute kits to other shops.

I talked nice to them and got them to sell me the components as a kit for a DIY installation. As the Title says, I'm starting with a 2010 Harley CVO Softail Convertible. If you are considering a similar build and you don't have a doner bike already, try to find a low milage Softail; I didn't but chose my base bike because I liked the color scheme. That may cost me in the end, but it makes me happy.

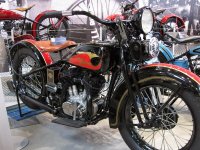
Here are a couple pictures of the starting point:

20211115 (1).jpg20211119 (7).jpg
 
Going through the doner bike

Spent some time cleaning and inspecting the doner bike and decided to fix a couple things. The rear fender had a significant dent and chips and the oil tank had some paint chips and fading. Even though the rear fender won't be used with the rear end kit, I sent it out for repair anyways in case I want to remove the rear kit at some point.

20211121 (1).jpg
 
Getting rid of fork

Oil tank reinstalled, wiring cleaned up some, and prepping the front end to receive the reverse trike kit. That involves removing the fuel tank (to access wiring harnesses), the front wheel, front brake caliper, front fender, light bar with driving lights and turn signals, headlight, and fork tubes. I'm still waiting for kit components to ship at this point, so I'm not sure yet how much of the triple tree needs to come off. In the meantime I can prep turn signals and headlights to go on the kits. I'm going to try to reuse the original turn signals, which are already set up as 3 in 1 units for brake and running lights too.

20220121.jpg
 
About the Q-Tech Kit

Since I've got a while to wait for the Q4 kit and because anyone searching for information on Qtec kits will probably turn up this thread, I'm going to give a little background. Qtec-Engineering builds the Q3R (standard trike) and the Q3F (reverse trike) kits in Belgium. The Harley Quad conversion is Euro-Spec approved and is popular in many European Countries. Kits are imported and distributed by American Qtec, also known as American Bike and Trike located in Gilbert Arizona. Additional information is available at the following links: Qtec-Engineering - Harley Quad, Harley Trike, Harley Reverse Trike and American Bike And Trike - Motorcycle Conversions, Trikes Quads Reverse Trikes, Road Bikes For Sale . I'm not affiliated with either of these companies and I am not a dealer or a shop. One web page I found says that the Qtec kits are only installed by American Bike and Trike or an authorized dealer. If you decide to do an at-home installation, expect to sign a waiver of liability with the distributer.

The frames (front and rear) look like this at the manufacturing facility, before powder coat.

Kit Frame.jpg

This is approximately what you get if you order the Q3F. I found that I needed to supply my own lights and shocks.

Kit Front 1.jpg

This is approximately what you get if you order the Q3R. Again, I had to supply lights and shocks. I also had to supply the exhaust system and wheels and tires.

Kit Rear 2.jpg
 
Spelling Correction

The folks at American Bike and Trike corrected me on my spelling: It's Qtec-Engineering, not Q-Tech.

I've gone through my previous posts and made spelling corrections. Thanks Ana, keep me straight.
 
Parts you need

I've been ordering parts while I patiently wait for the Qtec kit to ship. I was advised I would need to supply:

Q3F Parts (front kit): Wheels - 17x7 or 17x7.5 4x100 42 offset, Tires - 205/40 R17, Shocks - Legend Heavy Duty, 12 inch, Lights - 3-4 in round headlights [I got 5 3/4 lights and buckets - hope they fit], and Harley bullet turn signals [repurposed from doner bike].

Q3R Parts (rear kit): Wheels - 17x7 or 17x7.5 4x100 42 offset, Tires - 225/45 R17, Shocks - Legend Heavy Duty, 12 inch, Harley 3 in 1 rear bullet turn signals [repurposed from doner bike], and Primary gasket kit.

I later found out that I would need to supply a different exhaust system to fit the rear kit. I had to make a few compromises on selection of wheels and tires due to specs. I wanted chrome wheels, but they're hard to find in the right size. Picture is partial parts inventory.

20220129 (1).jpg
 
Comfort Items

It's been close to 2 weeks since my last post, so it's time for an update. Some pandemic related issues have delayed shipment of my Q4 kit. Finally, I got notice that they have a shipping quote, and I got another bill, so it should be on the way soon. In the meantime, I'm focusing on a couple items intended to make the finished conversion more comfortable for parade use and for any situations with stop and go traffic. Parades on a bike are characterized by lots of slow riding, sometimes some bobbling around, cramps in the clutch hand, and a sputtering/overheated engine. The trike/quad kit will solve any stability issues; the overheating will be addressed by Love Jugs cooling fans; and the hand cramps won't be an issue if I never need to feather the Rekluse clutch.
 

Attachments

  • 20220210 (1).jpg
    20220210 (1).jpg
    986.3 KB · Views: 70
  • 20220210 (3).jpg
    20220210 (3).jpg
    936.8 KB · Views: 64
Check's in the mail

I was told on the 16th that the kit has shipped. So, Pheonix to S.E. Ohio, three or 4 days right? Today I was told it's in Montana changing trucks. Not the most direct route, but I'm happy it's packed up and moving.

EDIT: I called today (after a long weekend) and was told the shipment is now in Fontana, CA and would go onto another trailer earmarked for Ohio; but that trailer won't move until its full. So they don't know when the shipment will be underway. Frustrating...

The current state of the receiving bike: cooling fans installed:

20220218 (1).jpg
 
What I've learned

First, an update: The kits (front and rear) were unpacked and inventoried. Then each frame assembly was dismantled in preparation for a different color powder coat. Each of the frames will be sand blaster to remove the gloss black and will be re-coated in inferno orange. That process could take a week or so before I can start reassembling and installing the kits on the base bike.

So what have I learned thus far and what can you expect going into a project if you're considering a Q-tec build?

(1) Everything takes longer than you hope. I started talking to the dealer/distributed about buying a kit back in the middle of November and finally got an invoice the middle of January. Some of the delay was getting answers to questions needed to make decisions on my end. (Granted, Christmas was in there and COVID was a factor.) Then I finally received the kit(s) the first week of March. Paint will be the long pole in the actual build timeline.

2) It'll cost more than you expect. In addition to the base bike there are a lot of other big dollar things a builder will need to acquire. Things like good coil-over shocks (Legends), a nice set of wheels, and new tires. Options will drive the cost up more; like my decision to buy mechanical reverse, a Rekluse clutch, bumpers, and a trailer hitch.

(3) Some of the stuff you thought you could repurpose from the base bike won't work with the trike kits. Like some lights and probably your exhaust system; and maybe even the handlebar (if your bike has anything other than a 1-inch diameter bar). There's an issue with the proprietary Q-tec riser block which only fits a 1-inch diameter clamping area.

(4) The kits come mostly assembled, but don't let that fool you. The parts provided are put together as a way of verifying everything is there, but it is definitely not a final assembly. Additionally, you must at least partially disassemble several things during installation on your bike. Most of the nuts and bolts are barely finger tight, so you need to check everything.

(5) There is no Service Manual. The kit comes with a Dealer Manual with some assembly steps, which is woefully incomplete. Things like torque values for those loose fasteners; and recommended service items and intervals; and suspension alignment procedures or specs; etc, etc... I'm trying to put together a more comprehensive assembly manual as I go along and will offer that up to anyone who has a need.

(6) I was happy to see that the kits include preinstalled wiring harnesses for lighting.
 
Rebuilding Wiring Harnesses

(6) I was happy to see that the kits include preinstalled wiring harnesses for lighting.

The connector on the rear harness was not right for my bike, so I'm having to cut that harness and splice in connectors from the base bike. Also, the front harness didn't have wires for the turn signals to function as running lights (1157 style bulbs), so more added wires.
 
Modifying Handlebar and Lower Riser/Clamp

The lower clamp gets modified to provide a gap for internal handlebar wiring. The handlebar also needs some cutting and grinding to allow the handlebar harnesses to exit to the rear, rather than straight down.

20220306 (1).jpg20220306 (2).jpg20220313.jpg

I'll add final photos once mounted on the bike.
 
Workmanship Issues with the rear kit

Still waiting for my frames to come back from powder coat, so right now I'm not in the full-on build mode yet. However I have an appointment next weekend to take the fiberglass cowlings and fenders to the paint shop and I've been laying out a paint scheme that matches the original bike. While making some rough templates, I noticed that the rear hole for the passenger seat hold-down screw is not centered on the cowling. This was installed by the dealer and is an issue because the paint scheme will be symmetrical down the centerline. The off-center screw placement will stand out like a sore thumb. I'll need to fill the hole and re-drill it in the proper position.

20220320 (1).jpg

Another issue I've found is stripped threads in the rear wheel hubs/spindles where the calipers bolt in place. Is obvious that the calipers were mounted at one time but were removed to fit the assembly into the shipping crate. The bolts provided won't thread into the boogered up holes. I will try chasing the treads with a tap and hopefully they will hold when reassembled and torqued.

20220320 (3).jpg
 
Still waiting for my frames to come back from powder coat, so right now I'm not in the full-on build mode yet. However I have an appointment next weekend to take the fiberglass cowlings and fenders to the paint shop and I've been laying out a paint scheme that matches the original bike. While making some rough templates, I noticed that the rear hole for the passenger seat hold-down screw is not centered on the cowling. This was installed by the dealer and is an issue because the paint scheme will be symmetrical down the centerline. The off-center screw placement will stand out like a sore thumb. I'll need to fill the hole and re-drill it in the proper position.

View attachment 106981

Another issue I've found is stripped threads in the rear wheel hubs/spindles where the calipers bolt in place. Is obvious that the calipers were mounted at one time but were removed to fit the assembly into the shipping crate. The bolts provided won't thread into the boogered up holes. I will try chasing the treads with a tap and hopefully they will hold when reassembled and torqued.

View attachment 106982

It re tapping the holes does not work, and there is enough a boss you may look at time serts, they are a permanent repair unlike a heli coil, I have had good luck with them

Have a look here

https://www.timesert.com/html/inchsert.html
 
Working it

Got the frame sections back from powder coat Monday (it's Wednesday now), so the actual build has begun.

20220328 (1).jpg

Front frame in position to be married to the base bike.

20220328 (2).jpg

The front frame bolts on using the holes for the foot controls. Shims are required between the foot control brackets and the Q-tec frame.

20220329 (1).jpg

The frame uprights run through the Q-tec triple tree brackets and a steering rod runs down through the frame head to complete the connection at the top.

20220329 (3).jpg

This steering coupler is a very tight fit and took a ton of pressure, filing, grinding, and hammering to finally seat the steering rod inside the coupler. I hope I never need to take it apart.

20220330 (1).jpg

The A-arms are another problem area where they connect to the lower frame mounts. I'm currently trying to figure out how one person can pry [to align] and pound the bushing into the frame mount. Might have to call a Brother.

20220330 (2).jpg20220330 (3).jpg
 
Terebit

Just a thought here, a number of years ago I was putting a Champion trike kit on a Kawasaki frame and I must have worked for the better part of a day trying to get the trike frame mounted to the swingarm mounts and it would not fit. So after looking at it for a few minutes it dawned on me that the trike kit was manufactured to fit with just a couple thousand clearance and they had been powder coated. I sanded all of the powder coating off of the ends of the trike frame and it slid right into place.
 
Sigh of relief

Got the A-arms in place. It took a long pry bar (15-inch flat tip screwdriver) to spread the A-arm while pushing the bushing between the mounting tabs, lots of failed attempts, lots of cussing, and plenty of paint chips that'll need touched up later. Also had to flatten one side of the cupped washer that goes between the rubber bushing and the frame mounting tab in order to wedge it in.

20220331.jpg
 
Got the A-arms in place. It took a long pry bar (15-inch flat tip screwdriver) to spread the A-arm while pushing the bushing between the mounting tabs, lots of failed attempts, lots of cussing, and plenty of paint chips that'll need touched up later. Also had to flatten one side of the cupped washer that goes between the rubber bushing and the frame mounting tab in order to wedge it in.

View attachment 107168

Lookin Good Cant wait to see it finished :D
 

Trike Talk Community

Welcome to a community dedicated to the most diverse and fastest growing powersports segment, Motorcycle Trikes. Come join the discussion about the best makes and models, popular modifications and proven performance hacks, trike touring and travel, maintenance, meetups and more!

Register Already a member? Login

Forum statistics

Threads
55,570
Messages
901,969
Members
22,550
Latest member
stag man
 photo 260e2760-d89e-45b2-8675-2bc26fb3d465.jpg

 photo Trike-Talk-150-x-200.gif

 photo DK Trike Talk Right side banner 19.jpg

Merziere Reverser

 photo 9796095c-0d4b-4a9b-88ed-efe4c498d084.png
 photo f9866e4e-75c5-471a-86f5-5e72a446ecc3.png
Back
Top