New Brake Shoes Locking Up 2004 Lehman Goldwing

Apr 26, 2013
161
111
Clio MI USA
I have a 2004 Honda Goldwing Lehman Monarch (not the Monarch ll) I just changed my rear brake shoes, springs, star wheel adjuster and wheel cylinders. I also bled all the brake lines (front & rear) with new speed bleeders. This is the second time I changed the rears since new in 2004 and had no issues.

After adjusting the brakes giving them some drag, I took a test ride. The left side grabbed and locked up easily upon applying the brake pedal in a usual fashion. I then proceeded several stop/go procedures to see if it would get better....didn't help. I re-adjusted the brake shoes after about 20 miles in which it's not (knock on wood) pulling to the left now upon applying the brakes.

Unfortunately, both are now grabbing (locking up) when depressing the rear brake in a normal way. If I ease into it while braking I can manage it not to lock up as bad. I'd like to add, I have good pedal but, it's now very touchy causing this grab. The brakes shoes are fully disengaging when released. I'm about to remove everything and start over.....

What a P.I.A. due to just changing out my rear tire to new. I always take pic's and double check my install therefore, I can't believe I re-assembled anything wrong. If anyone has any idea what to chase down, I would sincerely appreciae it. Thank You. Ray :help: (Headbang)
 
Did your 2004 have both of the recalls done for the brakes? I had the 1st recall done and mine didnt get much better and after the 2nd recall my brakes were 100% grab free.

Thanks Mick.... Yes I did. I haven't had any issues until this replacement. Thanks, appreciate it. Ray 😊
 
Did you use bonded shoes or riveted shoes ?

Do you have the shoes oriented correctly?

Shorter shoe to the front, longer shoe to the rear

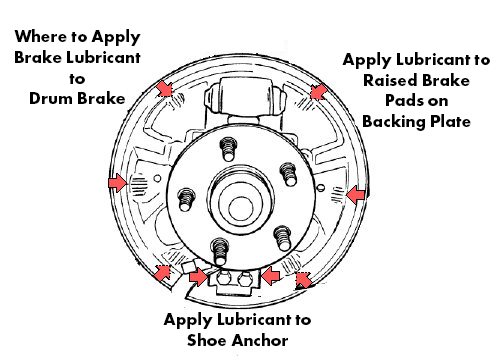
How are the high spots on the backing plates, are they smooth and did you lube them

lubricate_drum_brake%20edit.png
 
Did you use bonded shoes or riveted shoes ?

Bonded - NAPA TS474 - Same as previous install.

Do you have the shoes oriented correctly?Shorter shoe to the front, longer shoe to the rear

Yes, shorter as leading (front).

How are the high spots on the backing plates, are they smooth and did you lube them

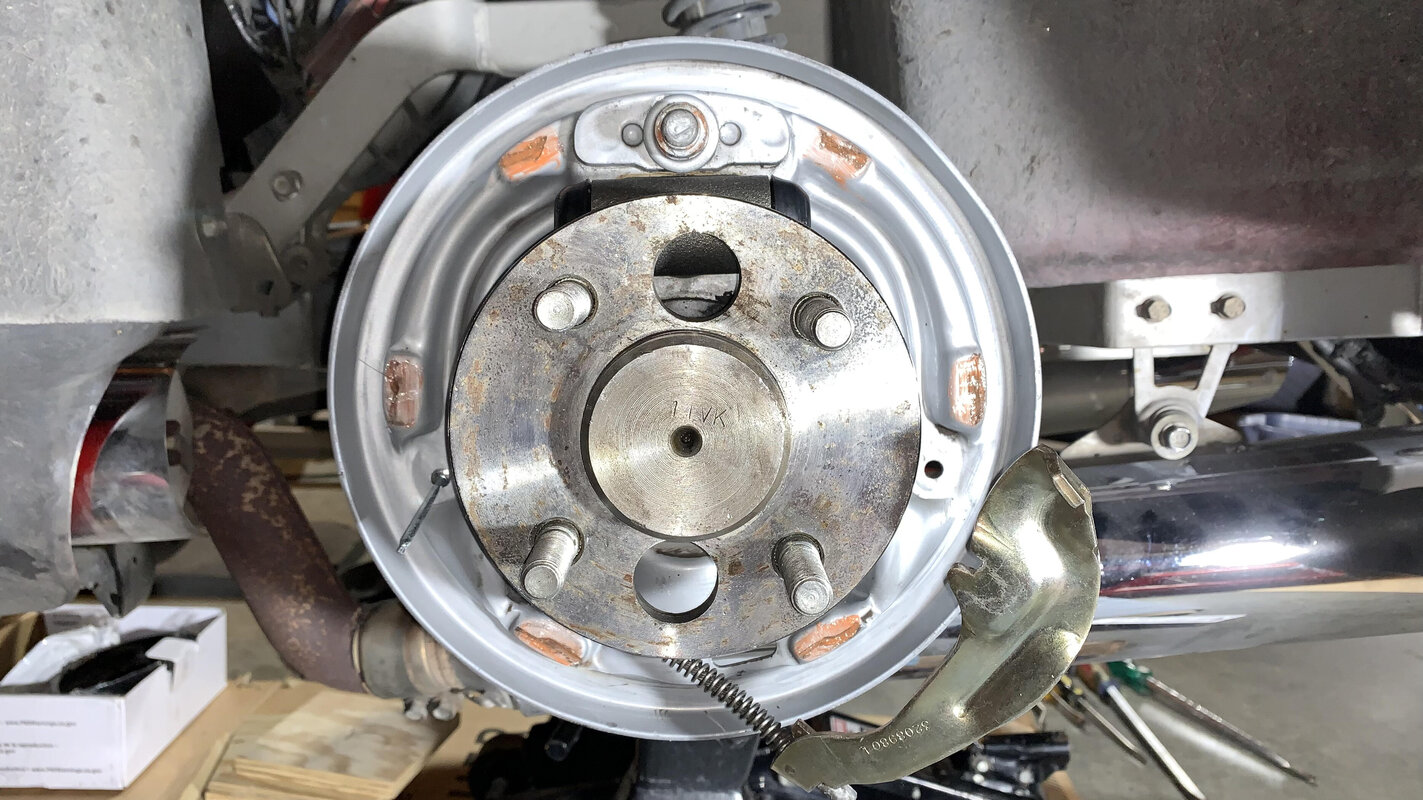
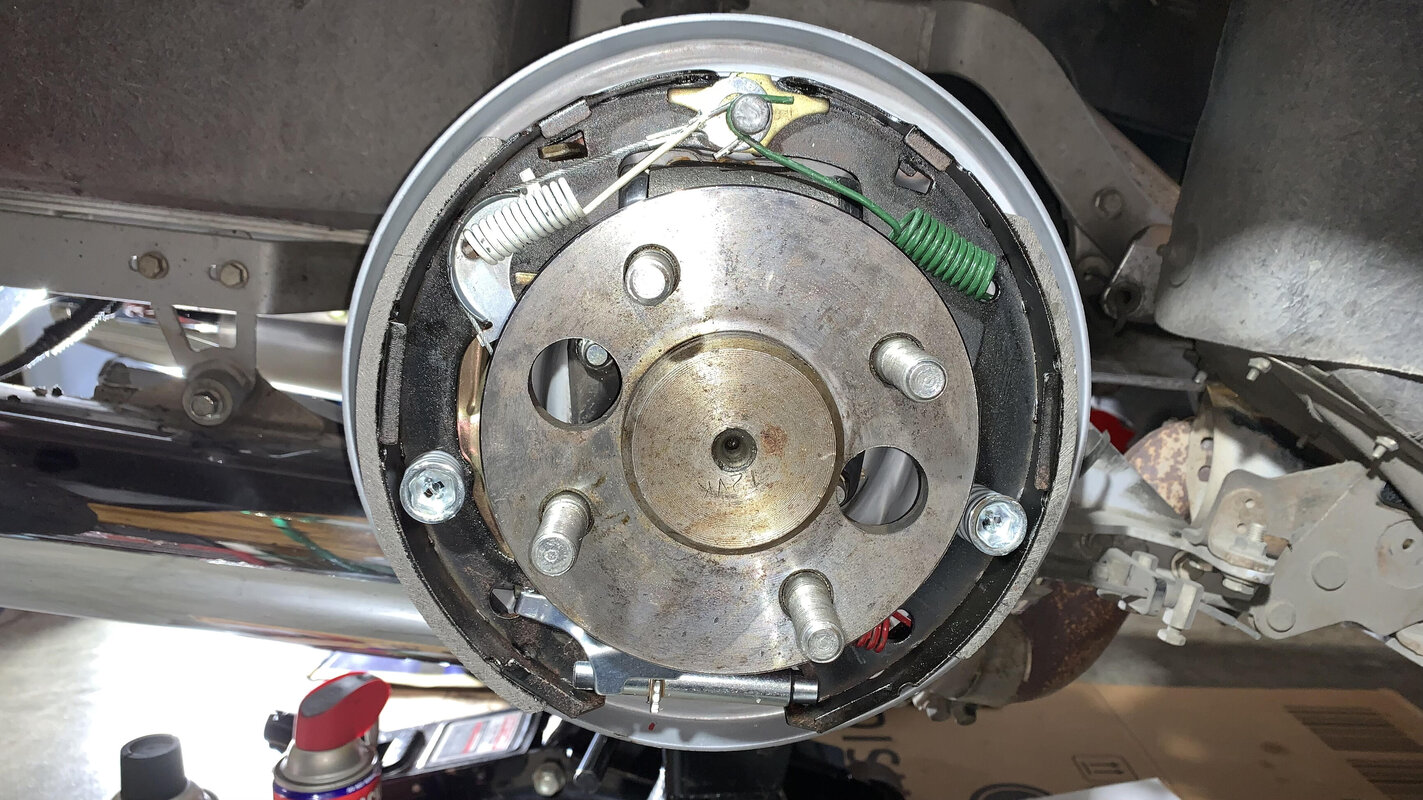
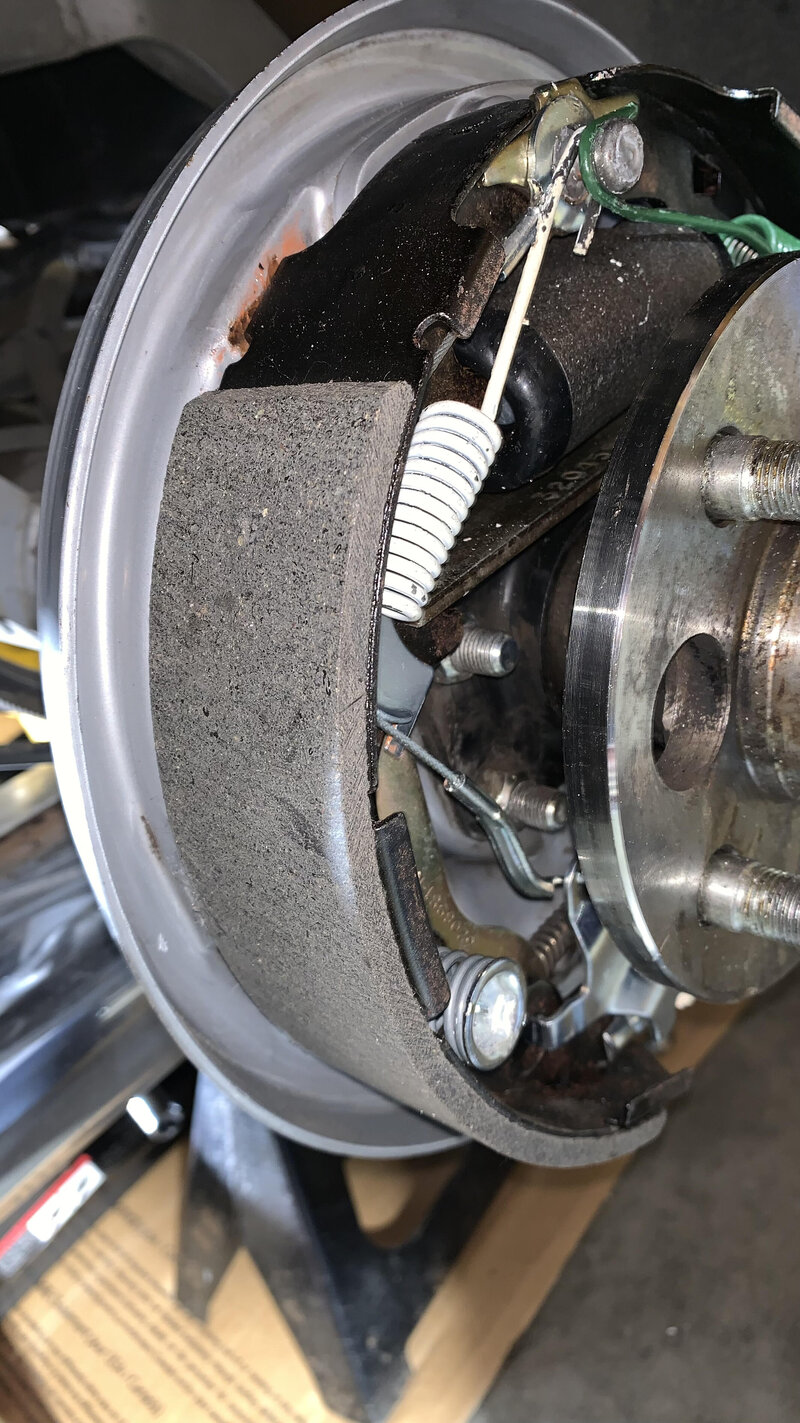
I lubed all of the high spots. They all showed some scuff marks but, nothing really gouged. I might as well sand them a little if I take them apart. I also greased the star adjuster threads / barrel. I used Permatex Silicone Extreme brake lubricant.

BP Greased.jpgBP 3.jpgBP 2.jpg

lubricate_drum_brake%20edit.png

Thanks for the help Jack! Everything you mentioned was a great call on what properly needs to be done. The only thing I didn't do was adjust the parking brake. It has always worked great therefore, I haven't messed with it. I did fail to see if the spring was compressed or relaxed upon re-assembly. If it's compressed, then that may very well be the problem causing pressure against each shoe. That's a guess but, will be the first thing I'll check. Out of all the pic's I took, I don't have a direct pic at that angle..... damn. If those are good, I'll move on to bleeding again but, I did that with speed bleeders carefully. Thanks again, appreciate the help. Ray ThumbUp
 
Check the parking brake adjustment next, this could( if not right) hold the shoes off the anchor and cause a false adjustment on the shoes, this could lock the rear brakes

Also did you sand the inside of the brake drum? Or machine them, if not use some 80 grit and sand a cross hatch in the drum, wash it out with soapy water and dry them

Your work looks good to me, I bet the parking brake is the problem

Look at the shoes do you see any wear pattern yet? High and low spots may already appear
 
Check the parking brake adjustment next, this could( if not right) hold the shoes off the anchor and cause a false adjustment on the shoes, this could lock the rear brakes

First thing I'll be checking out.... I know there should be a little play in the crossbar with the spring being un-compressed. If there isn't, then adjustment should do the trick. As for the assembly being on center, they were when I installed the drums.

When I did the re-adjustment, both wheels spun freely without drag.
With that being said, I believe they're releasing as they should. I have never adjusted the parking brake therefore, It'll be a learn as I go. Hopefully, I don't have any frozen nut's on the adjuster rods.....

The only info. I can find regarding this is from our good friend here "RIP" Jim (Post 4) https://www.triketalk.com/forum/threads/49099-Lehman-GL-1800-(2008)-Hand-Brake

I don't know if mine is the same or not. Other than what Jim mentioned, I believe I need to relax the cable some first and then adjust as he stated. Followup by adjusting the cable just to the point of no slack. He didn't mention having some drag, just to back off 7-8 clicks on the star wheel until the drum rotates freely.

I usually check the drag with the tires mounted by spinning them. Once they spin a full revolution or so, I leave them. If new shoes, I re-check/adjust after several stop/start test runs.


Also did you sand the inside of the brake drum? Or machine them, if not use some 80 grit and sand a cross hatch in the drum, wash it out with soapy water and dry them

Yes I did but, with 120 grit and did so in the circular direction of the drum, not back and forth. I thoroughly wiped it clean with some brake cleaner on a rag.

Look at the shoes do you see any wear pattern yet? High and low spots may already appear

I will definitely check that out... I didn't think of that.

I'm going to get into it within a couple days. Thanks again for all the things to chase down.... If anything else comes to mind, please let me know. Thanks again... appreciate your time in helping me out. Ray ThumbUp
 
You have a solid plan, best of luck, and I am watching your thread

I was a brake tech trainer for many years

Just when you thought you have seen it all bam something new pops up

That said, I have seen bonded shoes too many times cause a similar problem, not saying this is your problem, tho I have had better results with OEM riveted shoes

I would just for grins remove the parking brake equalizer from the shoes and try the brakes, that way you are eliminating the parking brake as the problem

- - - Updated - - -

Only other thing that comes to mind is it is possible your master cylinder is losing free travel and locking the rear brakes

This is easy to check for, when locking up, crack a bleeder on the wheel cylinder, after fluid comes out retry the brake, is it locking again?

A firm / hard pedal, ( touchy ) is a common attribute of a bad master

Just another thought on something to look at
 
Brake self adjusters only work to adjust if the brake is used with some serious intent (stabbing) while backing up. I use my driveway slope to let it roll back before stepping seriously on the brake, and even then, they'll only adjust up a notch or so each time. Drum brake adjusters do not work to adjust going forwards.

Also, if you adjust up too tight before putting a drum on, they do not "self" back off. You either manually readjust the adjuster through the long hole in back, or let the brake wear.

Axle lube will also cause grabbing if it leaks into the drum area..
 
You have a solid plan, best of luck, and I am watching your thread

I was a brake tech trainer for many years

Just when you thought you have seen it all bam something new pops up

That said, I have seen bonded shoes too many times cause a similar problem, not saying this is your problem, tho I have had better results with OEM riveted shoes

I'll give riveted shoes a try next time...

I would just for grins remove the parking brake equalizer from the shoes and try the brakes, that way you are eliminating the parking brake as the problem

I'm a little oblivious in what the parking brake equalizer is.... :hang2: please give this clueless tool a hint....

- - - Updated - - -

Only other thing that comes to mind is it is possible your master cylinder is losing free travel and locking the rear brakesThis is easy to check for, when locking up, crack a bleeder on the wheel cylinder, after fluid comes out retry the brake, is it locking again?

It only locks up upon stopping. Once I let off the brake pedal, the brakes are free.

A firm / hard pedal, ( touchy ) is a common attribute of a bad masterJust another thought on something to look at

This is good to know about a bad master... The foot pedal has never felt firm/hard but, it is firmer than it was after bleeding everything.
 
Brake self adjusters only work to adjust if the brake is used with some serious intent (stabbing) while backing up. I use my driveway slope to let it roll back before stepping seriously on the brake, and even then, they'll only adjust up a notch or so each time. Drum brake adjusters do not work to adjust going forwards.

Also, if you adjust up too tight before putting a drum on, they do not "self" back off. You either manually readjust the adjuster through the long hole in back, or let the brake wear.

Axle lube will also cause grabbing if it leaks into the drum area..

Thanks.... appreciate your input. Ray :)
 
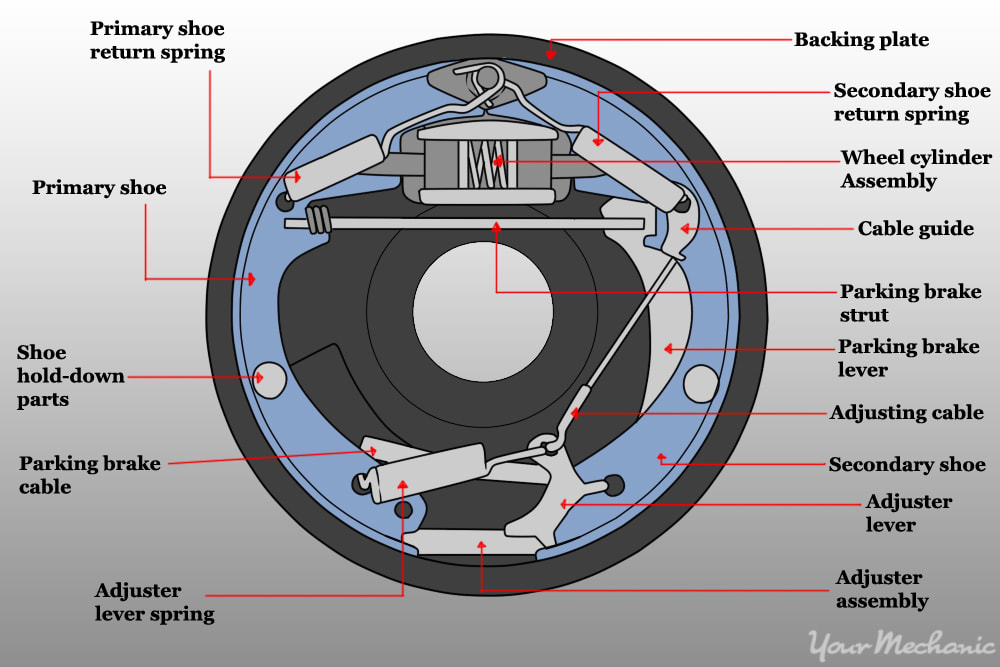
The parking brake equalizer ( parking brake strut) is between the shoes with the spring in this pic

2_How_To_Adjust_A_Parking_Brake_Shoe_Detailed_parts_description_of_a_drum_brake_system

Ahhhh... the strut. I thought maybe that's what you we're referring to. I have thought about removing the parking brake parts and tying off the cable o.s. of the backing plate. I excused that thought thinking that I may be asking for trouble if I took a test ride.

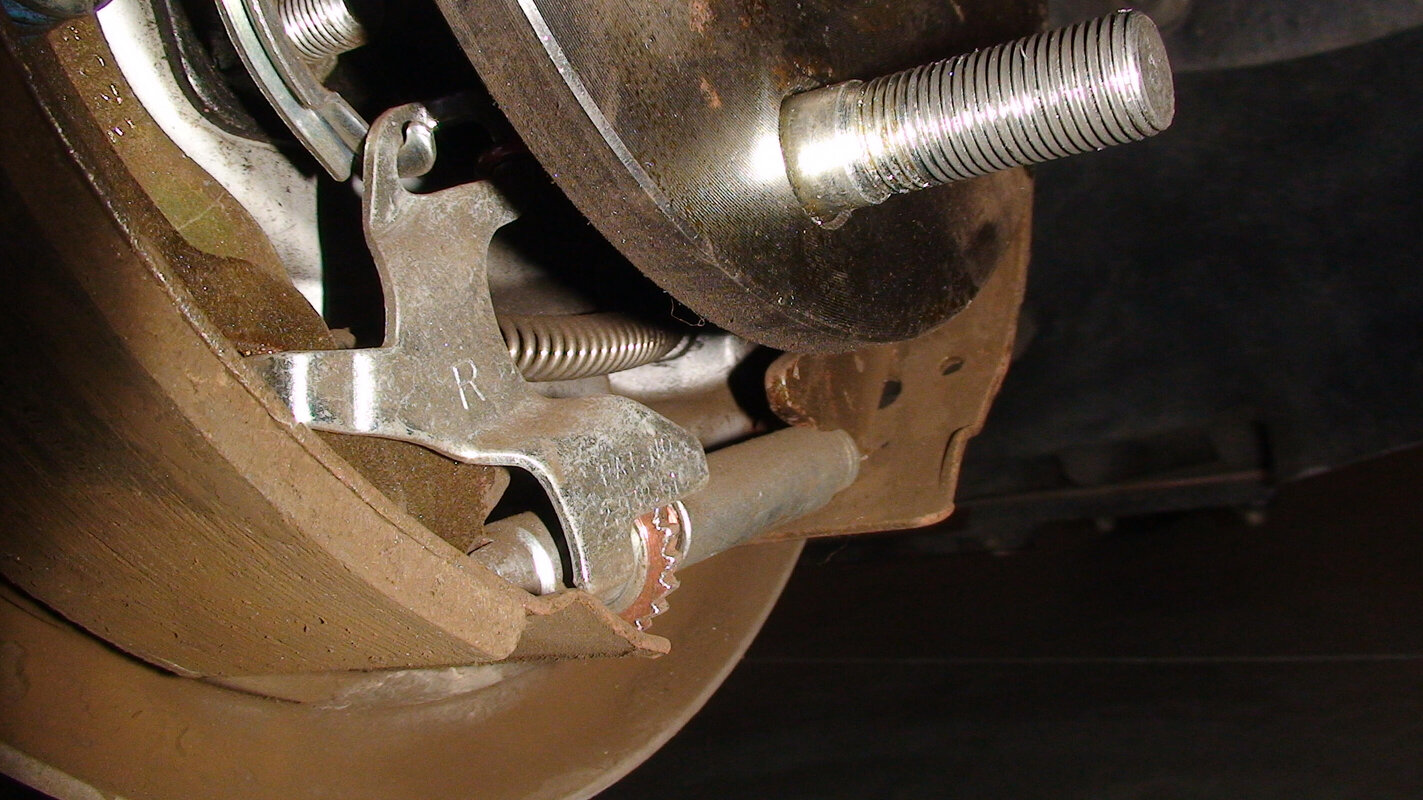
Since they're not staying locked in place after releasing the pedal, how would you check/confirm if this is the problem without actually riding? In addition, I see in the picture that the parking brake cable that's connected to the adjuster is placed in through the front which makes sense.

My original (from Lehman) right side was placed in from the back side probably by mistake. Thanks again along with the great pic.! I feel a little smarter now.....LOL Thanks to you! Ray ThumbUp

R-13.jpg
 
Thru process of elimination you will get it

I would leave the parking brake strut out ( on both sides) and go for a longer ride

By riding a bit longer if the master cylinder is the problem it will heat up the fluid faster and loss of free travel will show up, by removing the parking brake strut you are taking the parking brake out of the equation ( mechanical problem, not hydraulic)

I'll go ahead and do that.... My concern was leaving the parking brake lever in place "without" the strut while taking a test run. I was afraid that other brake shoe parts would be falling apart while riding locking me up....(Whew) Thanks!!
 
I'll go ahead and do that.... My concern was leaving the parking brake lever in place "without" the strut while taking a test run. I was afraid that other brake shoe parts would be falling apart while riding locking me up....(Whew) Thanks!!

Nothing bad will happen leaving the strut out, it is a separate mechanical link and has nothing to do with parts falling out

We would disable rusted ( non working) parking brakes this way for years, the only drawback was in states that had mandatory inspections would fail because of going outside manufacturers intended designs
 
Nothing bad will happen leaving the strut out, it is a separate mechanical link and has nothing to do with parts falling outWe would disable rusted ( non working) parking brakes this way for years, the only drawback was in states that had mandatory inspections would fail because of going outside manufacturers intended designs

Thanks Jack..... This information is great to know!! Question; So, if I want to eliminate the parking brake entirely, could do so by simply removing the strut, lever, cable guide and cable? My initial thought was that if I did so, with the parking brake lever being removed that it would cause a little slop in the rear shoe leading to issues.

I don't have any intention of eliminating the parking brake due to using it at times while traveling in the mountains but, this is great knowledge for me to know!! You definitely taught me something here which may come in handy down the road. For once....This isn't useless knowledge....LOL. Sincerely, Thank You for helping me out here. This is Awesome!!(Handshake) ThumbUp

 
Thanks Jack..... This information is great to know!! Question; So, if I want to eliminate the parking brake entirely, could do so by simply removing the strut, lever, cable guide and cable? My initial thought was that if I did so, with the parking brake lever being removed that it would cause a little slop in the rear shoe leading to issues. I don't have any intention of eliminating the parking brake due to using it at times while traveling in the mountains but, this is great knowledge for me to know!! You definitely taught me something here which may come in handy down the road. For once....This isn't useless knowledge....LOL. Sincerely, Thank You for helping me out here. This is Awesome!!(Handshake) ThumbUp


Just removing the strut should do the trick, as long as the arm it attatches to is fully moved back in this picture, you can check that by pulling on the cable at the backing plate, the lever should move and return freely, before you remove any item here you can verify the parking brake is working by pulling on the cable, it should lock the brake and release easily

2_How_To_Adjust_A_Parking_Brake_Shoe_Detailed_parts_description_of_a_drum_brake_system

Awesome!! Just remove the strut to eliminate the parking brake and of course, keep the parking brake handle in the locked down position. That would save a lot of disassembly. Thanks again!! Ray ThumbUp
 
Well.... Thought I had it.... at first. I checked the parking brake after I raised the rear end up placing it on jacks which worked on both sides. I proceeded and removed the wheels and brake drums. I then looked at the struts on both sides and the springs were relaxed as they should be.

Both sides have approx. 1/4" gap between the fork base and primary shoe. I was able to wiggle the struts freely in a twisting manner but, not back and forth towards the primary shoe freely. I was able to with my brake spoon but, under pressure of the strut spring. I then had my wife pull up and down on the PB arm while I observed the PB lever behind the rear shoe on both sides which worked properly.

At this point, I'm thinking all is good. Inspected everything further and all looked good except for brake dust all over, especially the left side where it initially grabbed the most. I cleaned up both sides along with cleaning the drums with soap & water real good. To check further, I went ahead and removed both struts, installed the wheels, adjusted the shoes for drag giving them one full revolution for each side.

I proceeded to take a test ride. Brakes felt and operated good.... for the first mile or so of about six times of nearly stopping and going. Then it happened..... The left side started to grab and progressively got worse each time. Got back home, placed the bike back on the floor jacks. I spun each side with the wheels on, both free spun approx. 3/4 rotation with a touch of drag.

The last 1/4 of the rotation on both turn very hard. I would say both left & right wheels spinn and feel about the same. At least at this point, its not the PB. Only other thing I did different other than new brakes and wheels cylinders was bleed all the lines with speed bleeders, twice. Lehman also tied the front brake handlebar lever in with the rear left brake as Honda's oem.

During the test, I tried just the front lever which grabbed the rear left but, not anywhere even close as the foot brake. I'm at the point of wanting to try another set of shoes and the possibility of having the drums turned. Although, its hard to believe it's either one, especially the drums. The oddest thing is both wheels spin the same. Damn.... :confused:
 

Welcome to the Trike Talk Community

Join our vibrant online community dedicated to all things Trikes! Whether you're a seasoned rider or just starting out, this is the place to share experiences, tips, and stories about your three-wheeled adventures. Explore modifications, maintenance advice, and rides, all while connecting with fellow trike enthusiasts from around the globe

Forum statistics

Threads
55,515
Messages
901,404
Members
22,562
Latest member
gdow5150

Trike Talk Community

Welcome to a community dedicated to the most diverse and fastest growing powersports segment, Motorcycle Trikes. Come join the discussion about the best makes and models, popular modifications and proven performance hacks, trike touring and travel, maintenance, meetups and more!

Register Already a member? Login

Forum statistics

Threads
55,515
Messages
901,404
Members
22,562
Latest member
gdow5150
 photo 260e2760-d89e-45b2-8675-2bc26fb3d465.jpg

 photo Trike-Talk-150-x-200.gif

 photo DK Trike Talk Right side banner 19.jpg

Merziere Reverser

 photo 9796095c-0d4b-4a9b-88ed-efe4c498d084.png
 photo f9866e4e-75c5-471a-86f5-5e72a446ecc3.png
Back
Top